Advance Shipping Notice (ASN)
This document is primarily intended for supplier companies, providing instructions on how to create ASNs in Jakamo.
Jakamo customer companies utilize the ASN feature by configuring it and integrating it with their internal systems, such as ERP, WMS, TMS, or other similar platforms. Customers can find the ASN API description at technical documentation.
1. Short introduction to Jakamo ASN
An ASN is an electronic document that provides detailed information about an upcoming shipment. It is sent by the supplier or carrier to the recipient, typically the customer’s warehouse, to notify them in advance of the delivery.
In Jakamo, the ASN includes essential details such as shipment contents based on the purchase order, item quantities, packaging information, the expected delivery date, and any special instructions or requirements. Receiving an ASN allows the customer to prepare for the shipment’s arrival, improving coordination and overall efficiency.
Quick access to key topics
- How to access Jakamo ASN? (for suppliers & customers in Jakamo)
- How to create ASN in Jakamo? (for suppliers in Jakamo)
- How to customize ASN? (for customers in Jakamo)
Benefits of using Jakamo ASN
For both suppliers and customers, Jakamo ASN offers:
- Improved visibility to upcoming shipments
- Streamlined logistics processes with real-time data
- Fewer errors with standardized process
- Increased operational efficiency
- Stronger collaboration
🎥 Watch a short tutorial video where Samuli from Jakamo briefly explains what an ASN is and how to easily create one in Jakamo.
2. Jakamo ASN - how to access it?
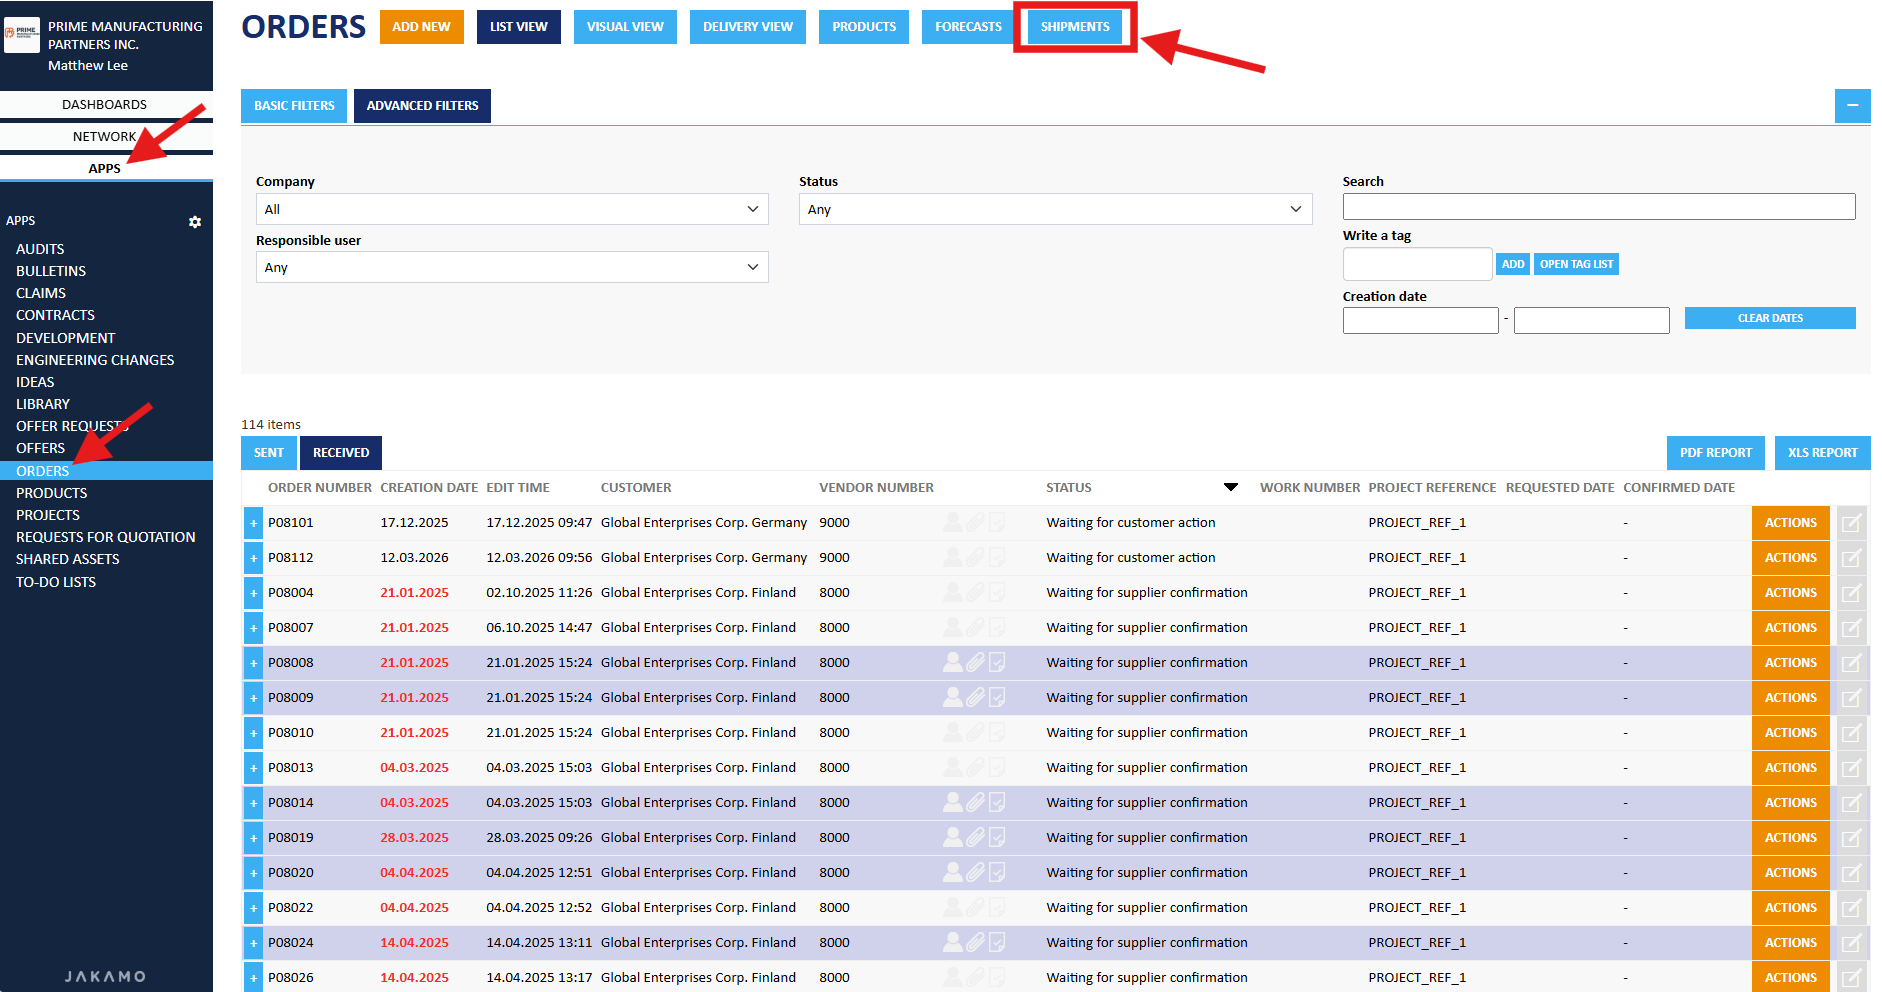
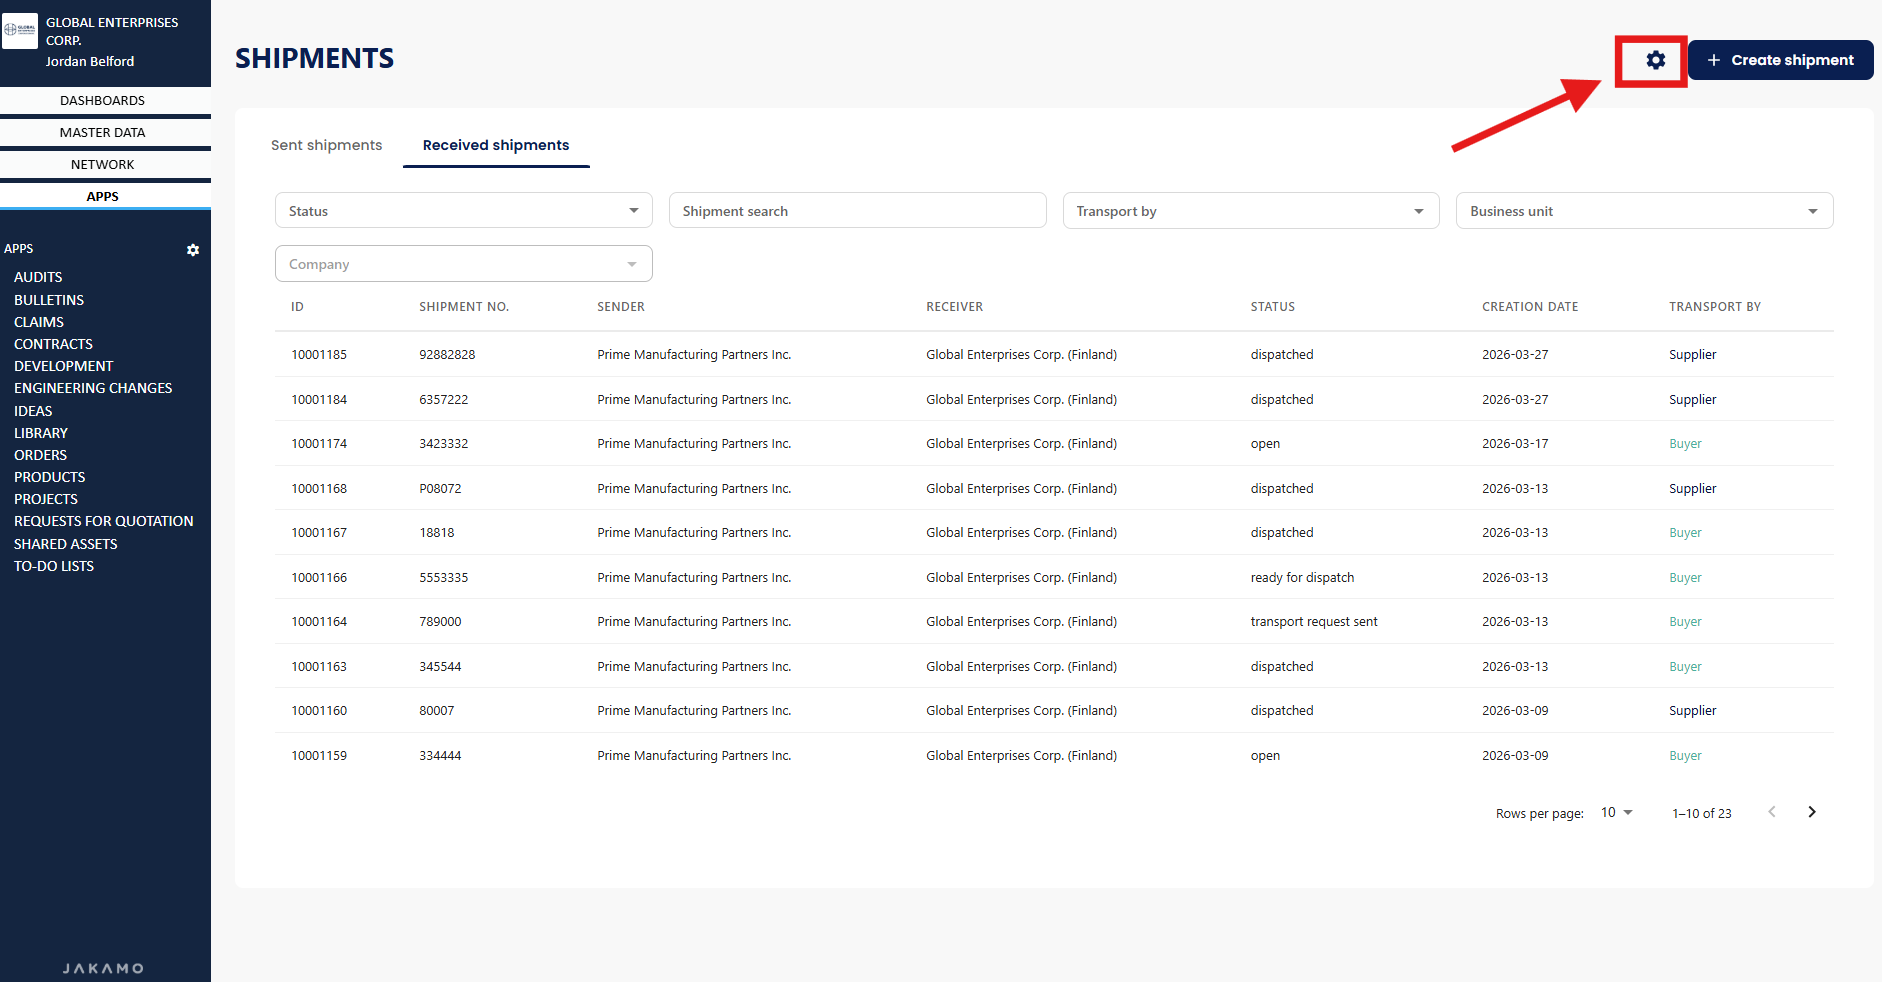
The ASN (Advance Shipping Notice) feature is available in the Orders application. To enable ASN functionality, the customer company must first activate it in their Jakamo account and configure the supplier in the ASN integration settings. Once this is done, the supplier will also gain access to ASN functionality through their Jakamo account. If ASN is available for you with your customer, a tab called SHIPMENTS will appear at the top of the Orders application list view page. You can access the ASN functionality either (a) from the Orders list view or (b) directly from an individual order (please note that this must be activated by your customer and Jakamo Team).
a) Access ASN from Orders app
- Select APPS -> Orders -> Shipments
- After selecting
SHIPMENTS, you can see the list view of all ASNs: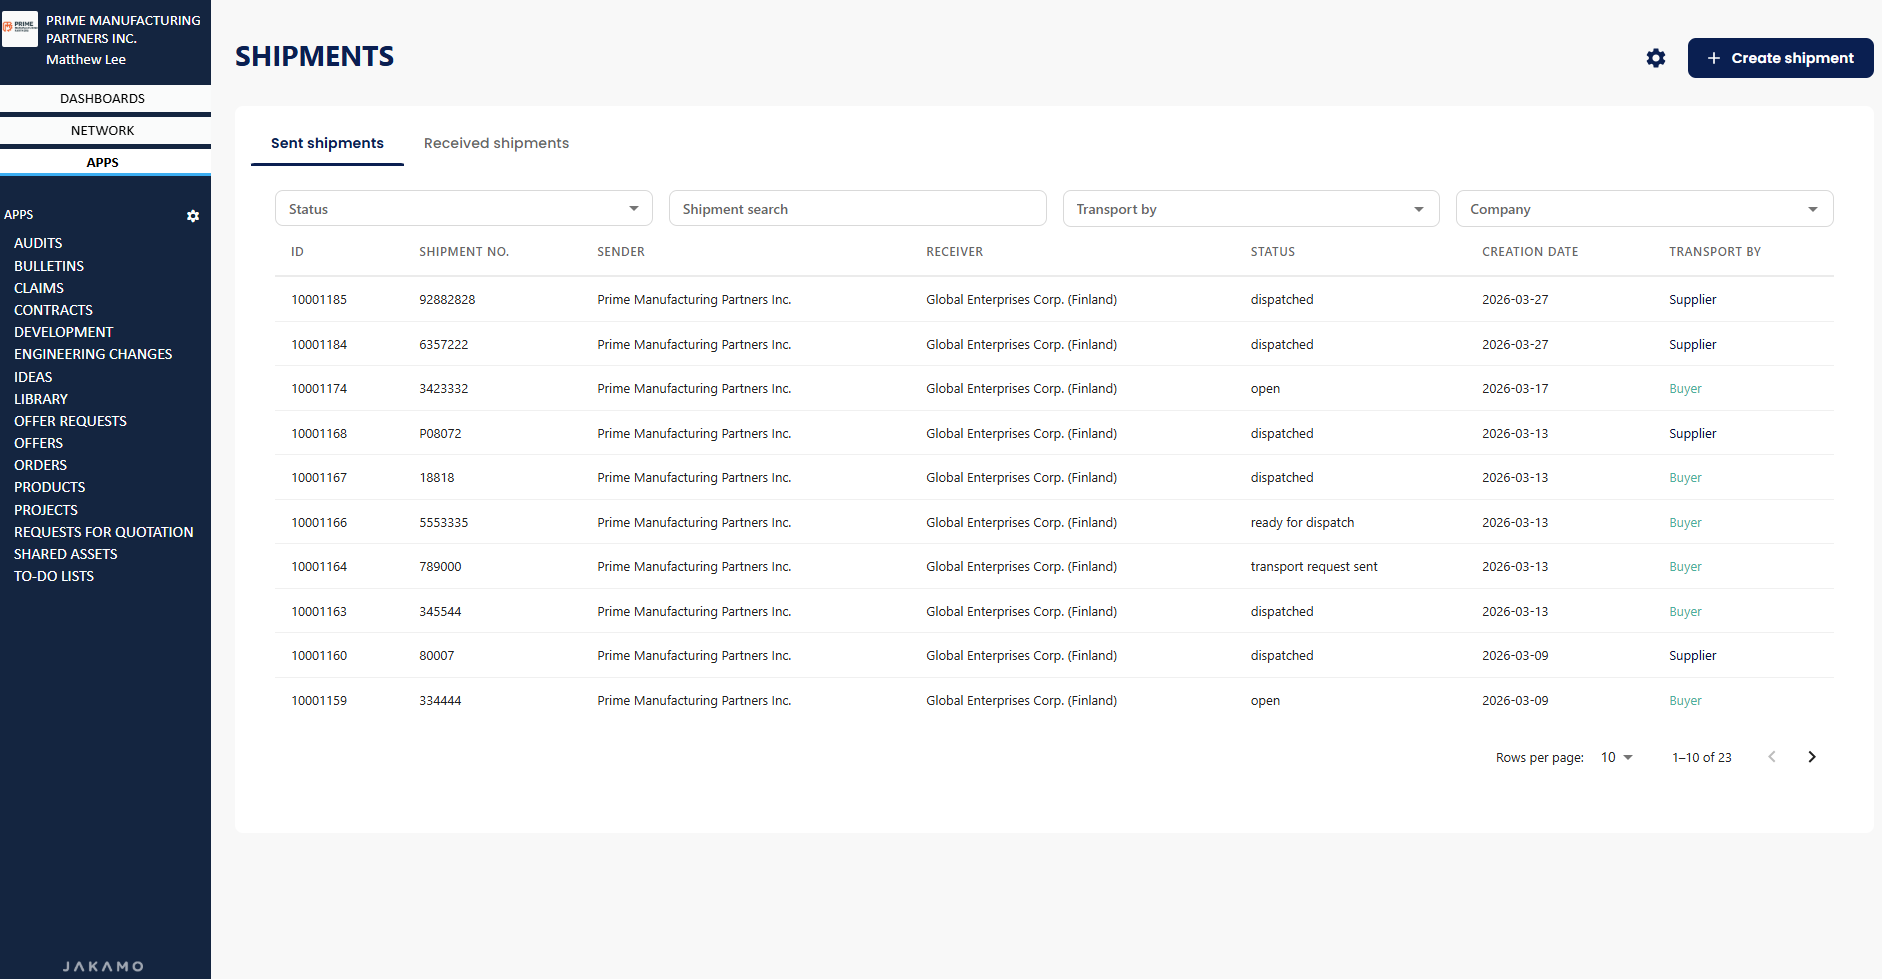 If you cannot find an already created ASN in the list, please check that you have selected the correct view from the top-left corner: Sent Shipments (for suppliers) or Received Shipments (for customers).
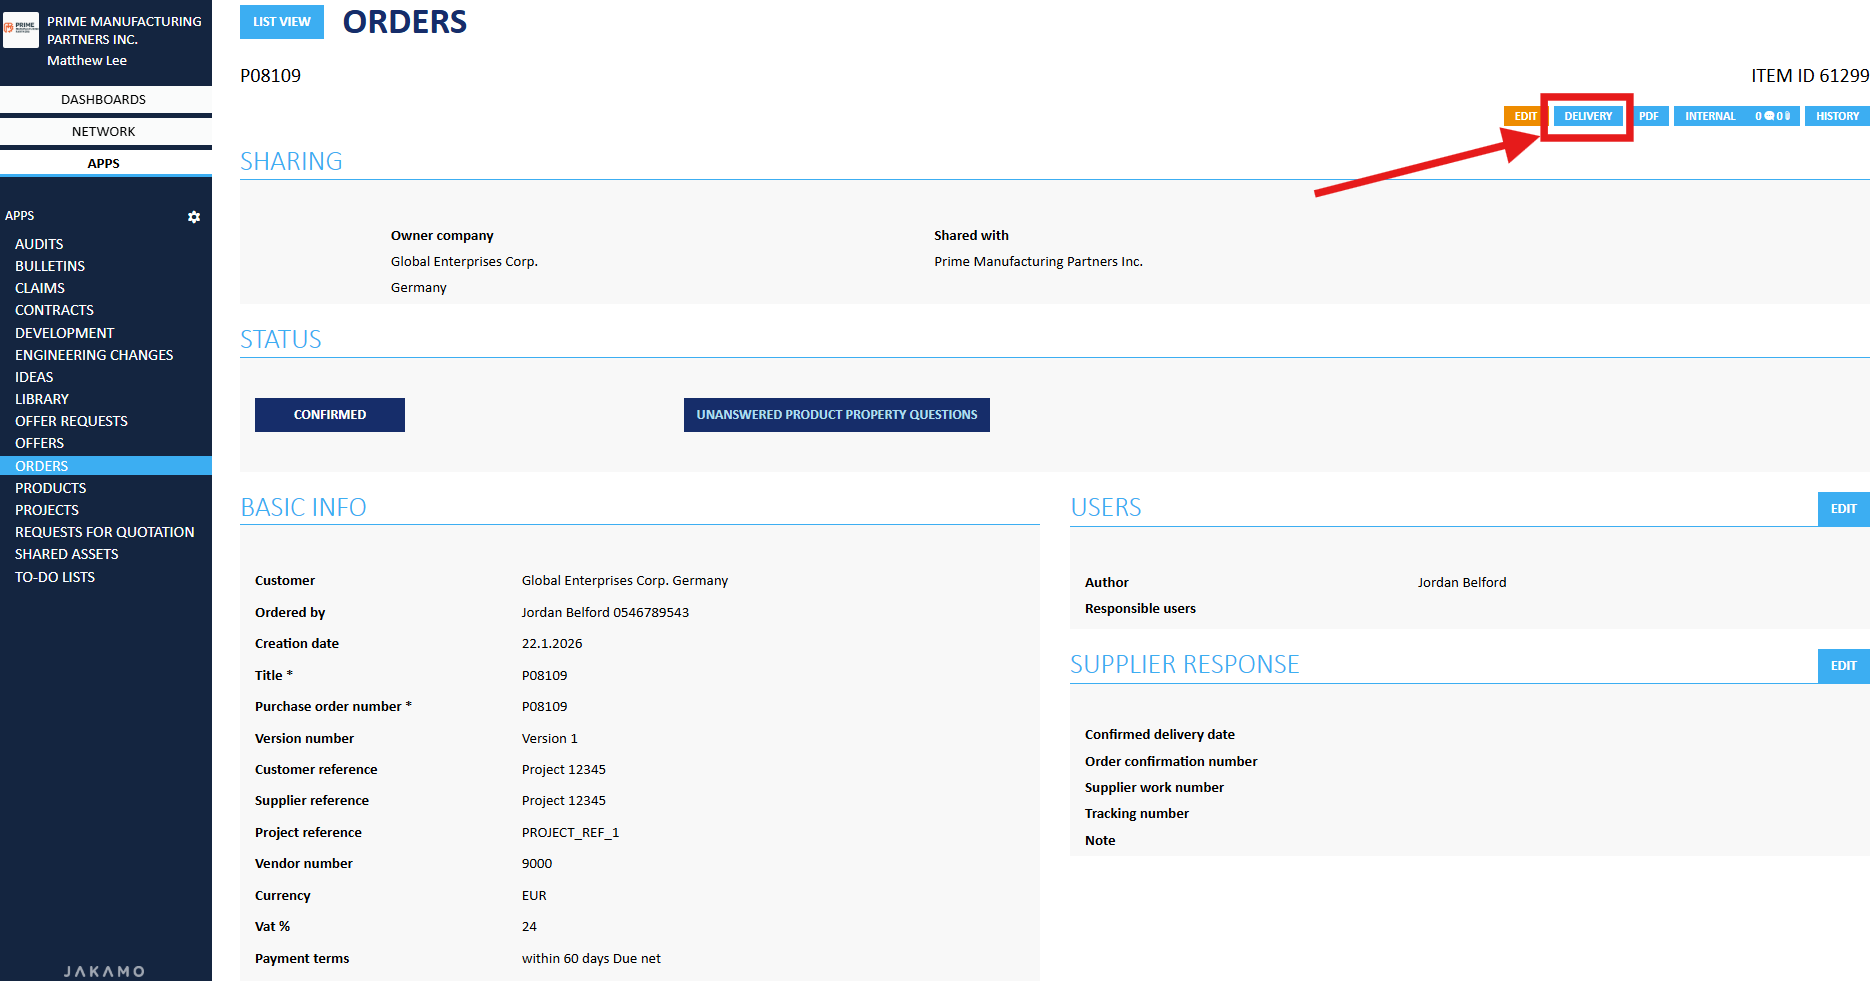
b) Access ASN from individual order
- Once the order is confirmed, the ASN can be accessed directly from the order by selecting the Delivery button Please note that this must be activated by your customer and Jakamo Team.
- After selecting Delivery, you can see the list view of all ASNs: If you cannot find an already created ASN in the list, please check that you have selected the correct view from the top-left corner: Sent Shipments (for suppliers) or Received Shipments (for customers).
3. Basic ASN process
This section describes the basic ASN creation process, in which the supplier informs the customer about item packaging and delivery timing. Transportation arrangements are not part of this process and are described separately here: Transport-oriented ASN process.
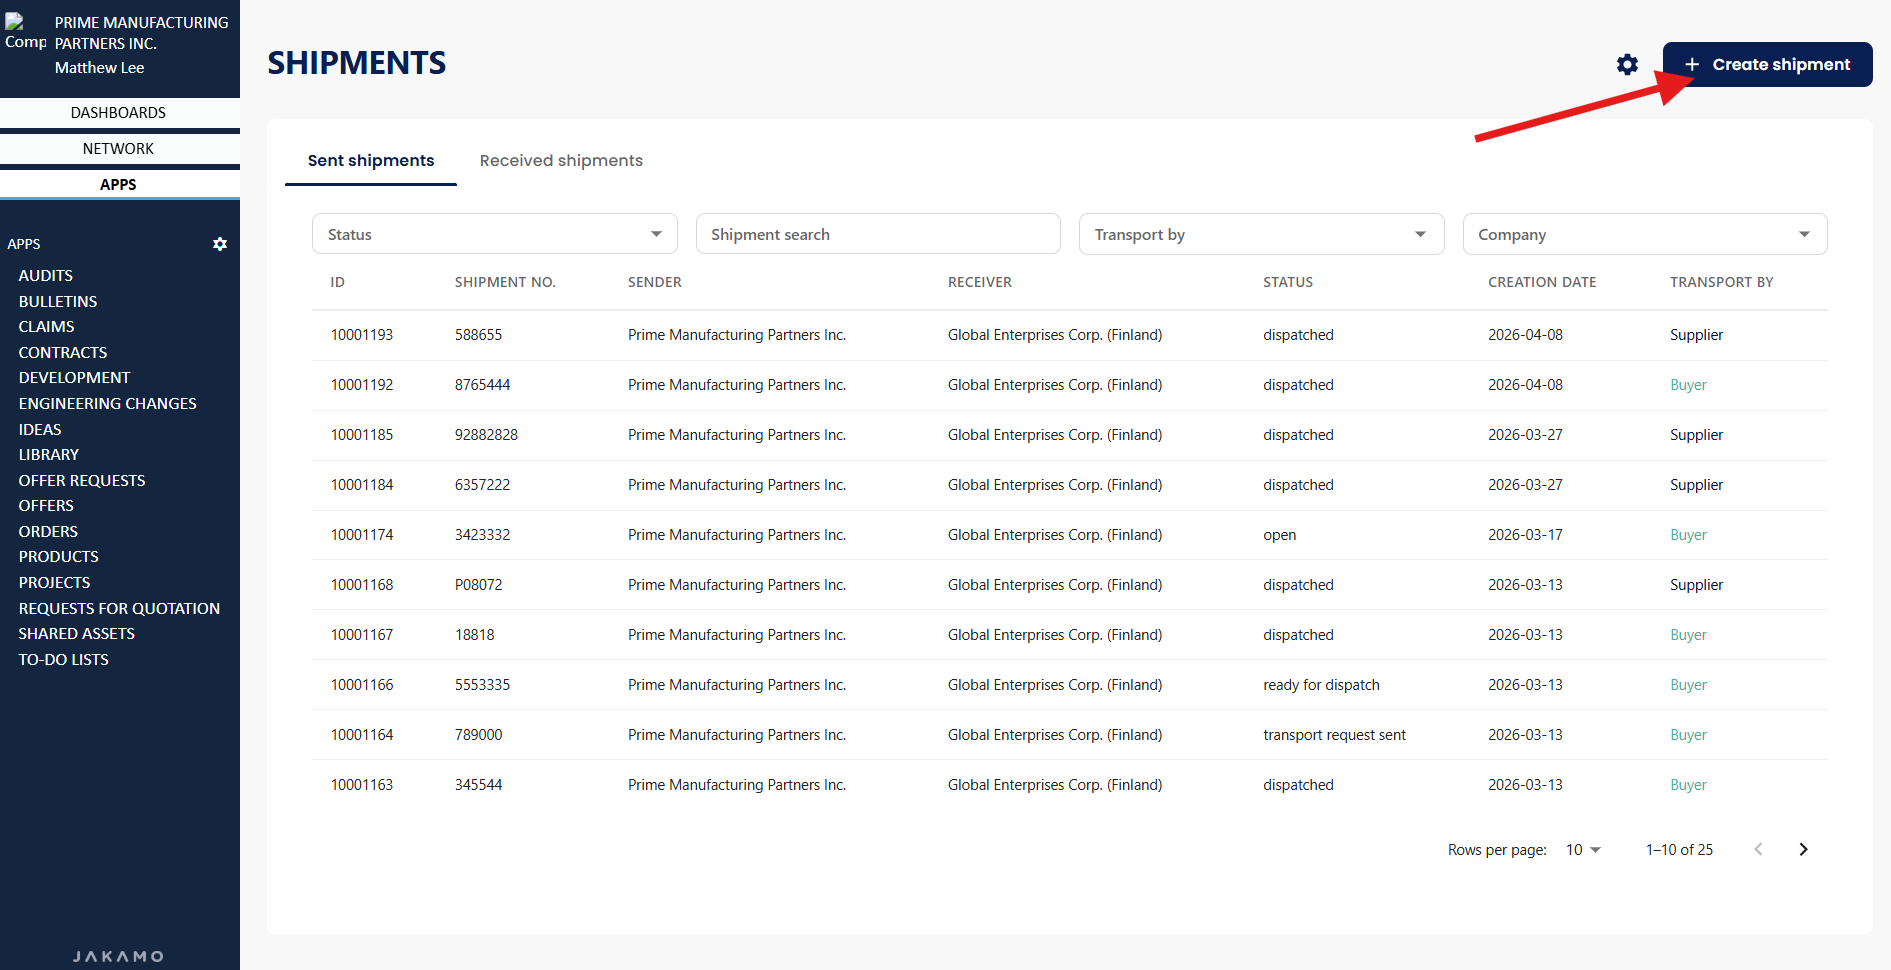
Start creating a new shipment by selecting CREATE SHIPMENT:

The ASN creation consists of six stages. Each of them will now be presented step by step. After completing each section, select Next > at the top or bottom of the page.
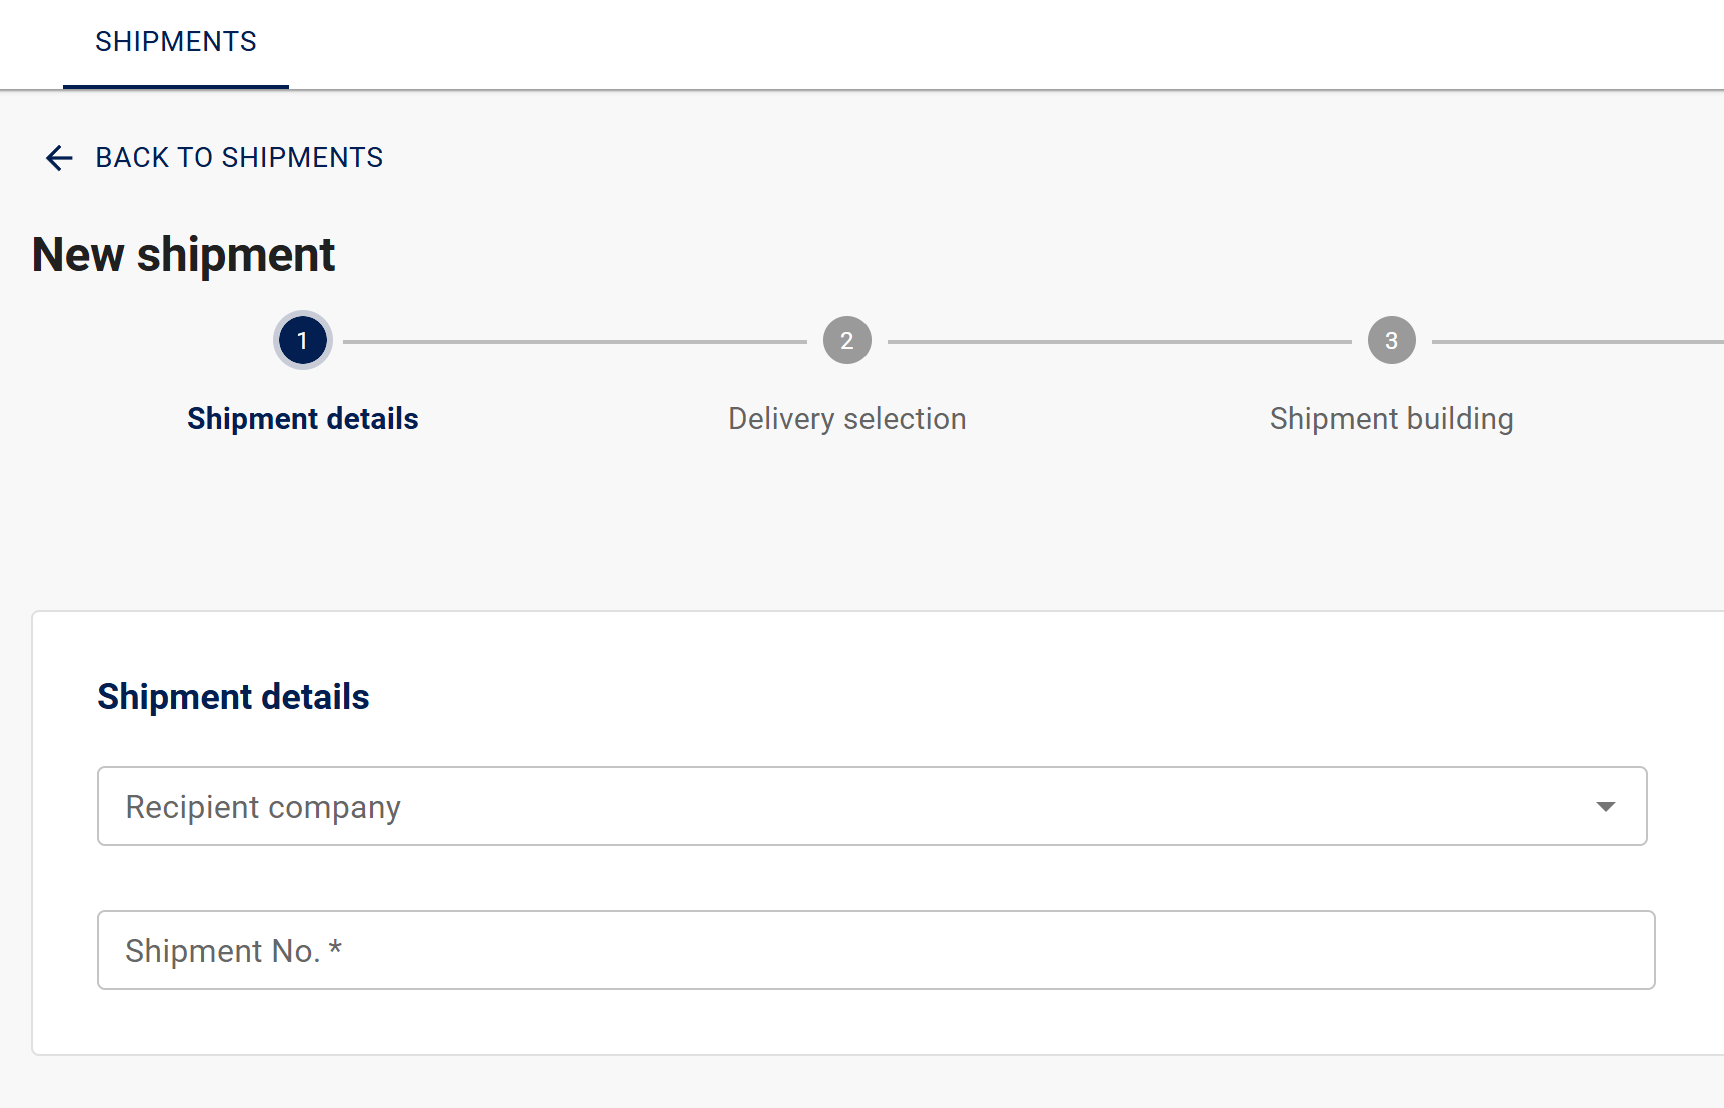
3.1 Shipment details
Start the shipment creation by filling the basic information of the shipment. All the fields explained shortly:
- Recipient company: Select the customer whose order you are delivering from the dropdown menu. A single shipment may only contain products from one customer's orders.
- Shipment No.: Fill in the shipment number here. It can be a waybill number, bill of lading number, tracking number, or any other number that identifies the shipment. If the customer has set automatic fullfilment of the shipment number, it will be disabled for manual entry.
3.2 Delivery selection
Select deliveries (delivery batches) you are about to deliver with this shipment. Find desired deliveries by searching with PO number, delivery batch number, item name or item number. User may also filter the search by order status (confirmed or not confirmed) or by the shipment status (all, sent, unsent, received).
Example: we are searching for POs, delivery batches, item names or item numbers with number 777 in it. Please note that you may have and therefore select items from multiple POs into a single shipment.
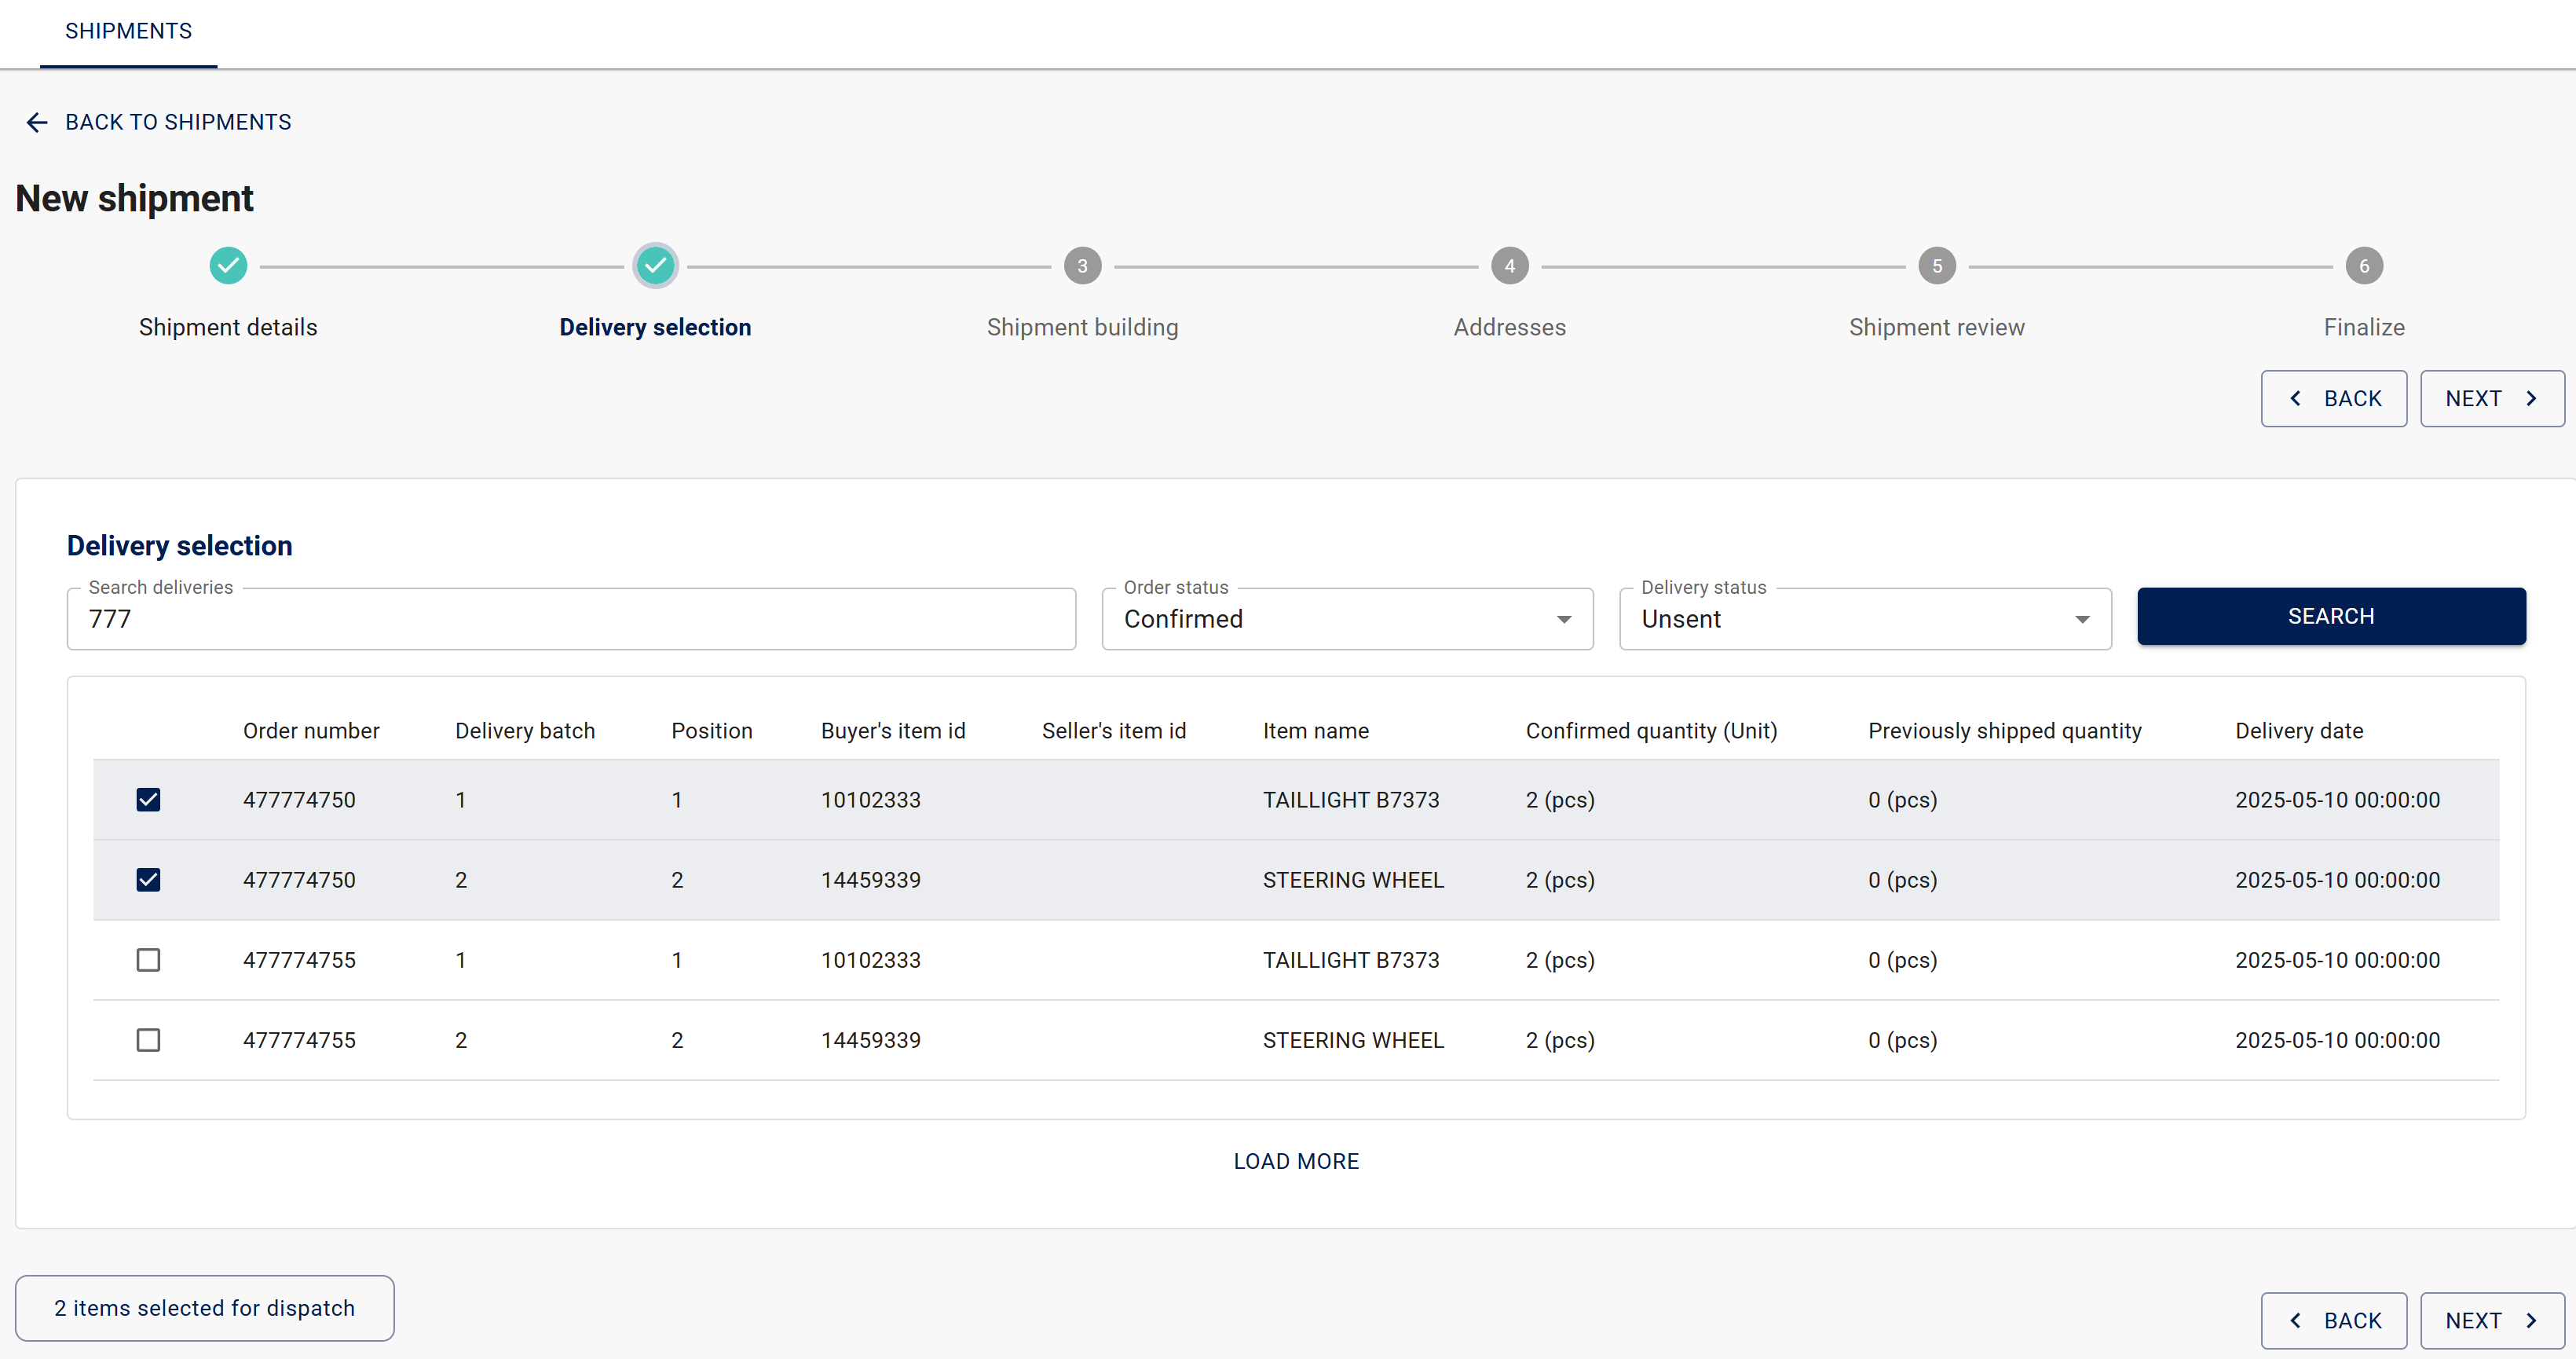
Select desired delivery batches by selecting the tickbox of the delivery. You may search multiple different deliveries from different orders, and your selections will remain.
By default, Jakamo displays confirmed and unshipped orders and delivery batches in the list. To view unconfirmed orders and delivery batches, adjust the search filters by modifying the Order Status and Delivery Status search filters.
3.3 Shipment building
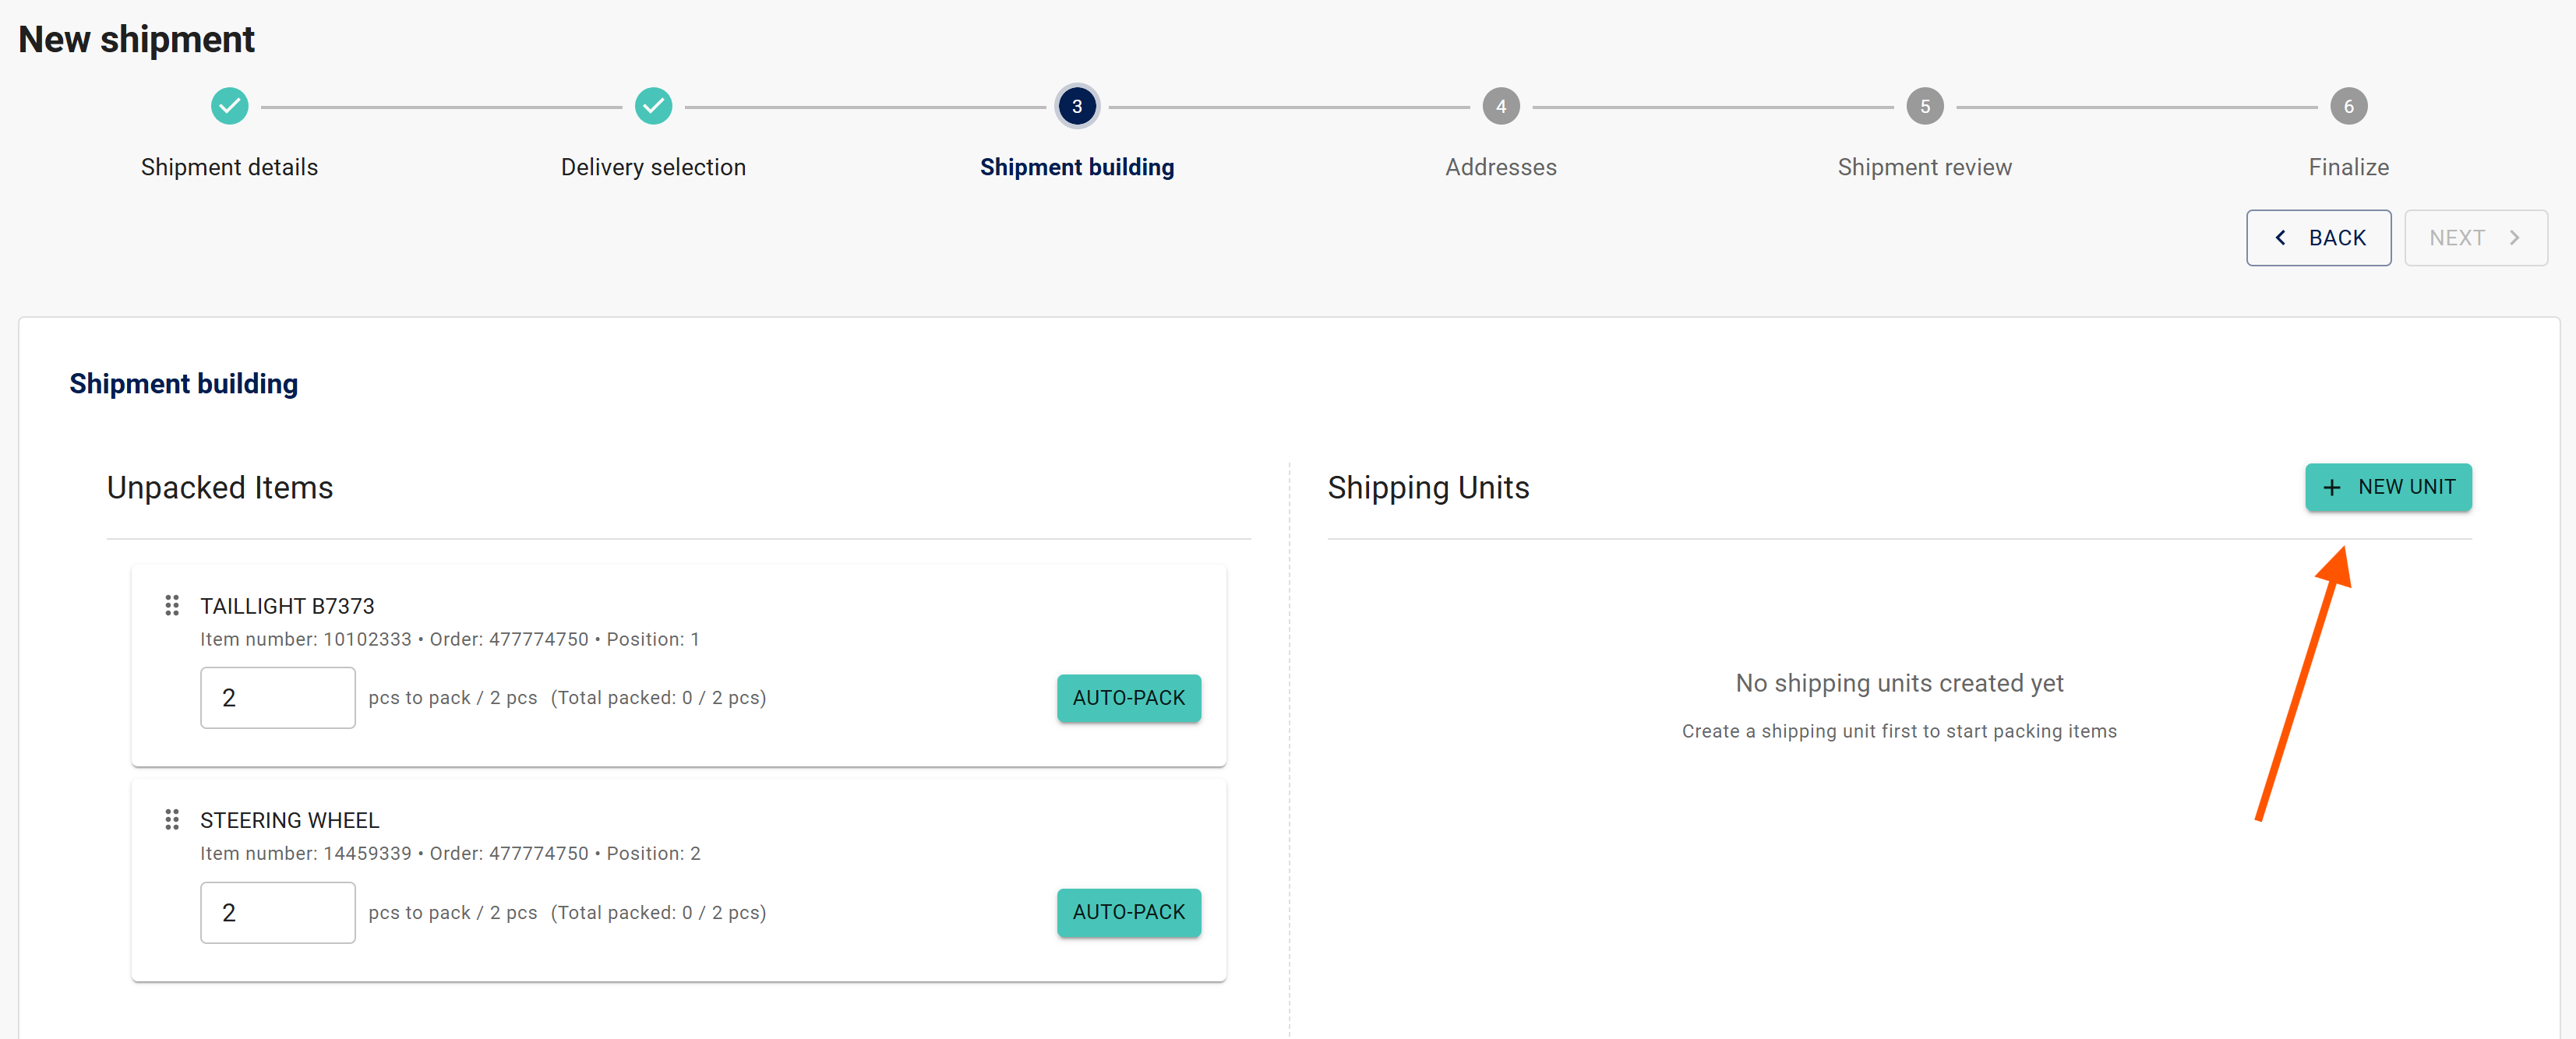
Build your shipment by selecting the types of shipping units it will include. Then, assign each item to the appropriate shipping unit. A shipment can contain one or multiple shipping units, which may be identical or different in type. Shipping units can also be nested within each other, forming a parent-child structure.
3.3.1 Create shipping units manually
Add one new shipping unit to your shipment by selecting + NEW UNIT:
Create new shipping unit:
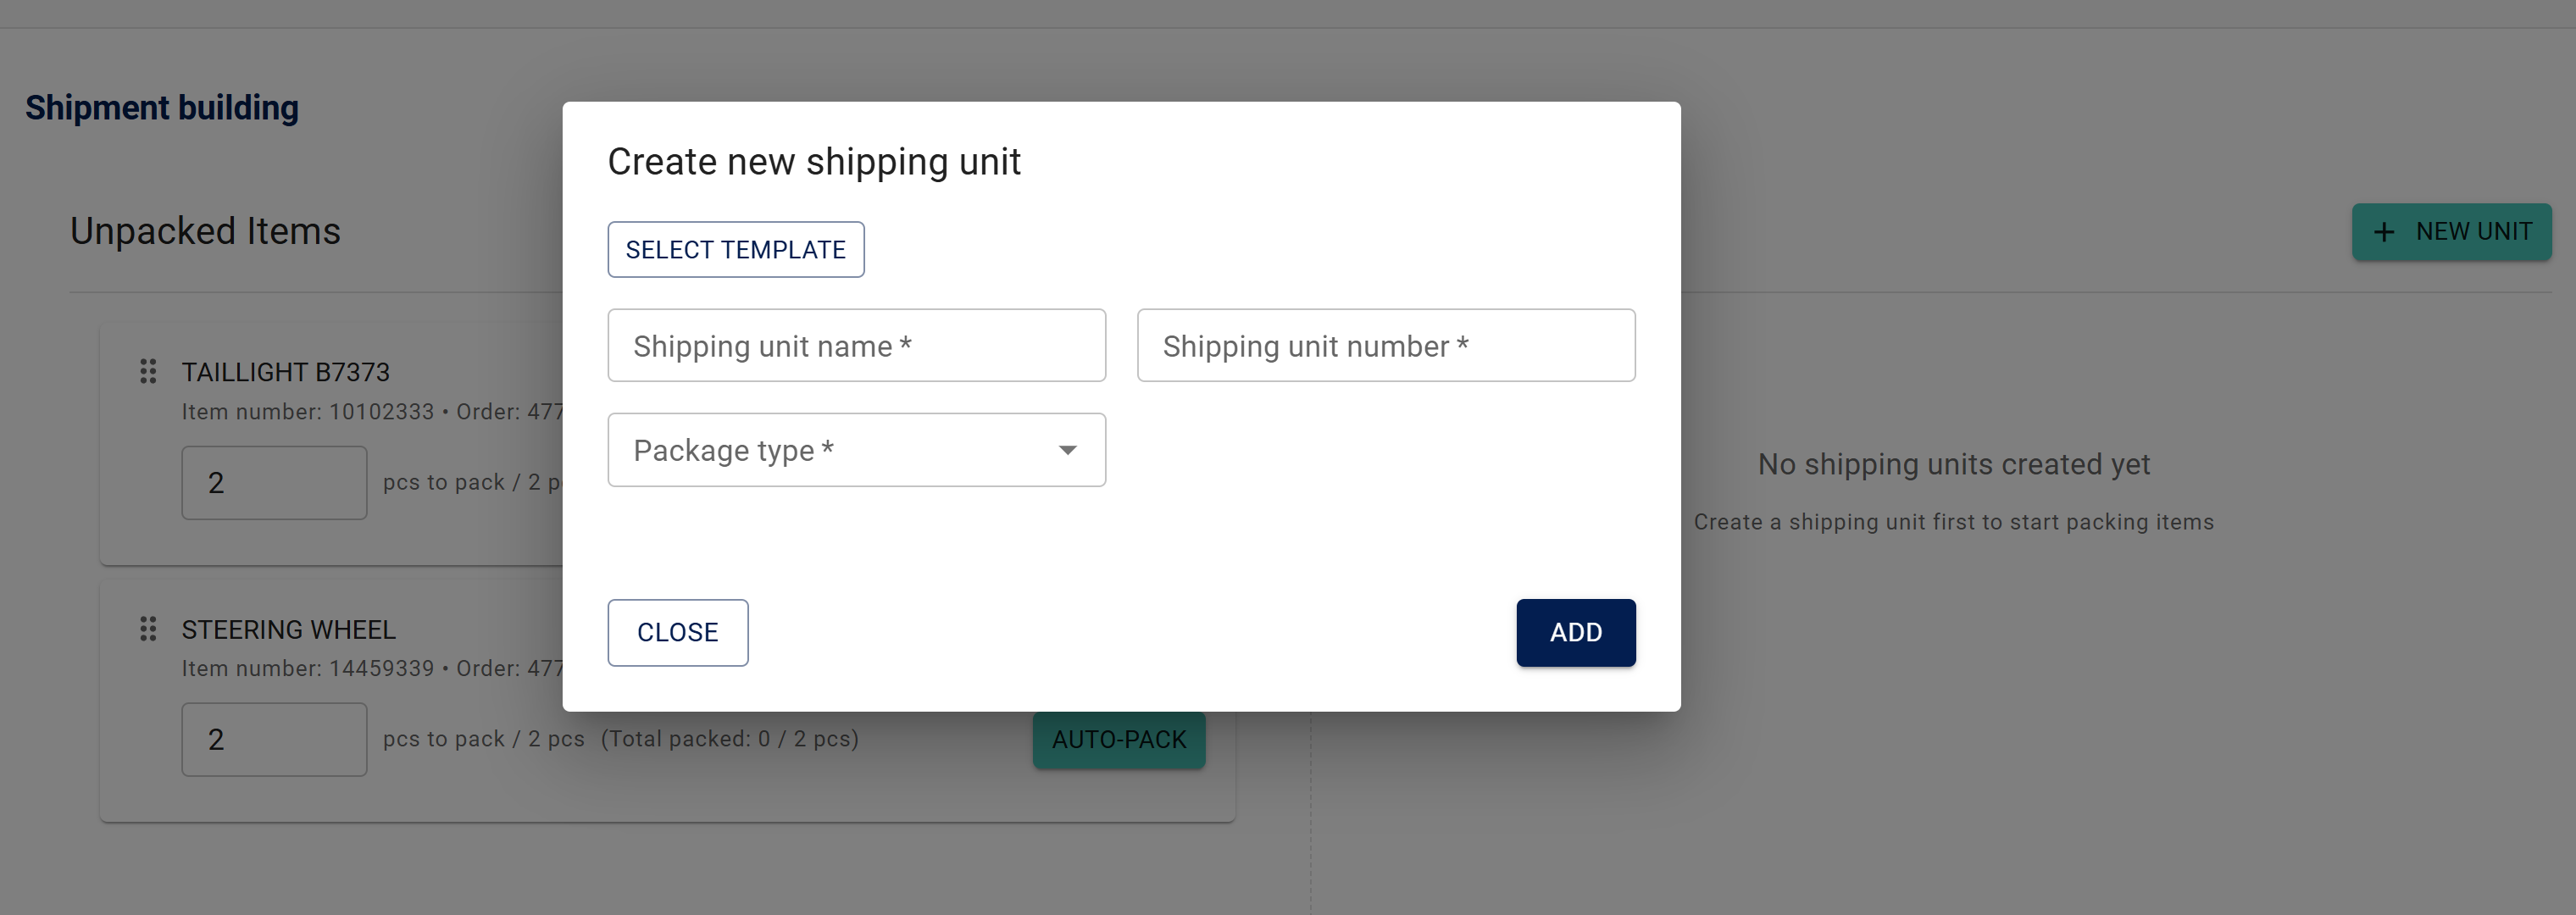
- Select template: Choose from pre-defined shipping units provided by your customer
- Shipping unit name: Assign a unique name to this shipping unit
- Shipping unit number: Assign a unique identifier to this shipping unit
- Package type: Select a package type from the pre-defined options
If the customer requires dimensions or other measures for the shipping unit, dedicated fields for various measurements will also be shown when creating the shipping unit (e.g. width, height, weight).
Select ADD to create a new shipping unit for the shipment.
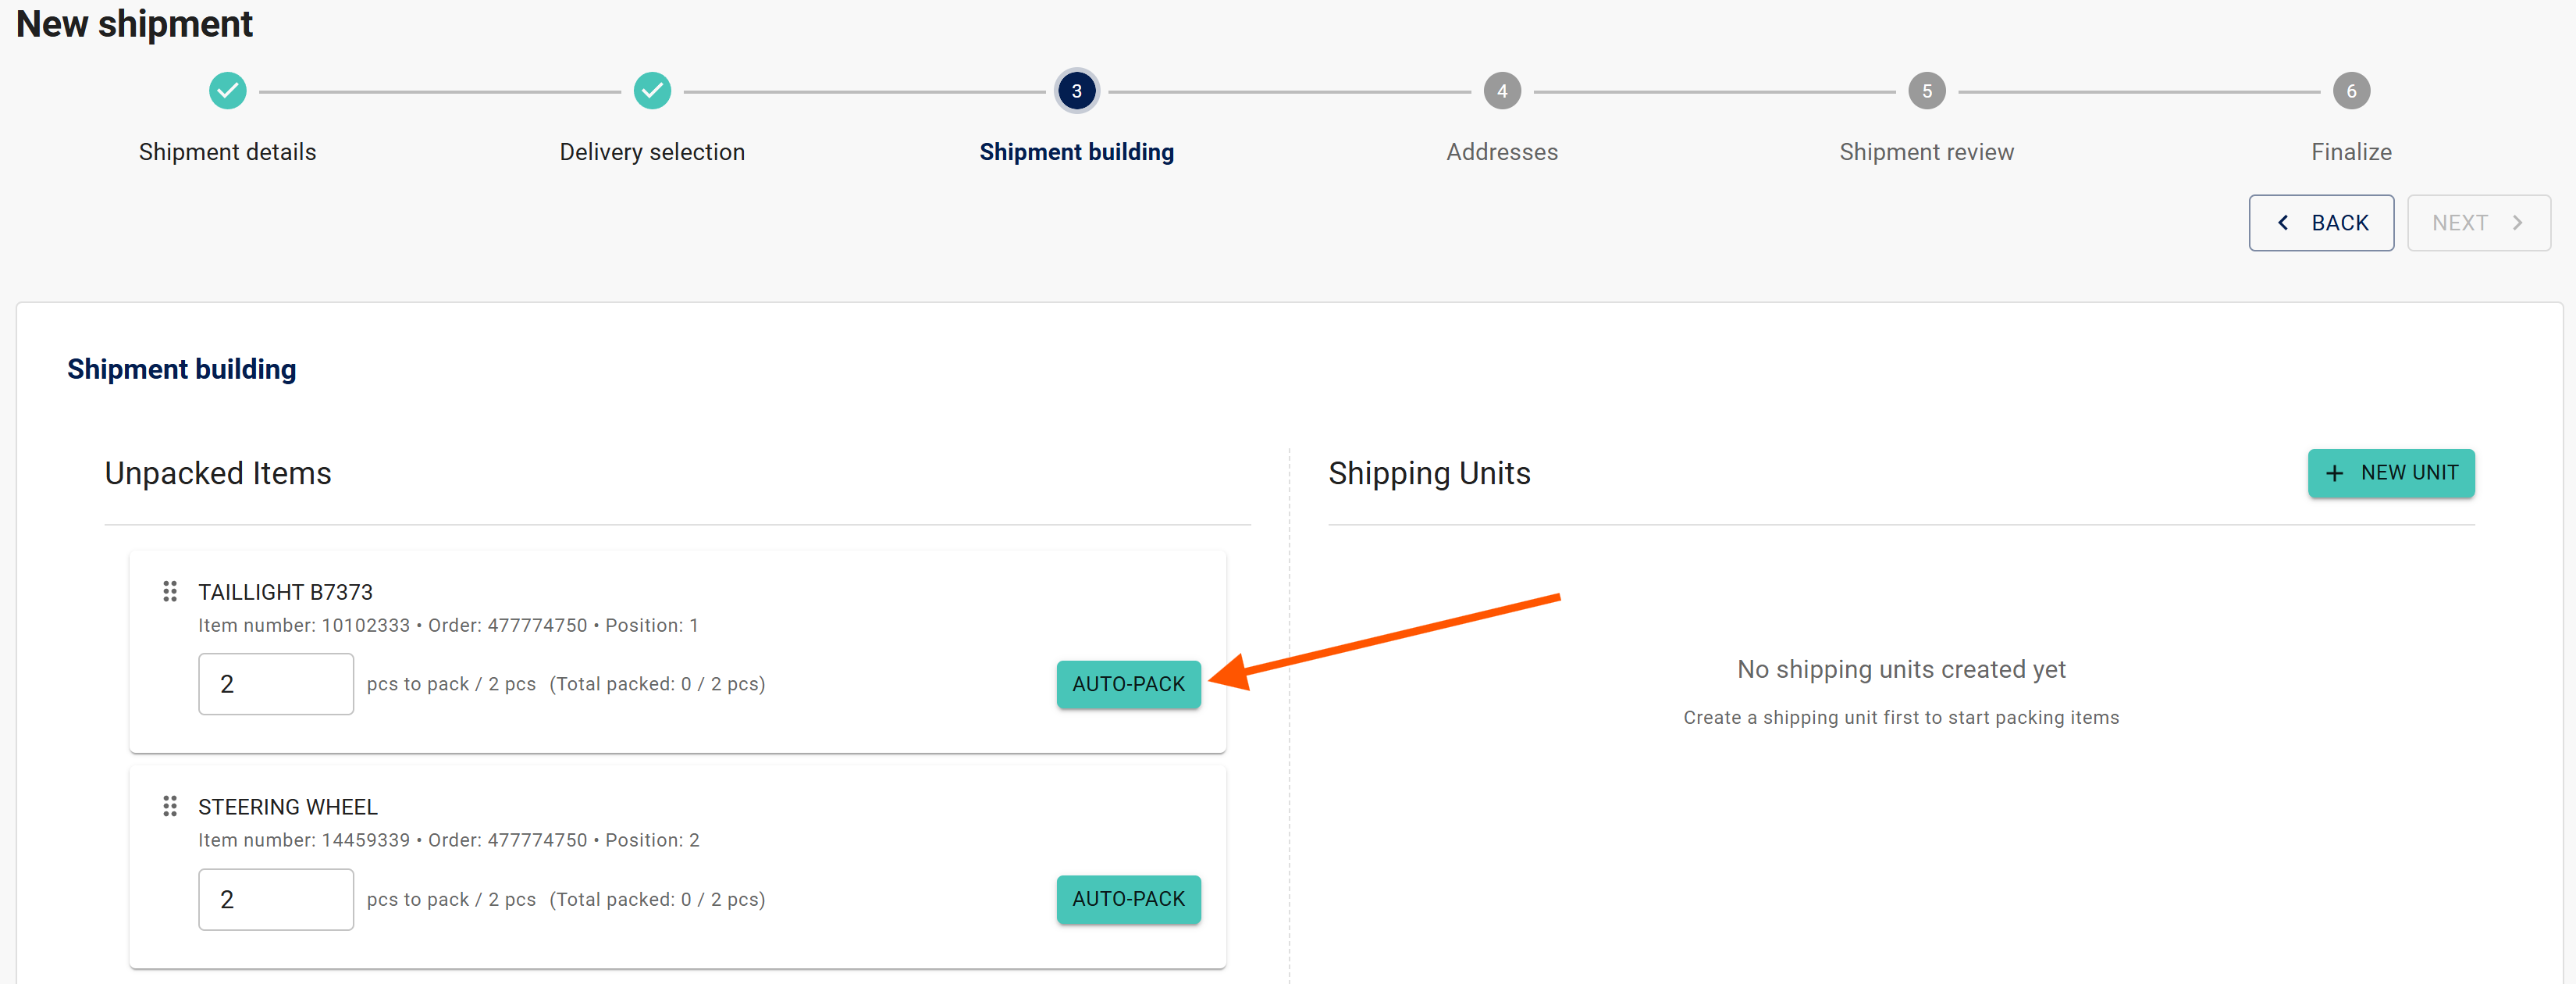
3.3.2 Create multiple shipping units with autopack
Auto-pack helps you quickly pack your items into shipping units without having to create each unit manually. Use the auto-pack functionality when you need to create multiple identical shipment units that contain the same number of items.
Select AUTO-PACK to start auto-packing process for selected items.
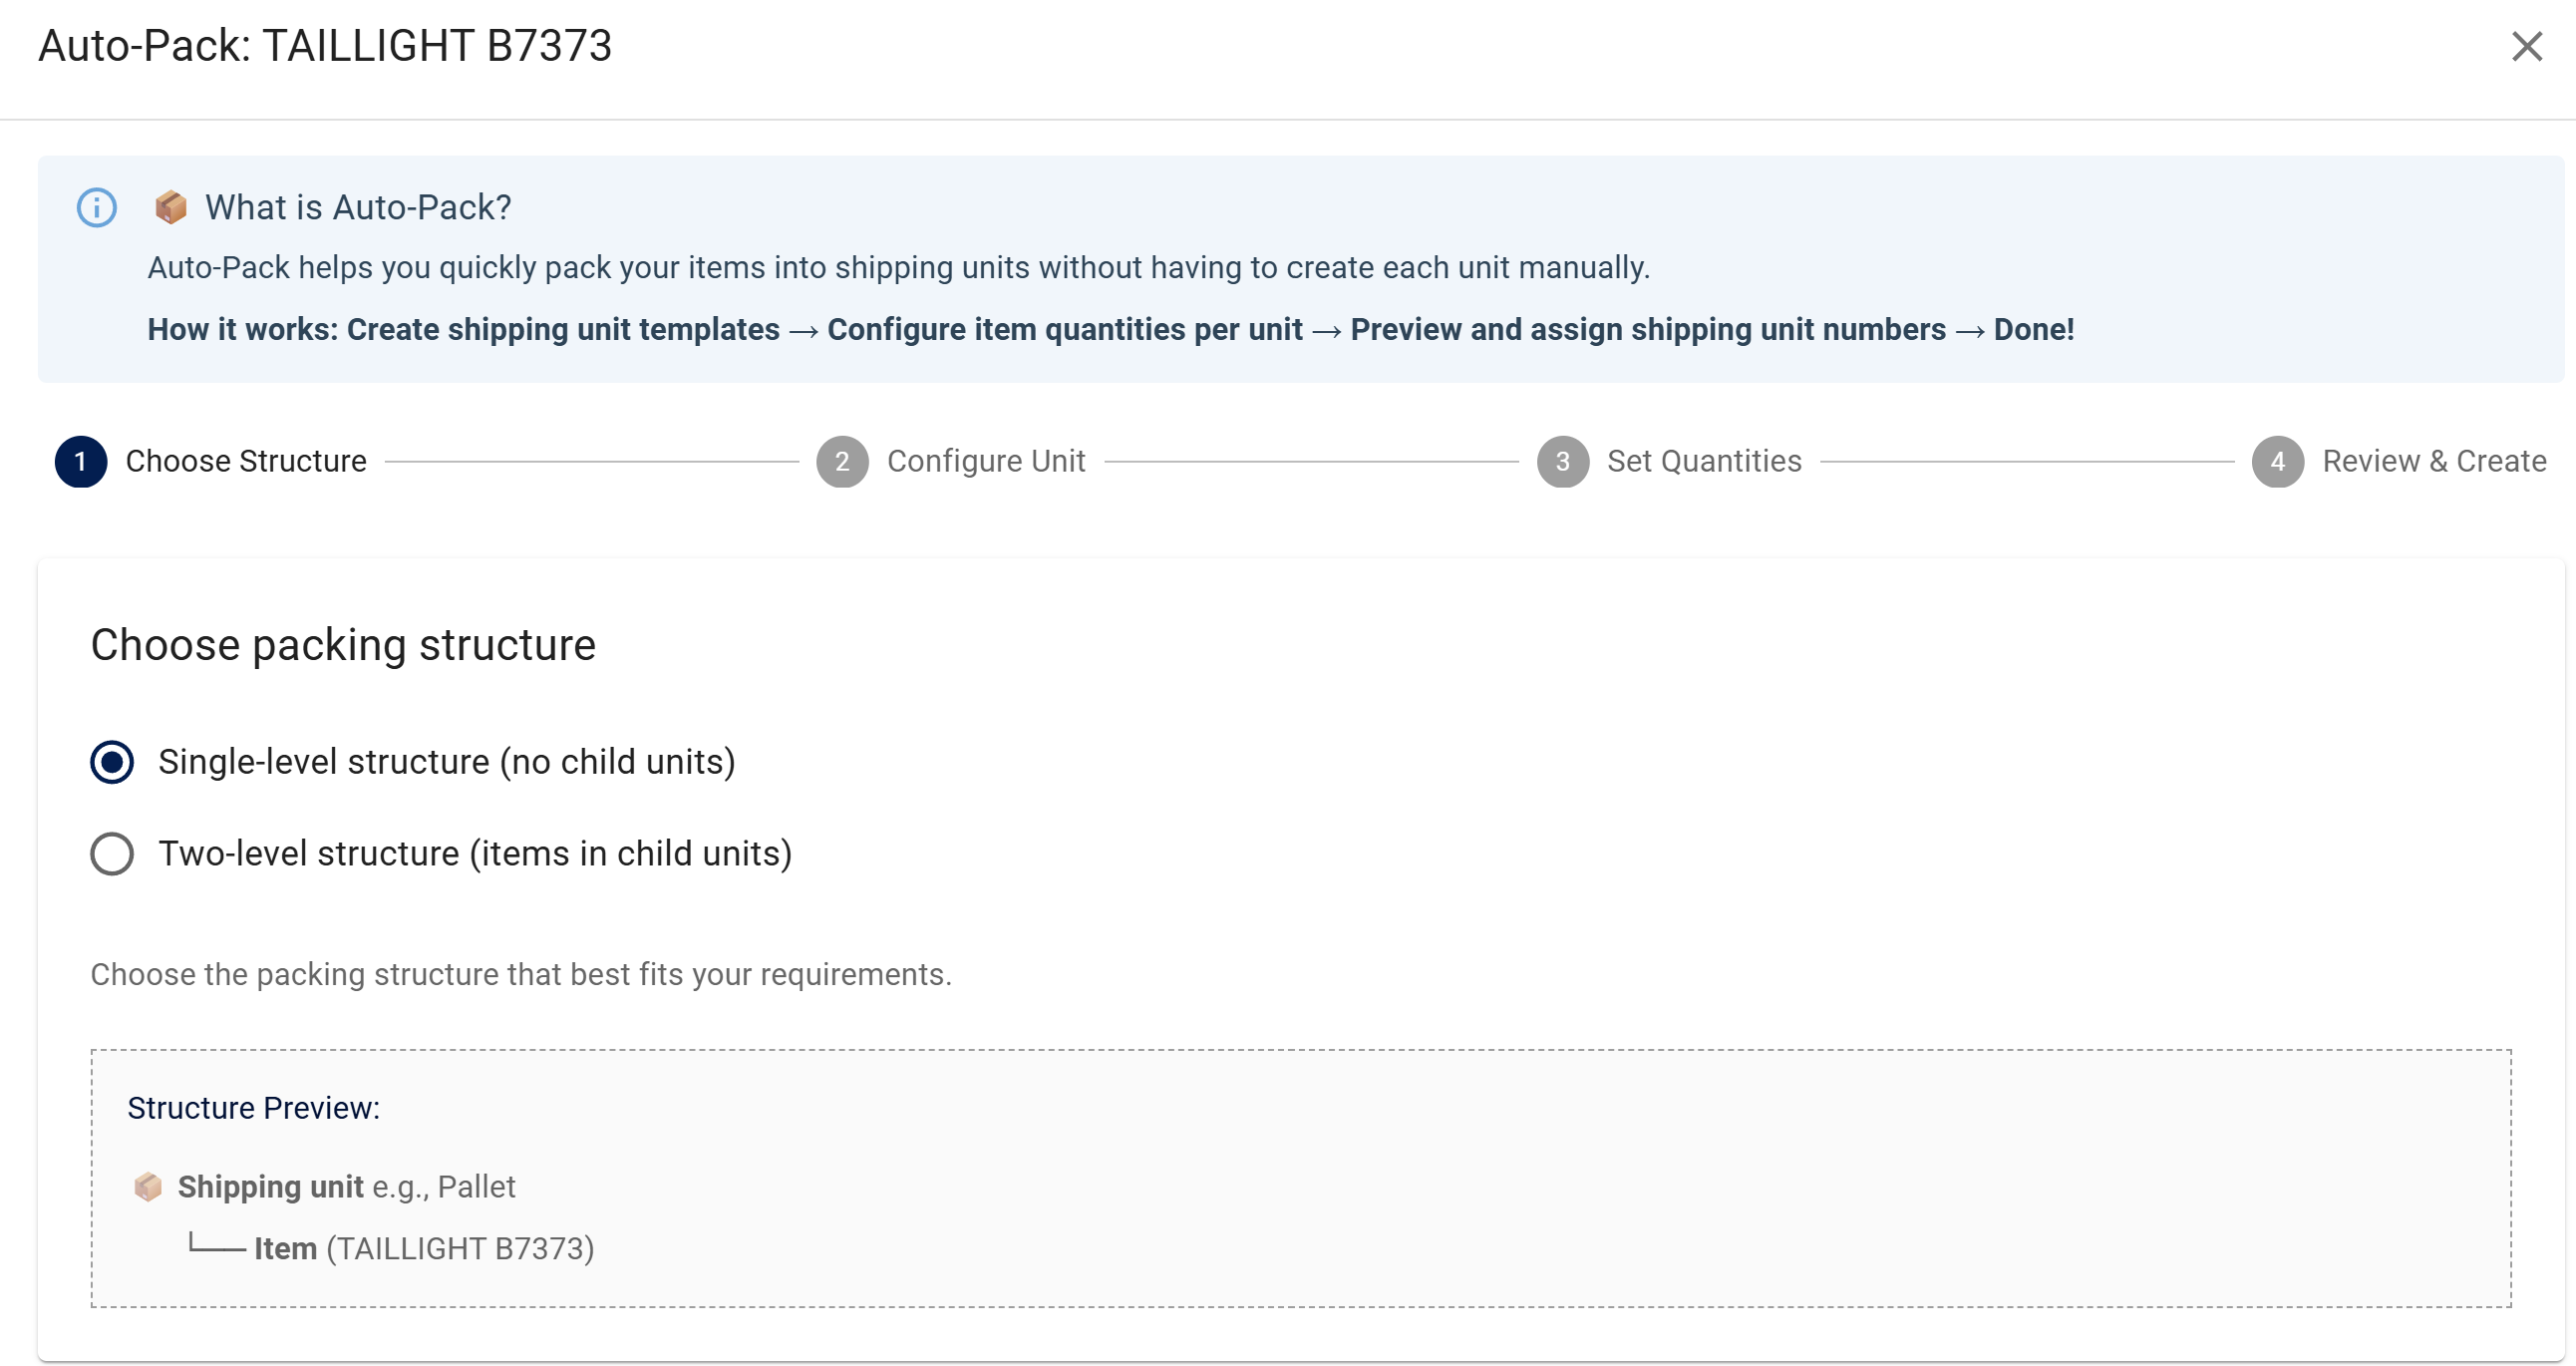
Auto-pack process follows these steps:
1. Choose structure: choose whether creating single-level structure or two-level structure (parent-child structure) of shipment units.
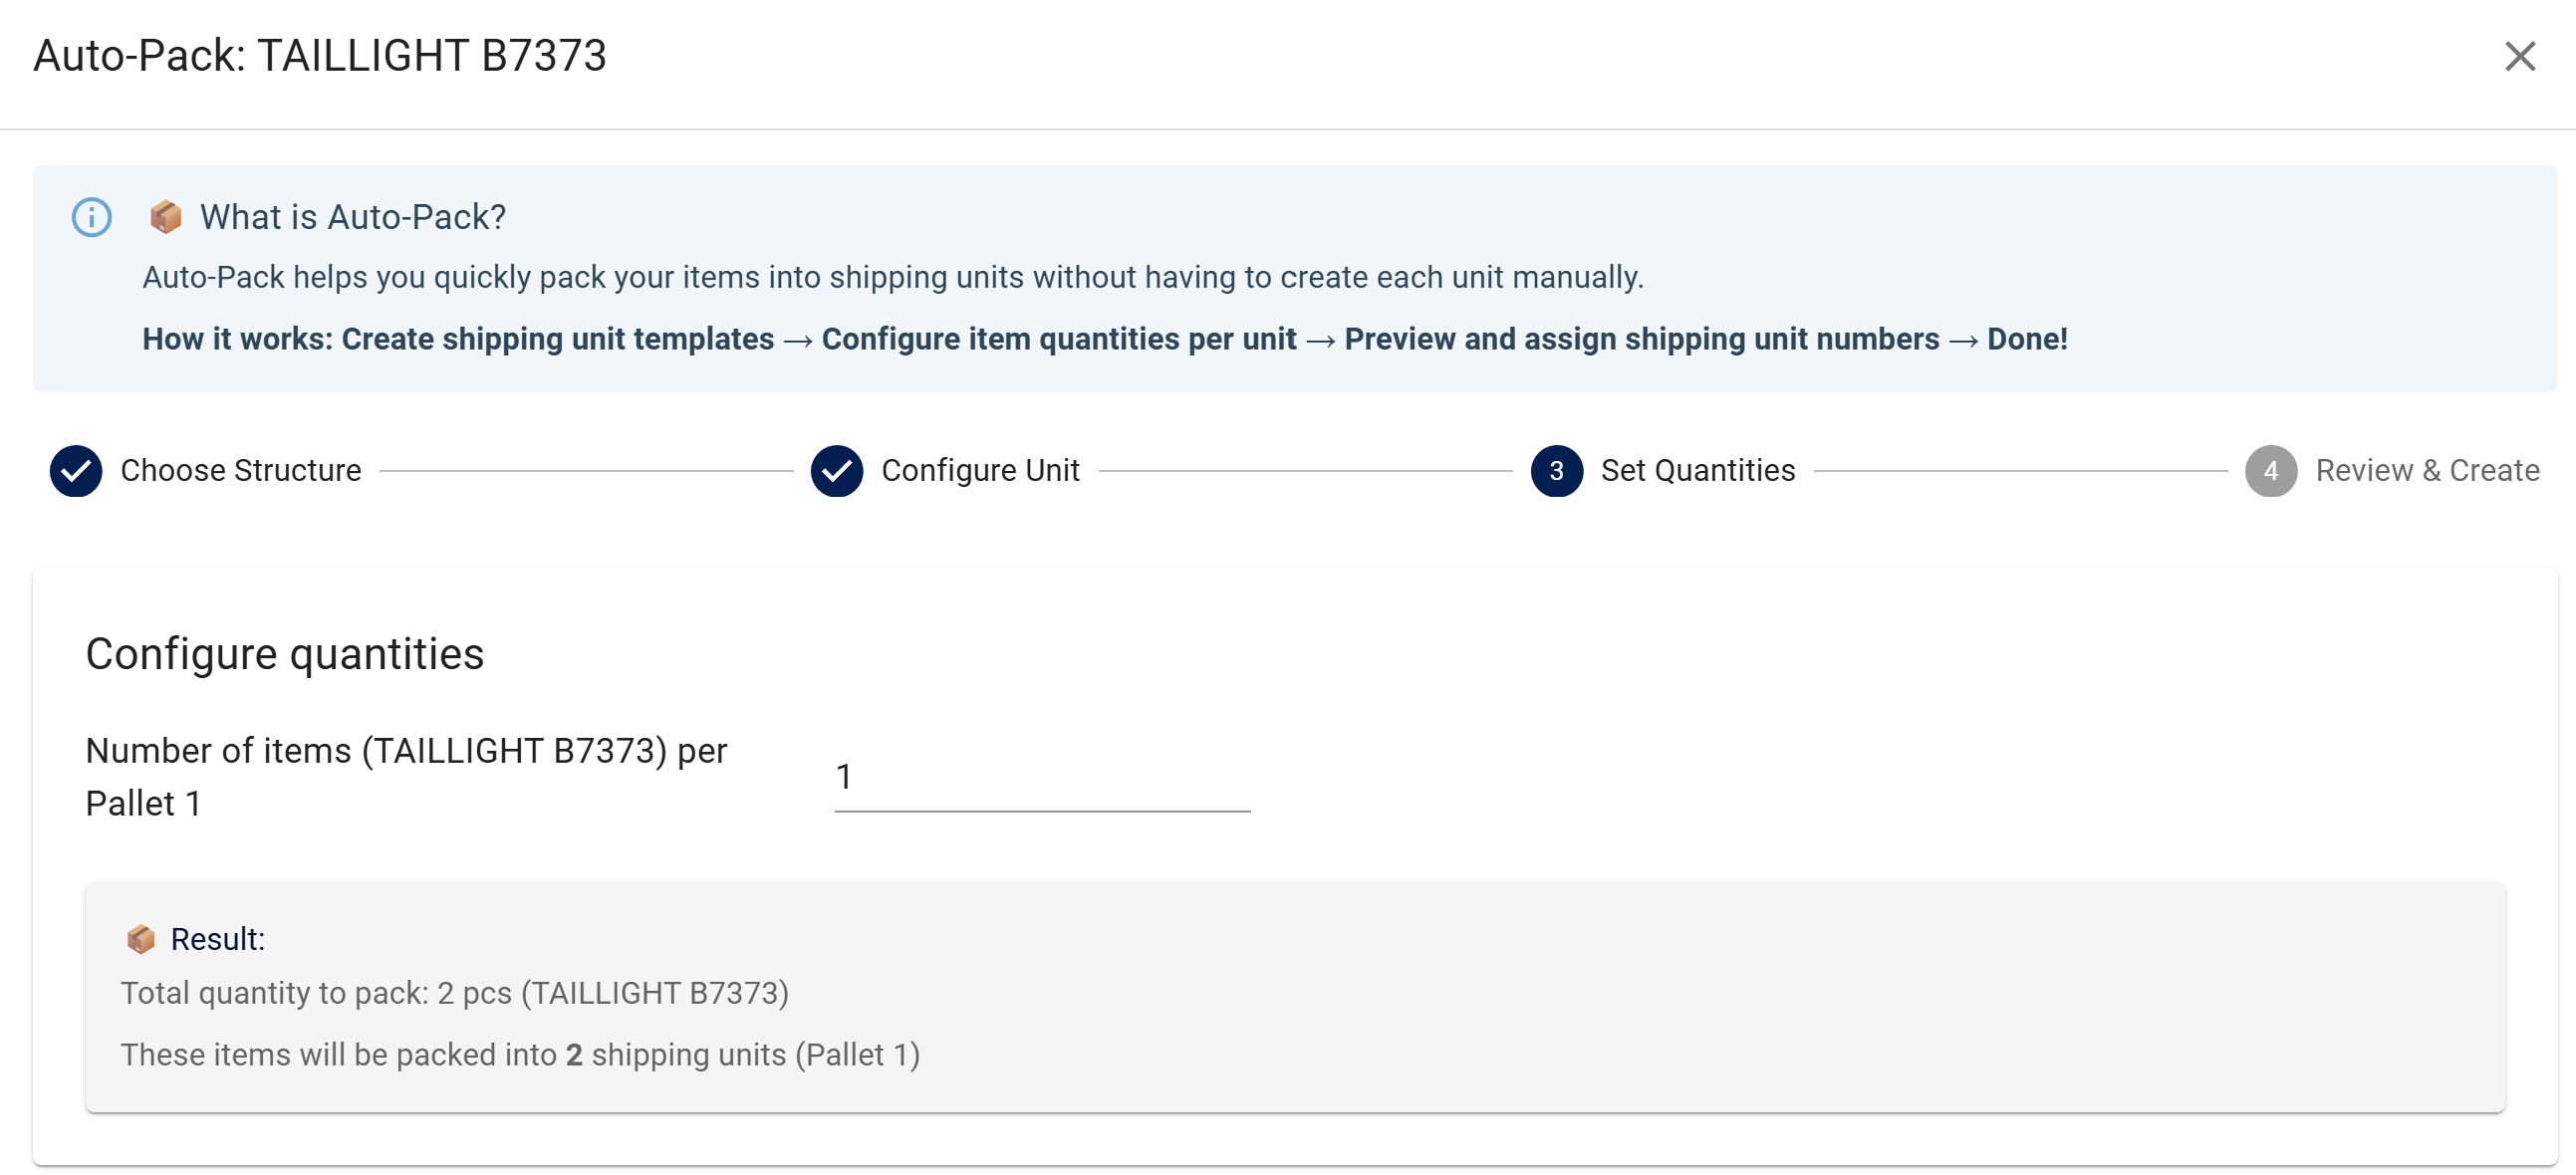
2. Configure unit: select which kind of shipping units will be created (one type).

3. Set quantities: select how many items will be added to one shipping unit.
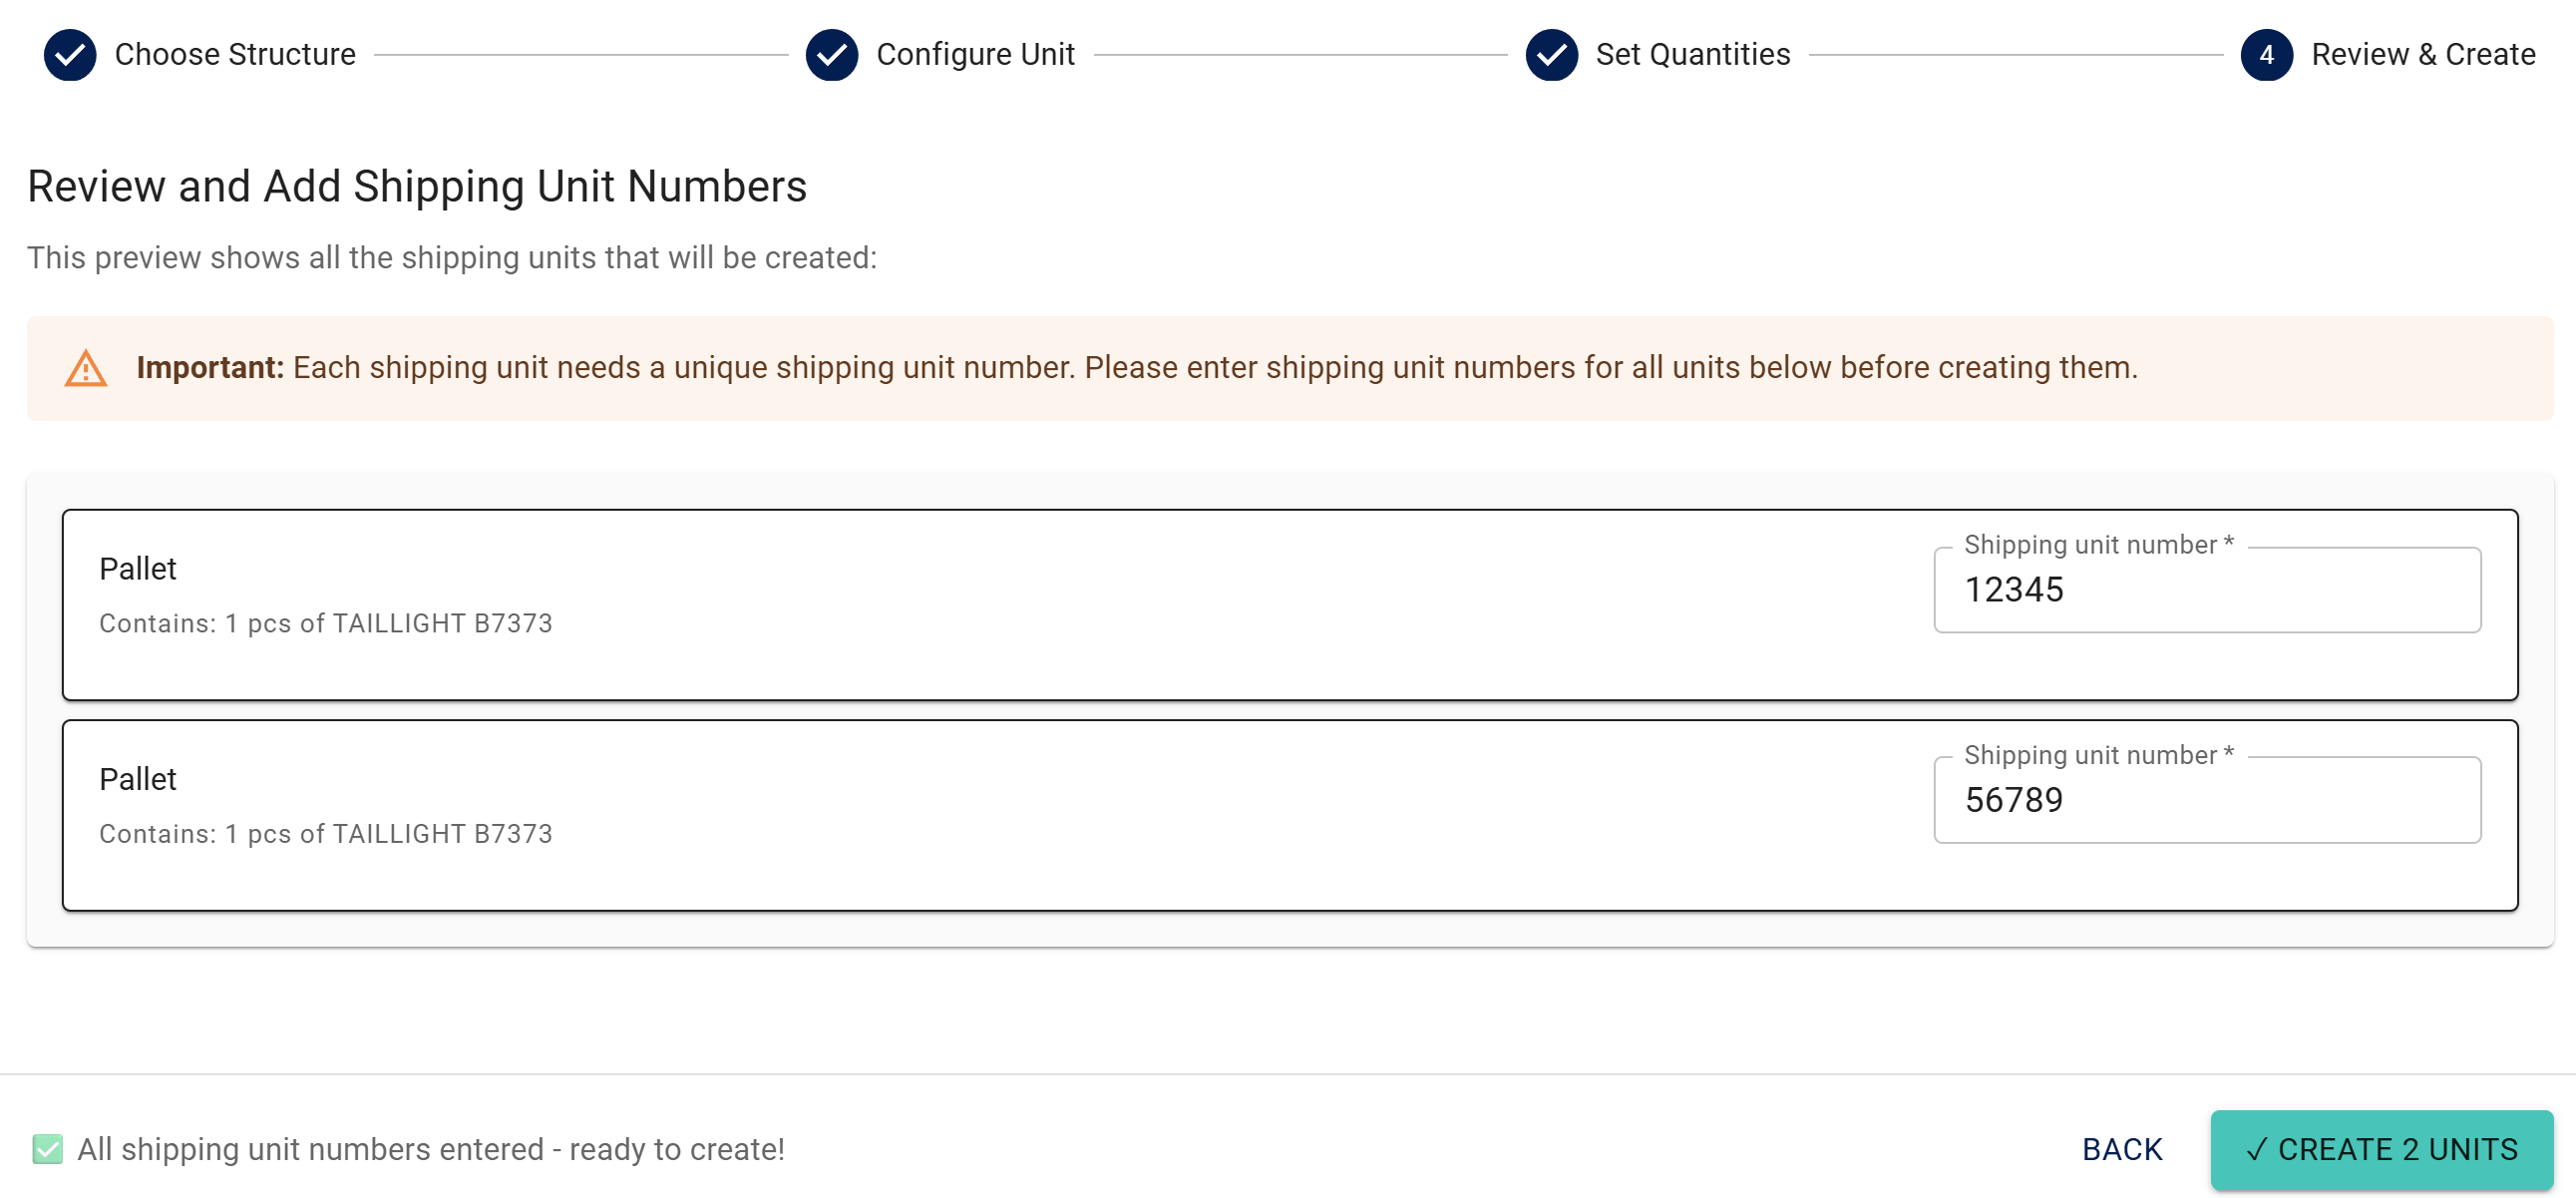
4. Review and create: Jakamo will show how many shipping units will be created and how many items will be placed inside each unit. Fulfill unique Shipping unit numbers for each shipping unit before creating units.
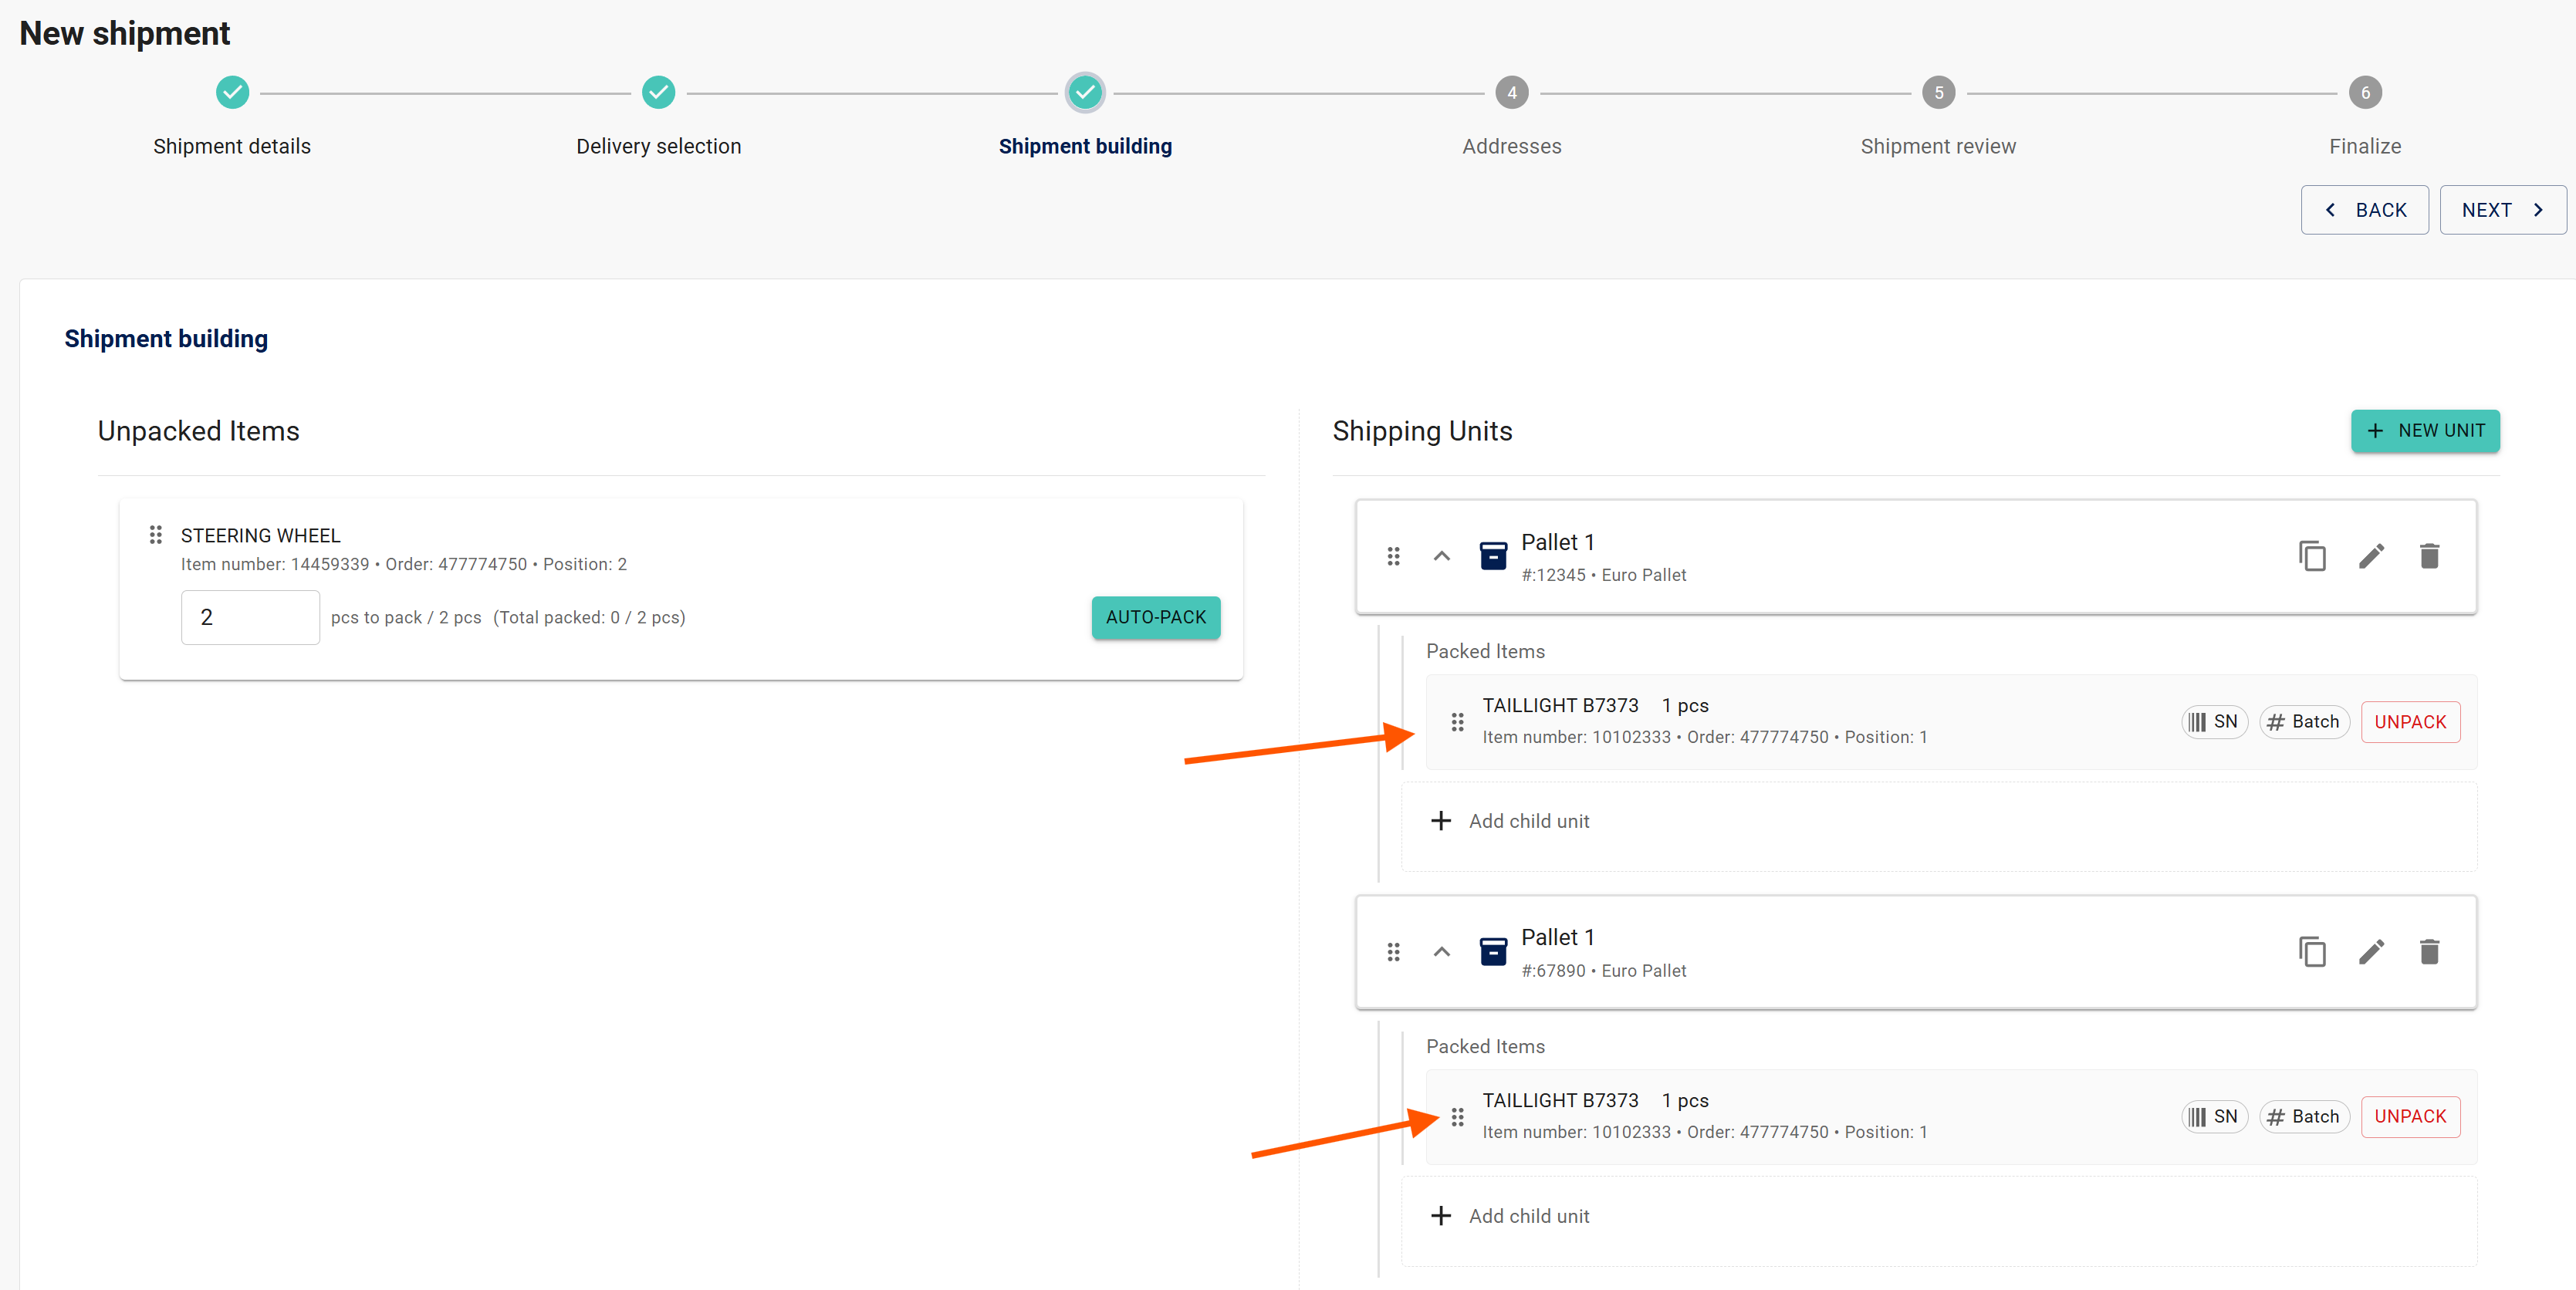
Select Create N units and you will now see those units in the Shipping Units section:
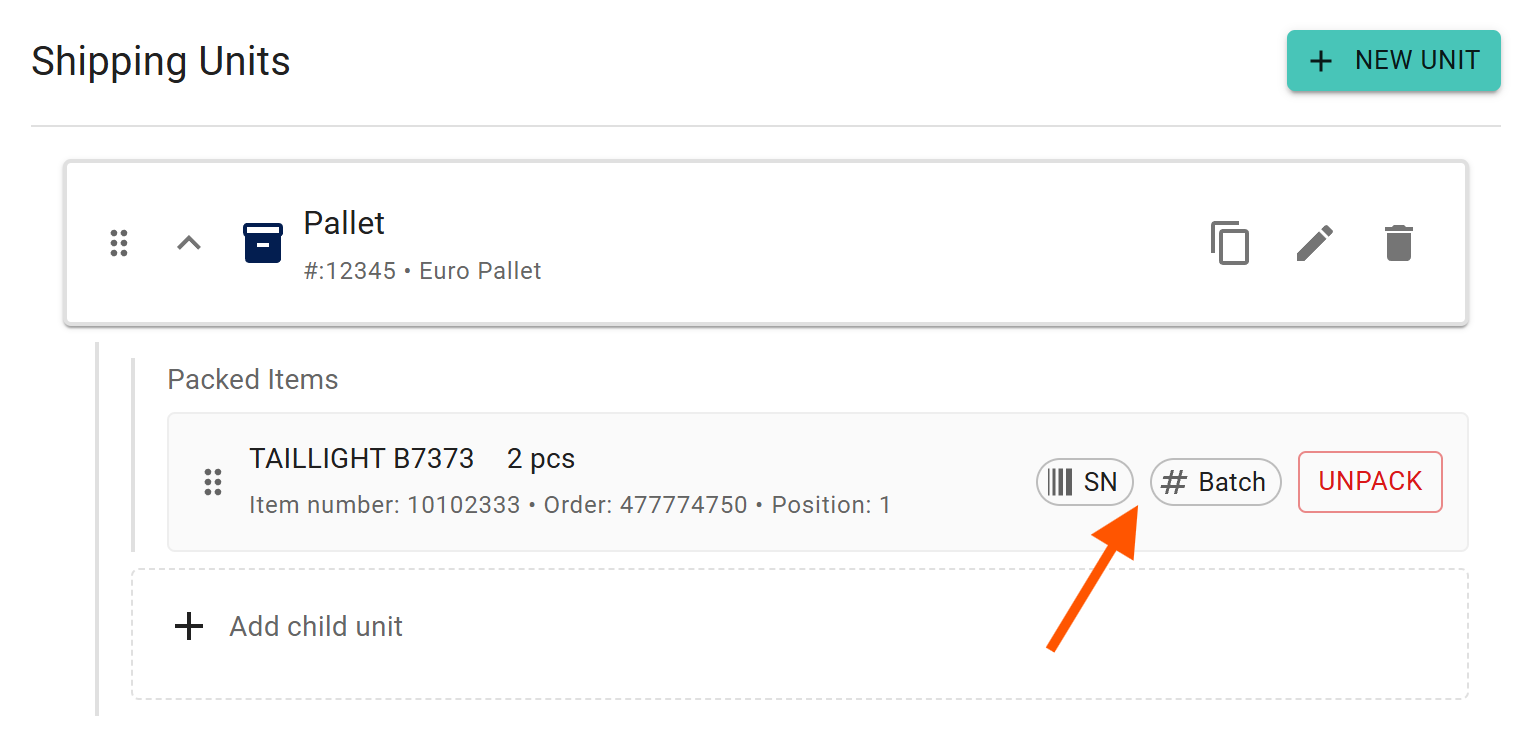
3.3.3 Serial numbers and batch information
For items tracked by serial number or manufacturing batch number, you can add the serial number or batch information after the item has been placed into a shipping unit.
Select SN or BATCH to add the information.
3.4 Addresses
Addresses page contains information about dispatch location and delivery location.
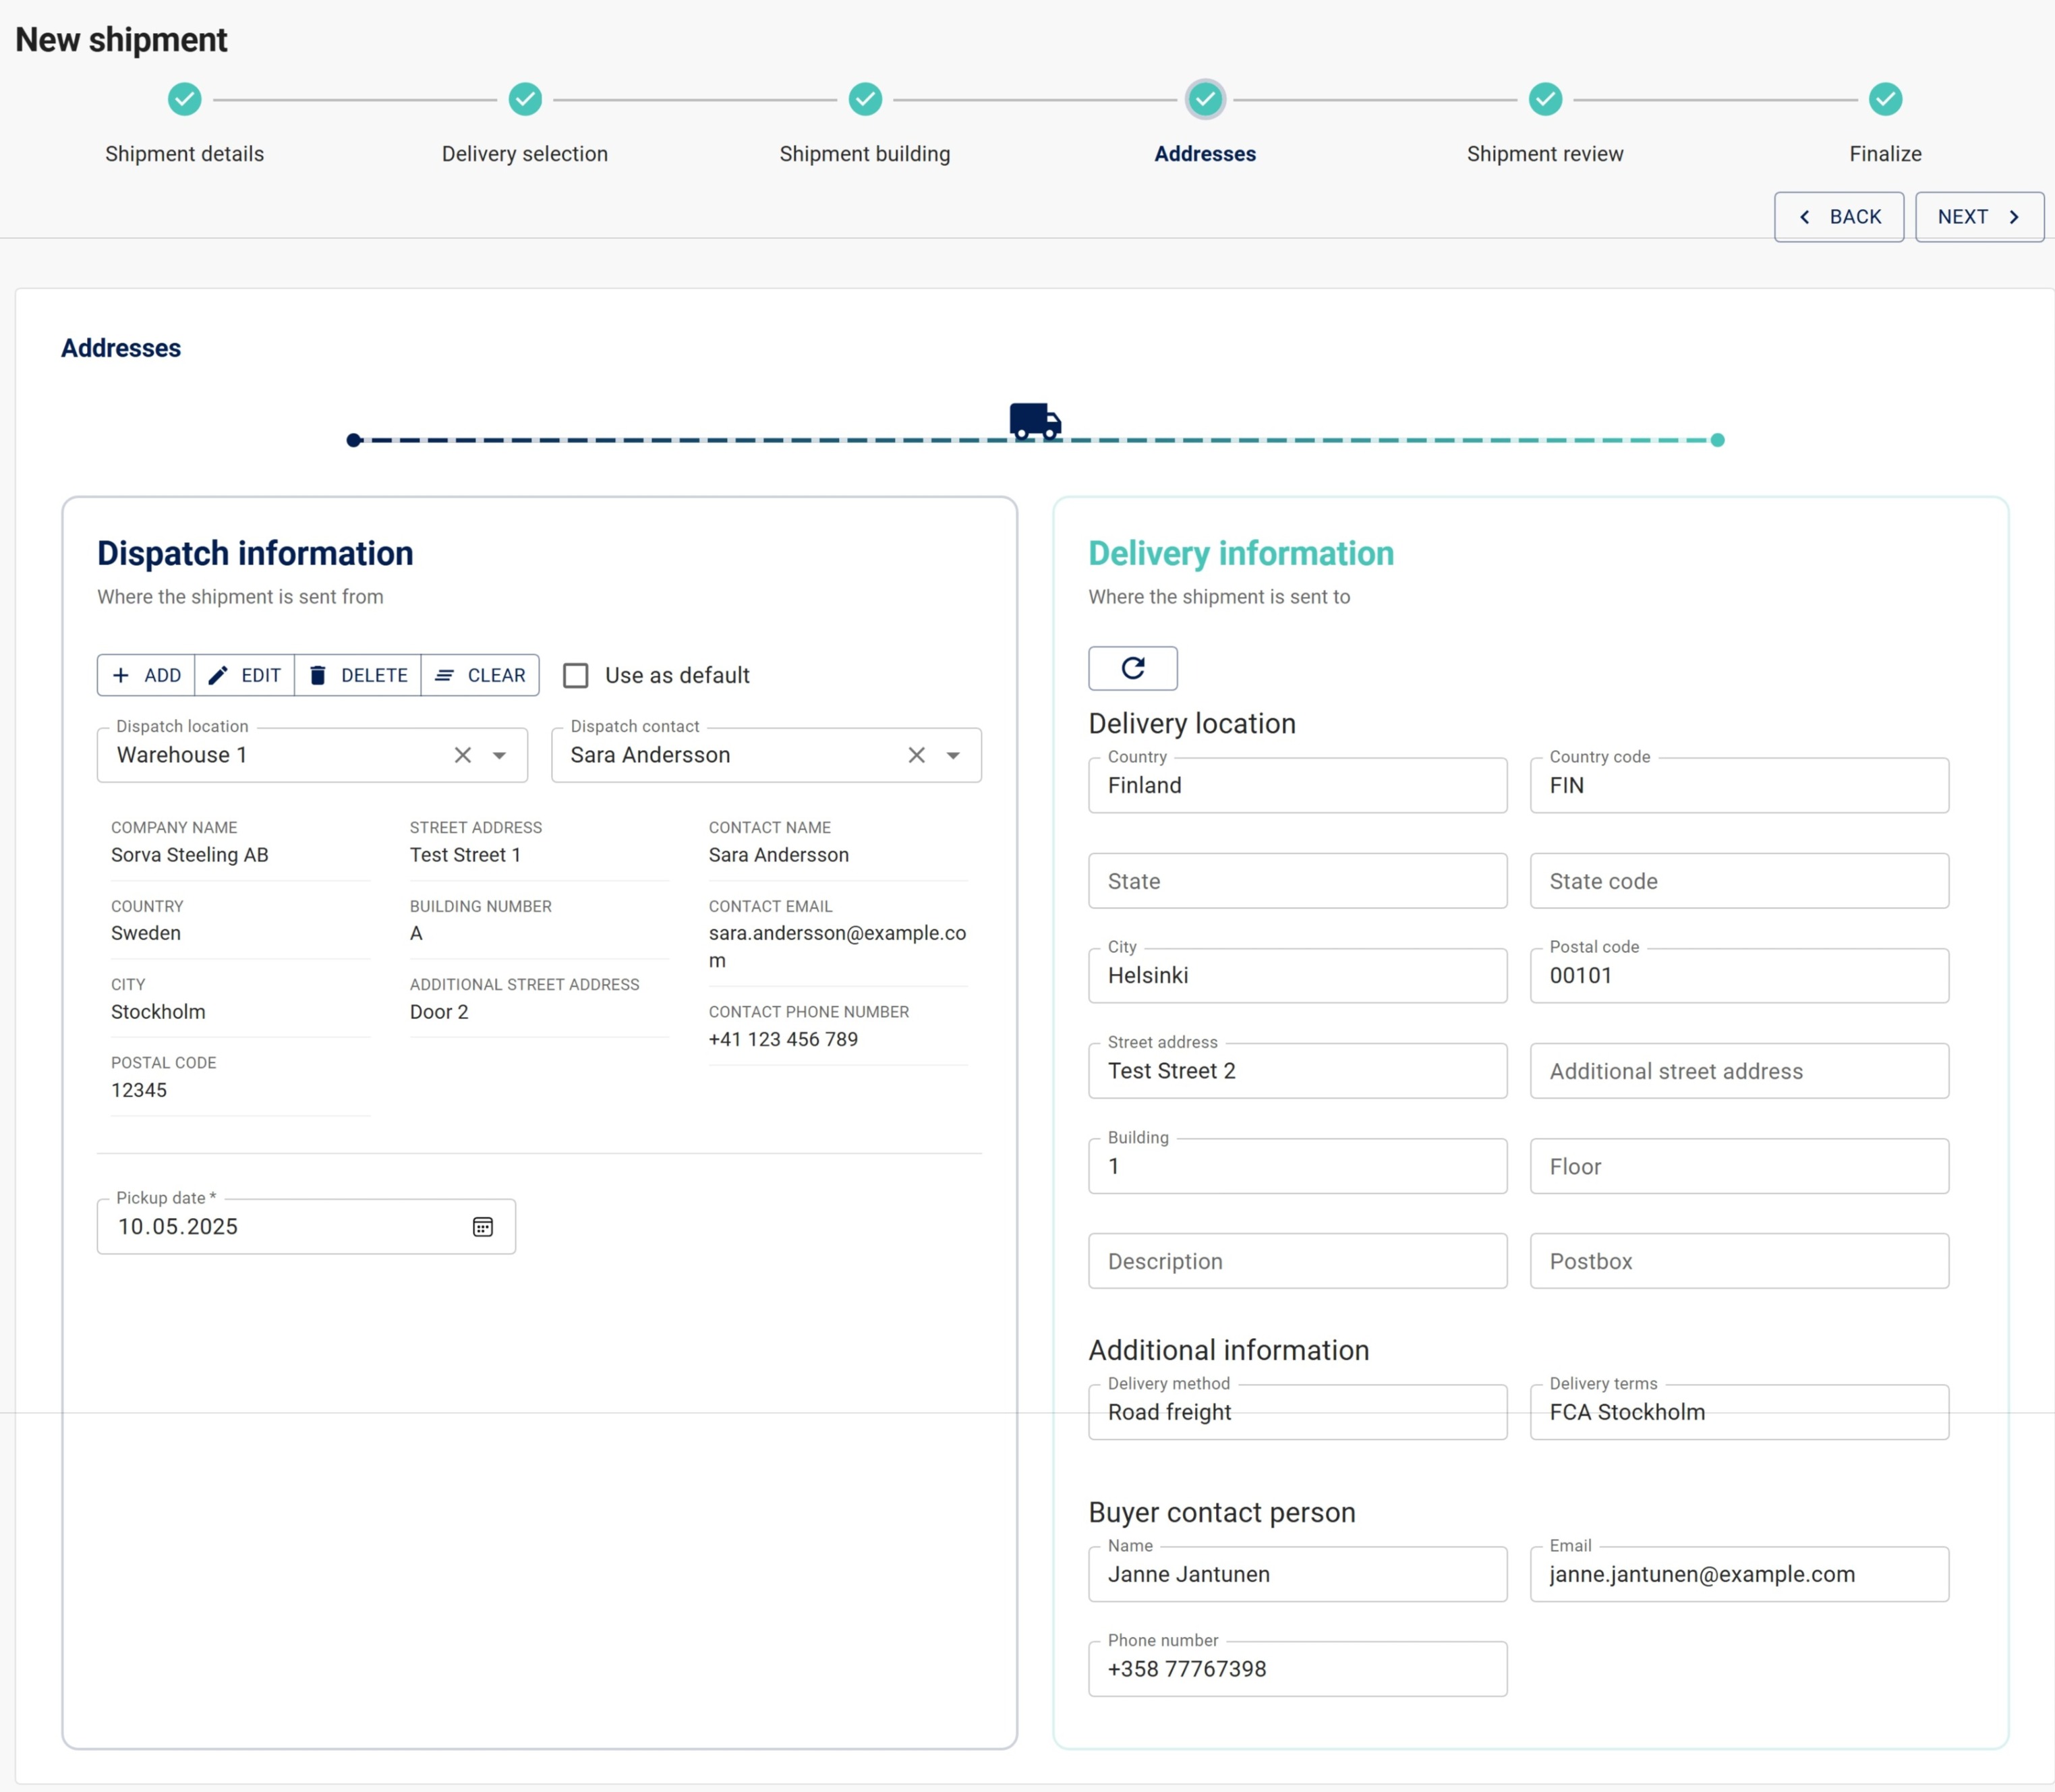
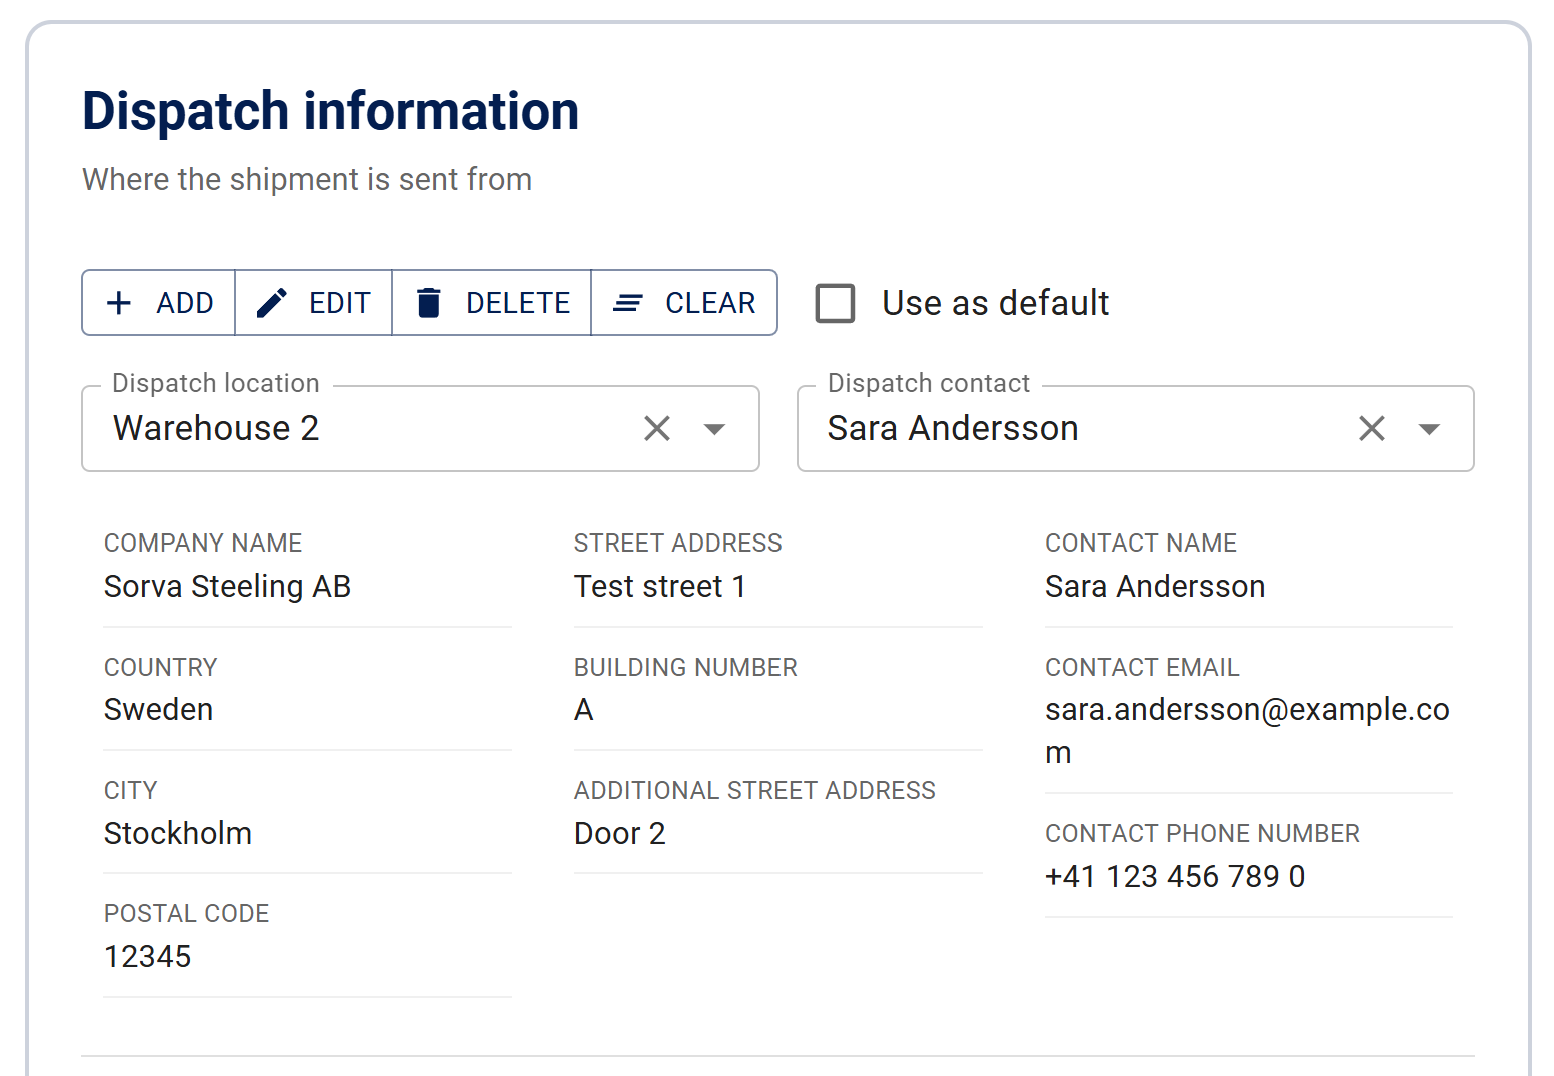
3.4.1 Dispatch information
Your customer may have restrict the dispatch information field, which means you, as the supplier, cannot fill it in. In this case, you can proceed with creating the ASN without entering dispatch information.
Dispatch location must always be the physical site from which goods are shipped to the customer. If your company operates across multiple dispatch locations, a separate entry must be created for each location.
Select the dispatch location from the dropdown menu from previously created locations, or create a new one by selecting Add +.
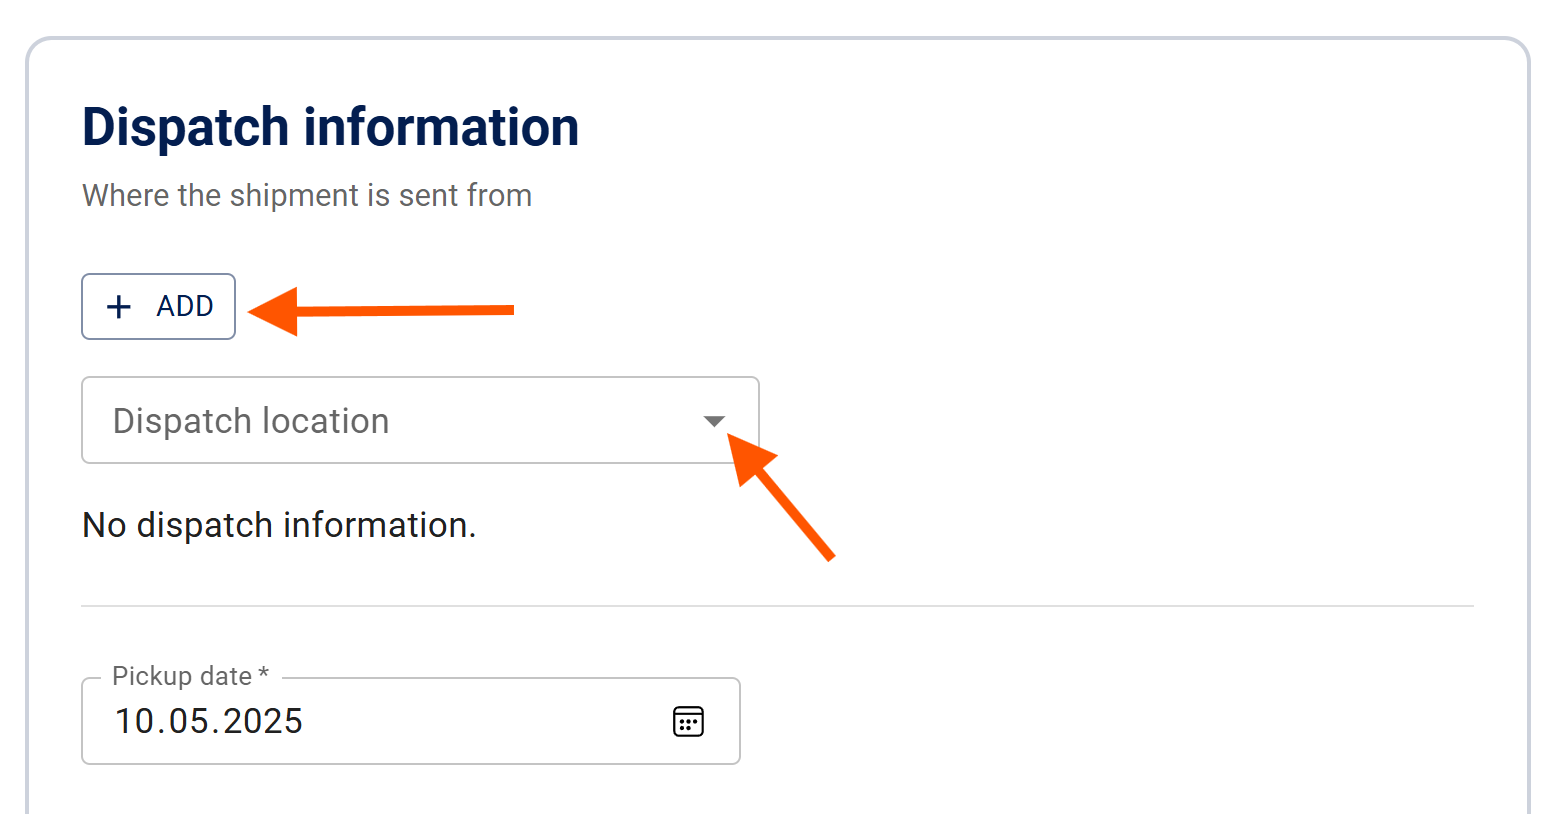
Create a new dispatch location
You can define dispatch locations, for example, for transportation purposes while creating new ASN. Saved dispatch locations are stored in Jakamo and will be available for all new ASNs. Select + ADD under Dispatch Information in order to add a new dispatch location.
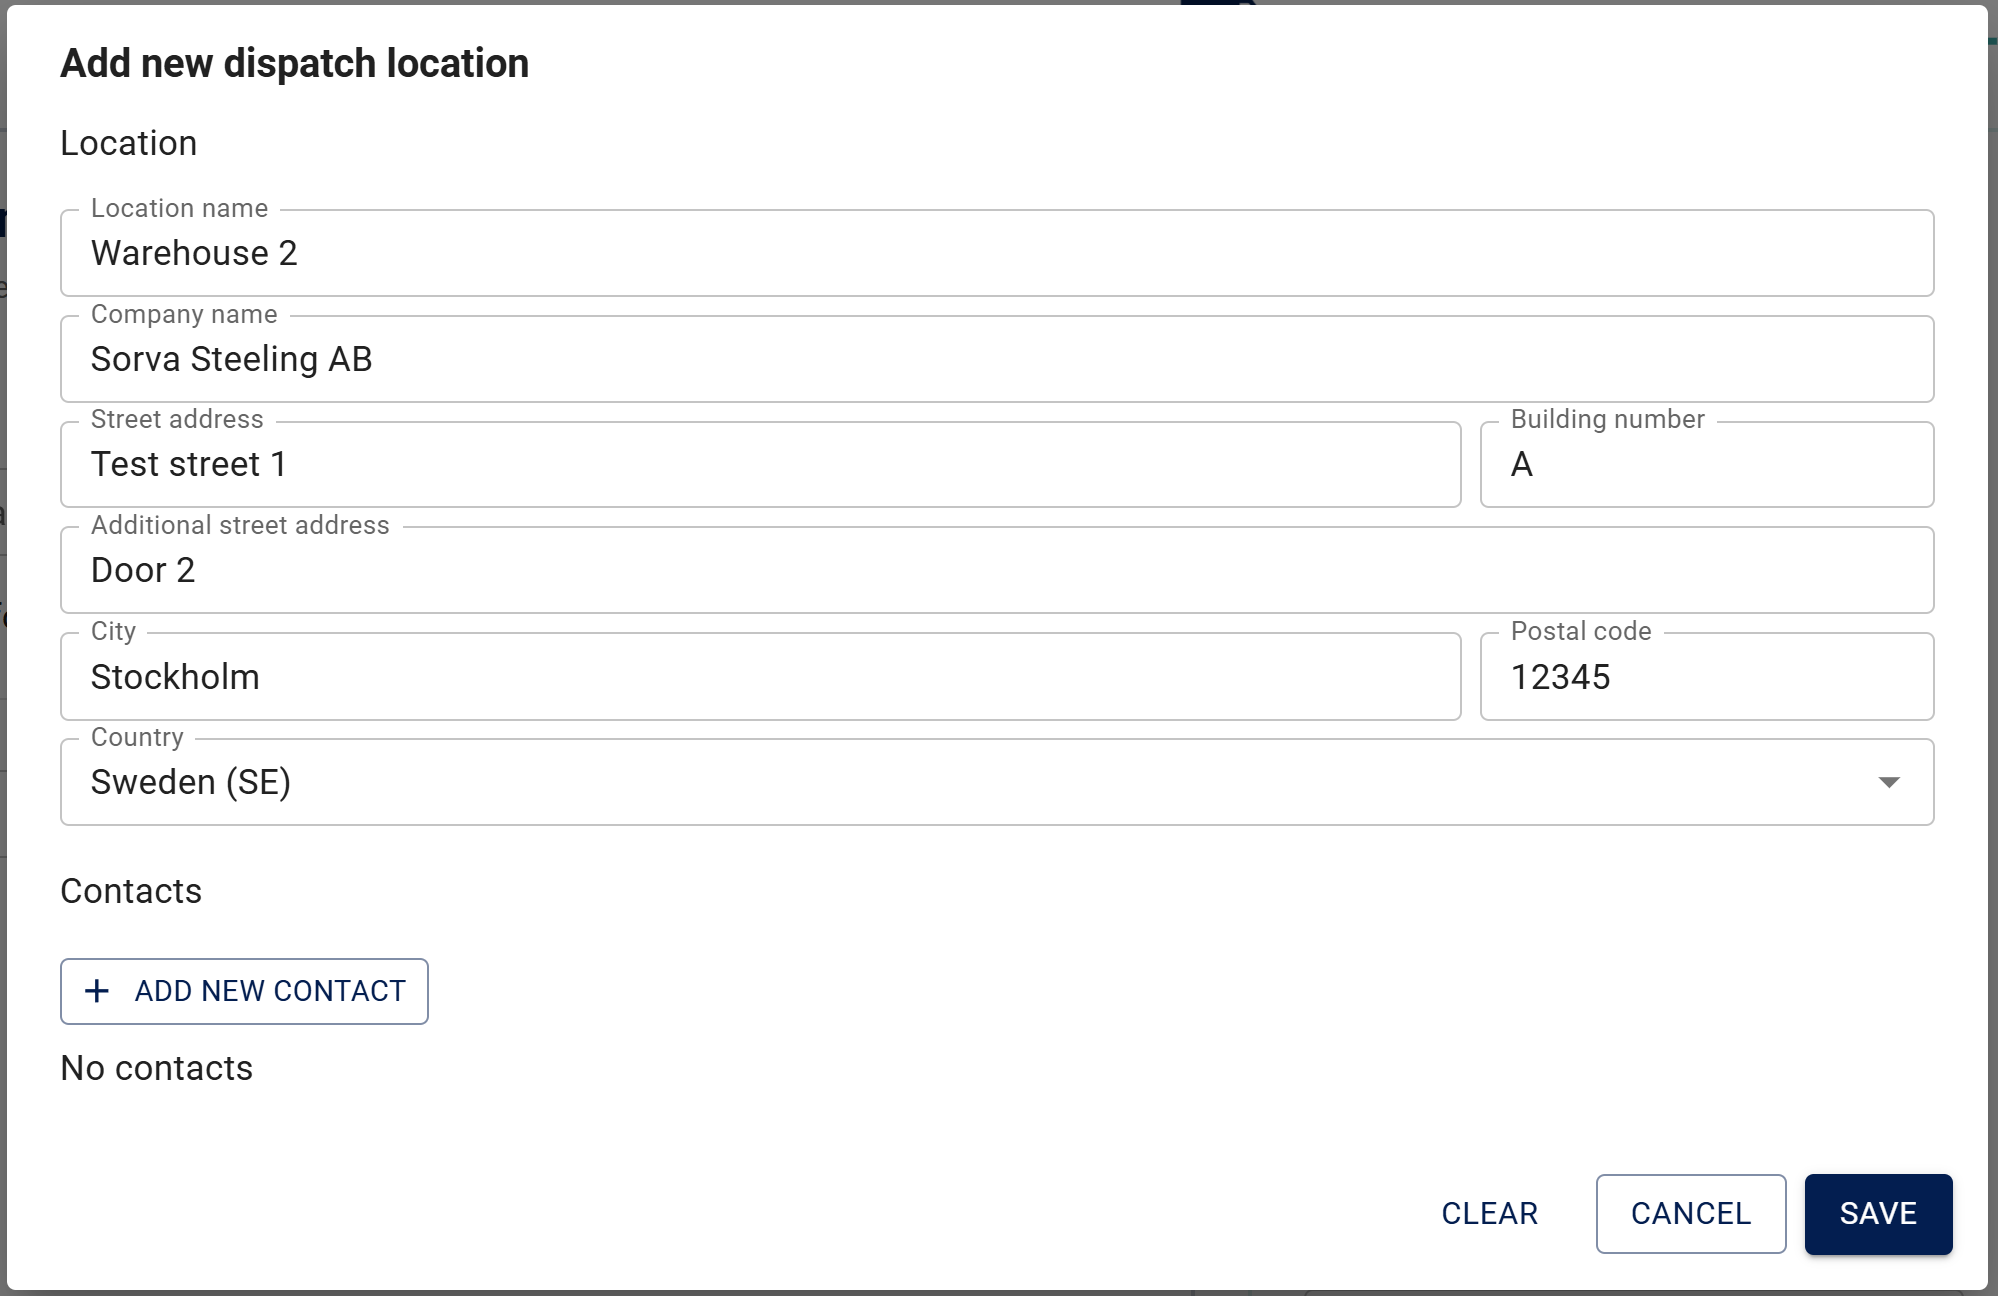
Use + Add new contact to add new dispatch contact person. Fulfill contact person's name, email and phone number and select Add to add person to be a contact person.
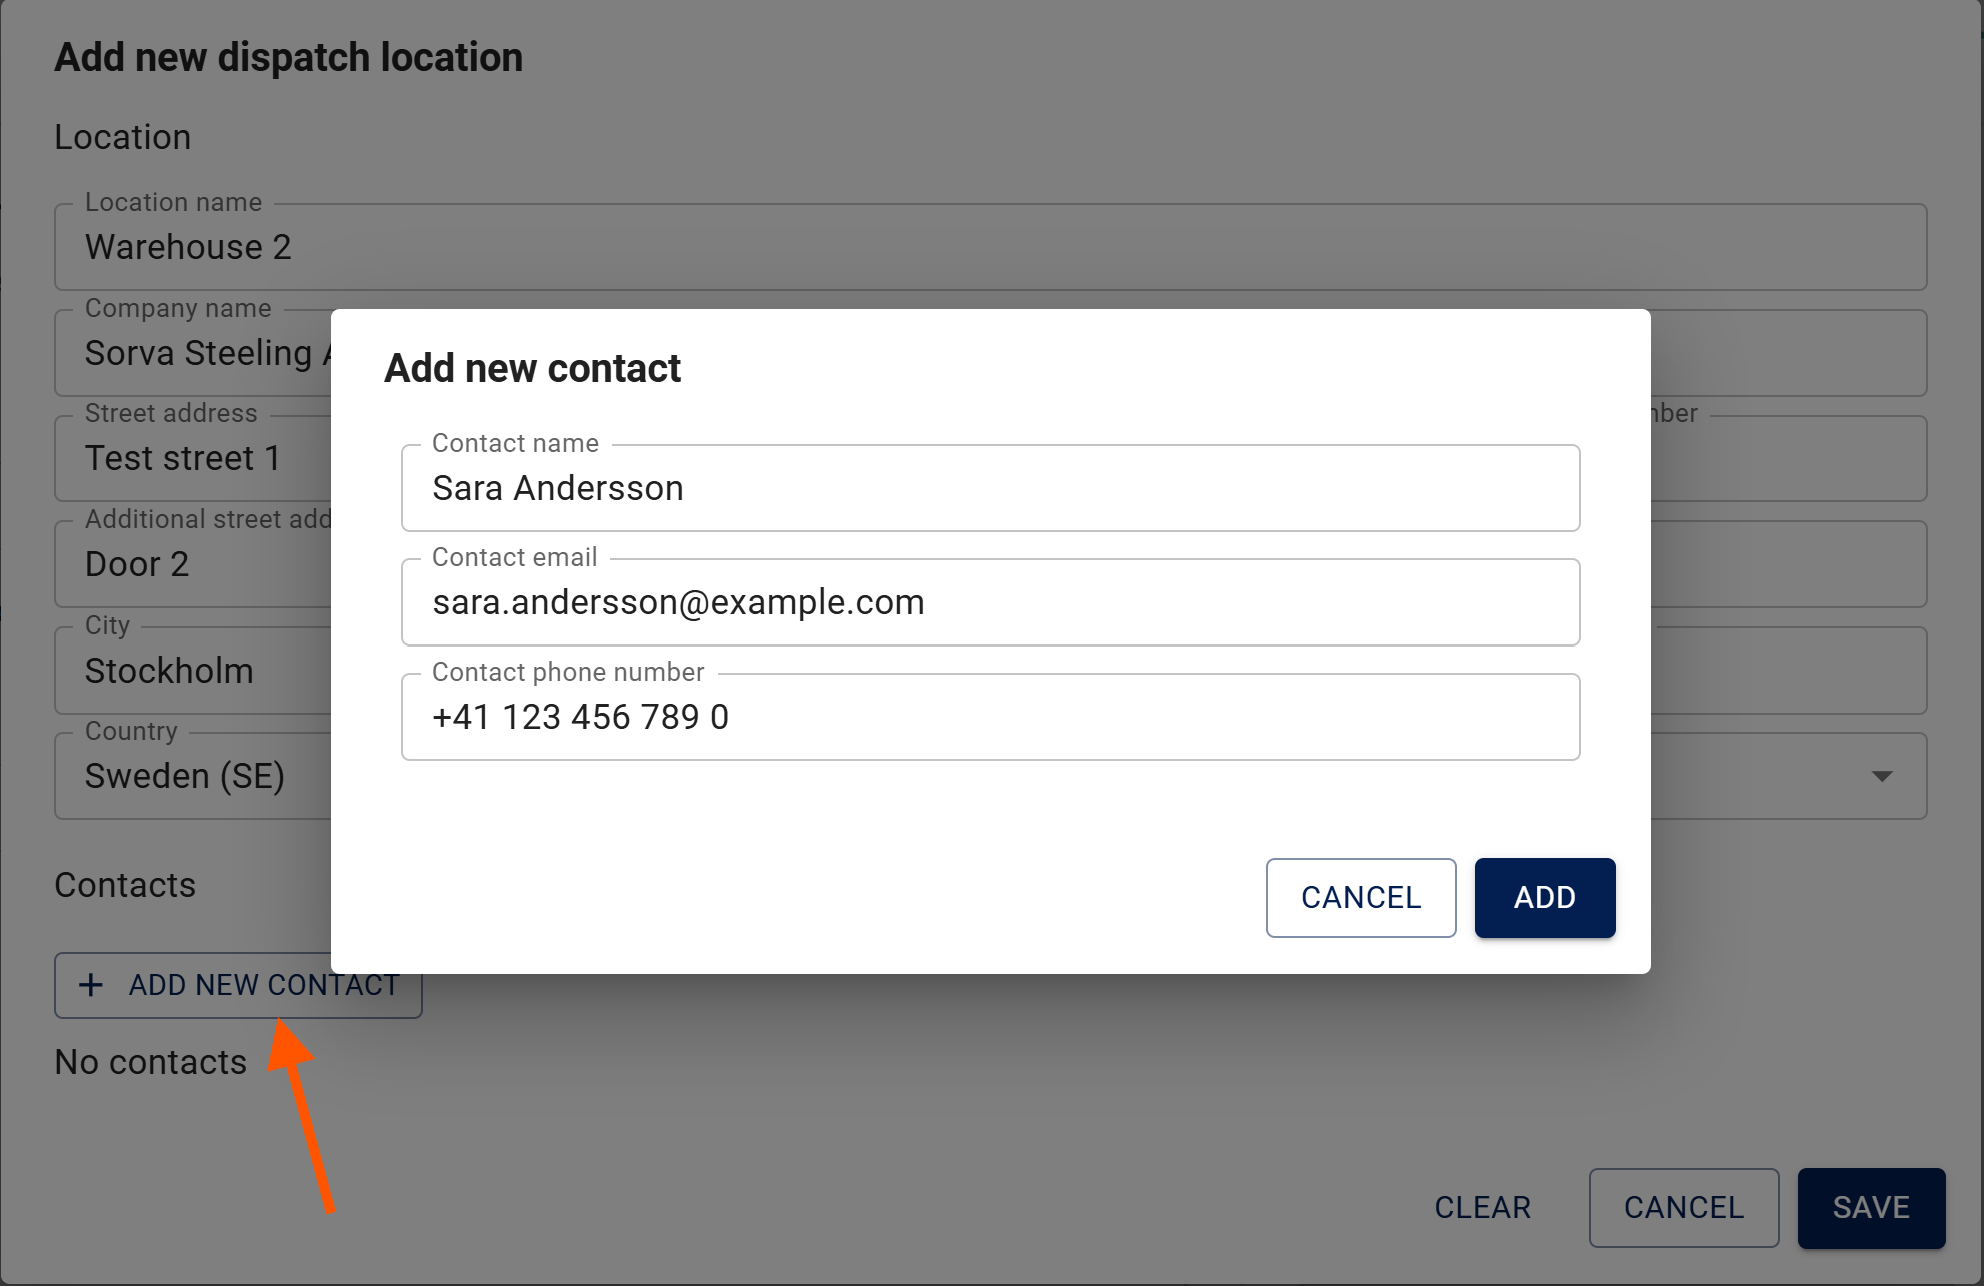
Select Save. You have now successfully saved your dispatch location and dispatch contact, and it can be now accessed from the Dispatch location dropdown menu.
Pickup date
Pickup date is automatically the day order is planned to be delivered (confirmed delivery date). If needed, update the date to actual pickup date by selecting the correct day from the calendar.
3.4.2 Delivery information
Delivery location and address details, additional information including delivery method and delivery terms, and buyer contact person will be automatically pre-filled from the customer's order or orders selected to be shipped.
3.5 Shipment review
Review your shipment before finalizing it. Use BACK function if something needs to be corrected.
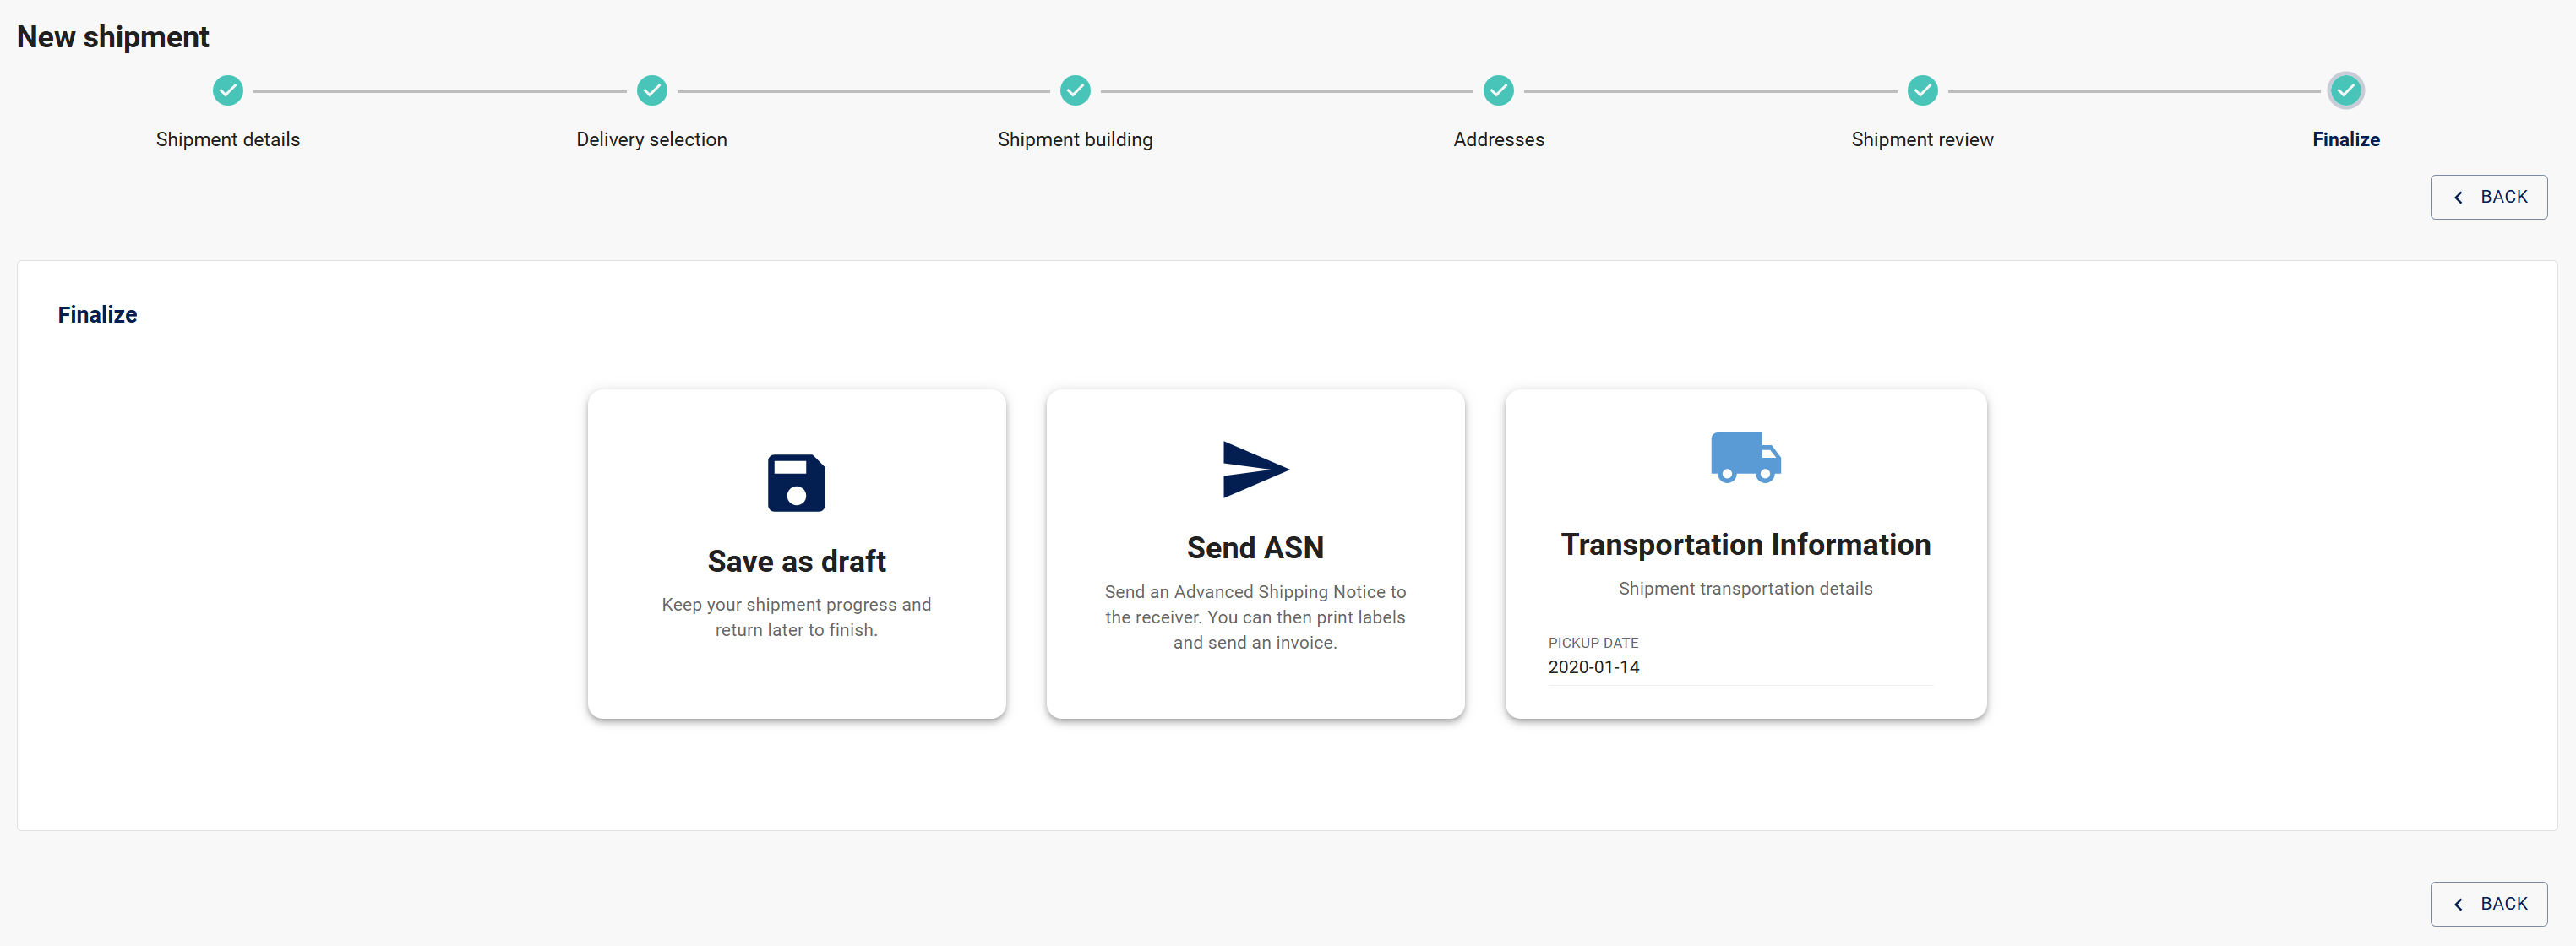
3.6 Finalize
On the Finalize page, decide what to do with the shipment you've created:
- Save as draft and continue later
- Send ASN information to your customer via Jakamo
(Please note, you can Print Shipping labels and Packing List only after sending the created ASN)
Send ASN
When the shipment is ready, you can mark the ASN as complete by selecting Send ASN. This action will take you to the summary view, where you can choose to Print the documents. If your customer requires an invoice to be created, you can do so after completing the ASN by selecting Create Invoice.

4. Transportation-oriented ASN process
This section describes the transportation‑oriented ASN creation process, where transportation arrangements are handled as part of the shipment. If transportation is not managed via Jakamo, please refer to the instructions here: Basic ASN process.
There are two processes available: Minimal and Standard - option 1 / Standard - option 2.
Start creating a new ASN
+ Create Shipmet
You can start creating a new ASN either by selecting + Create shipment (or directly from the order. More details on this process can be found here: Access ASN from individual order):
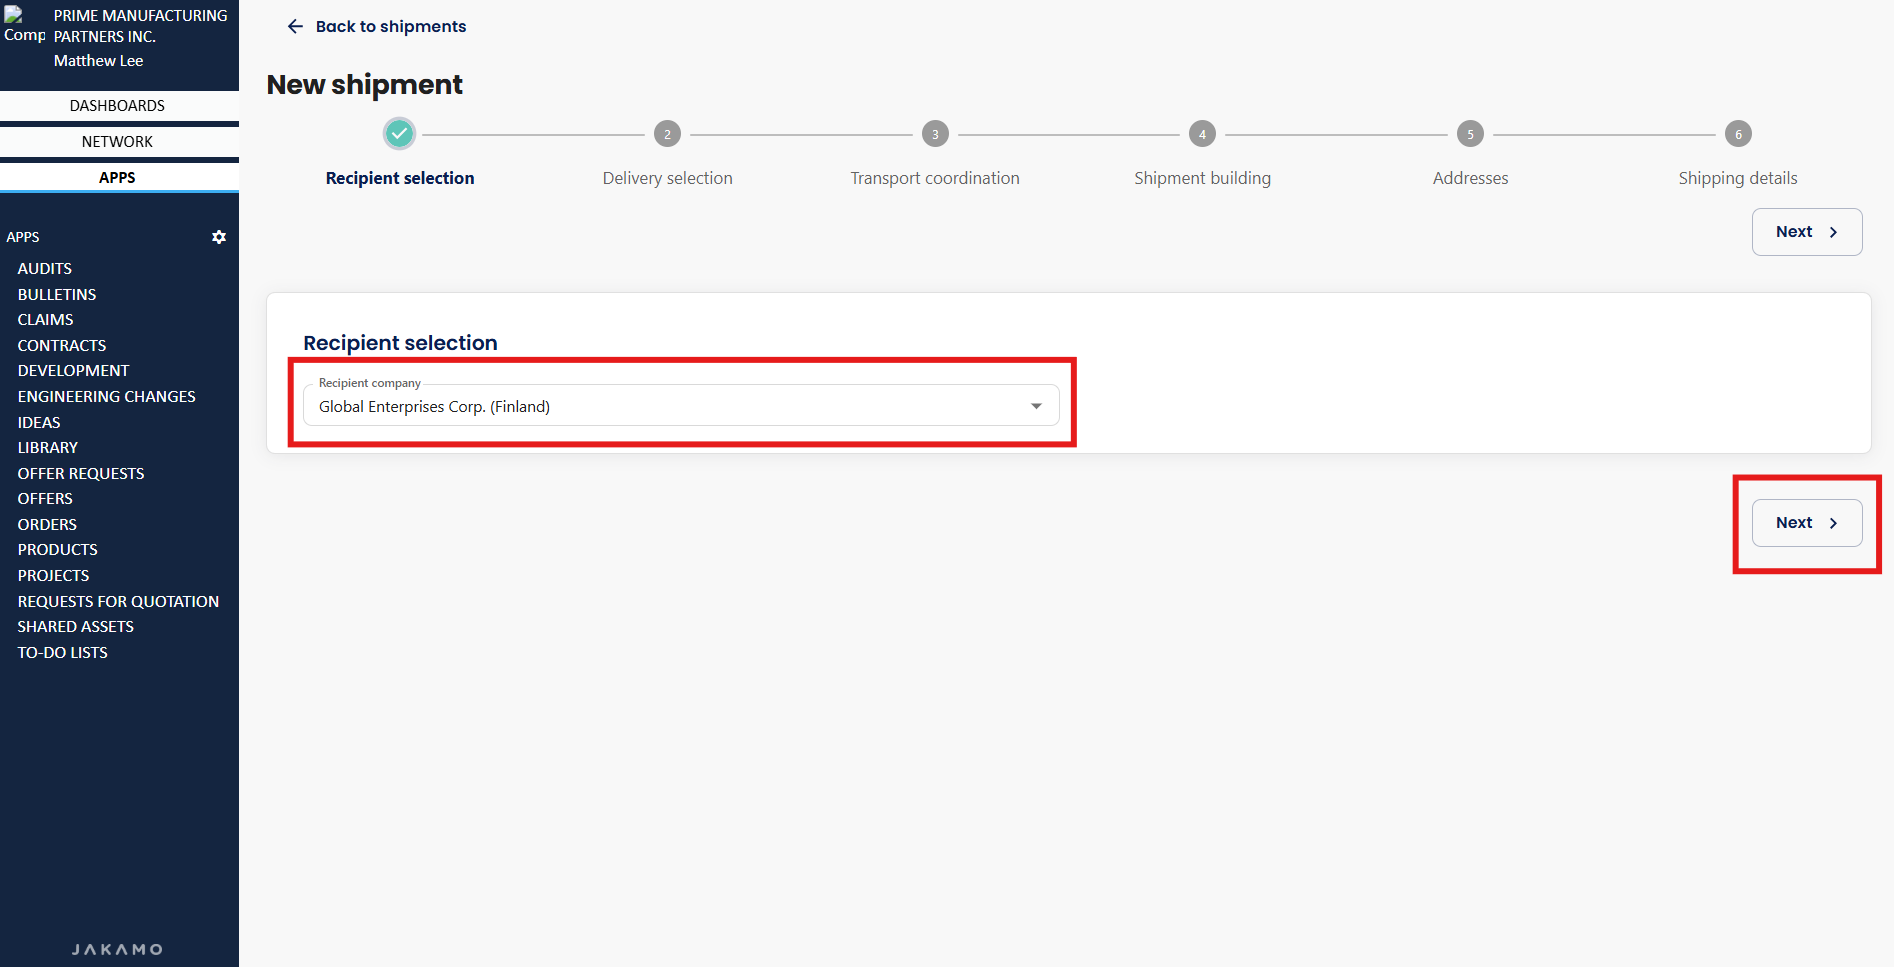
Shipment details
Select the customer from the Recipient company for which you are creating a new ASN, and then select Next.
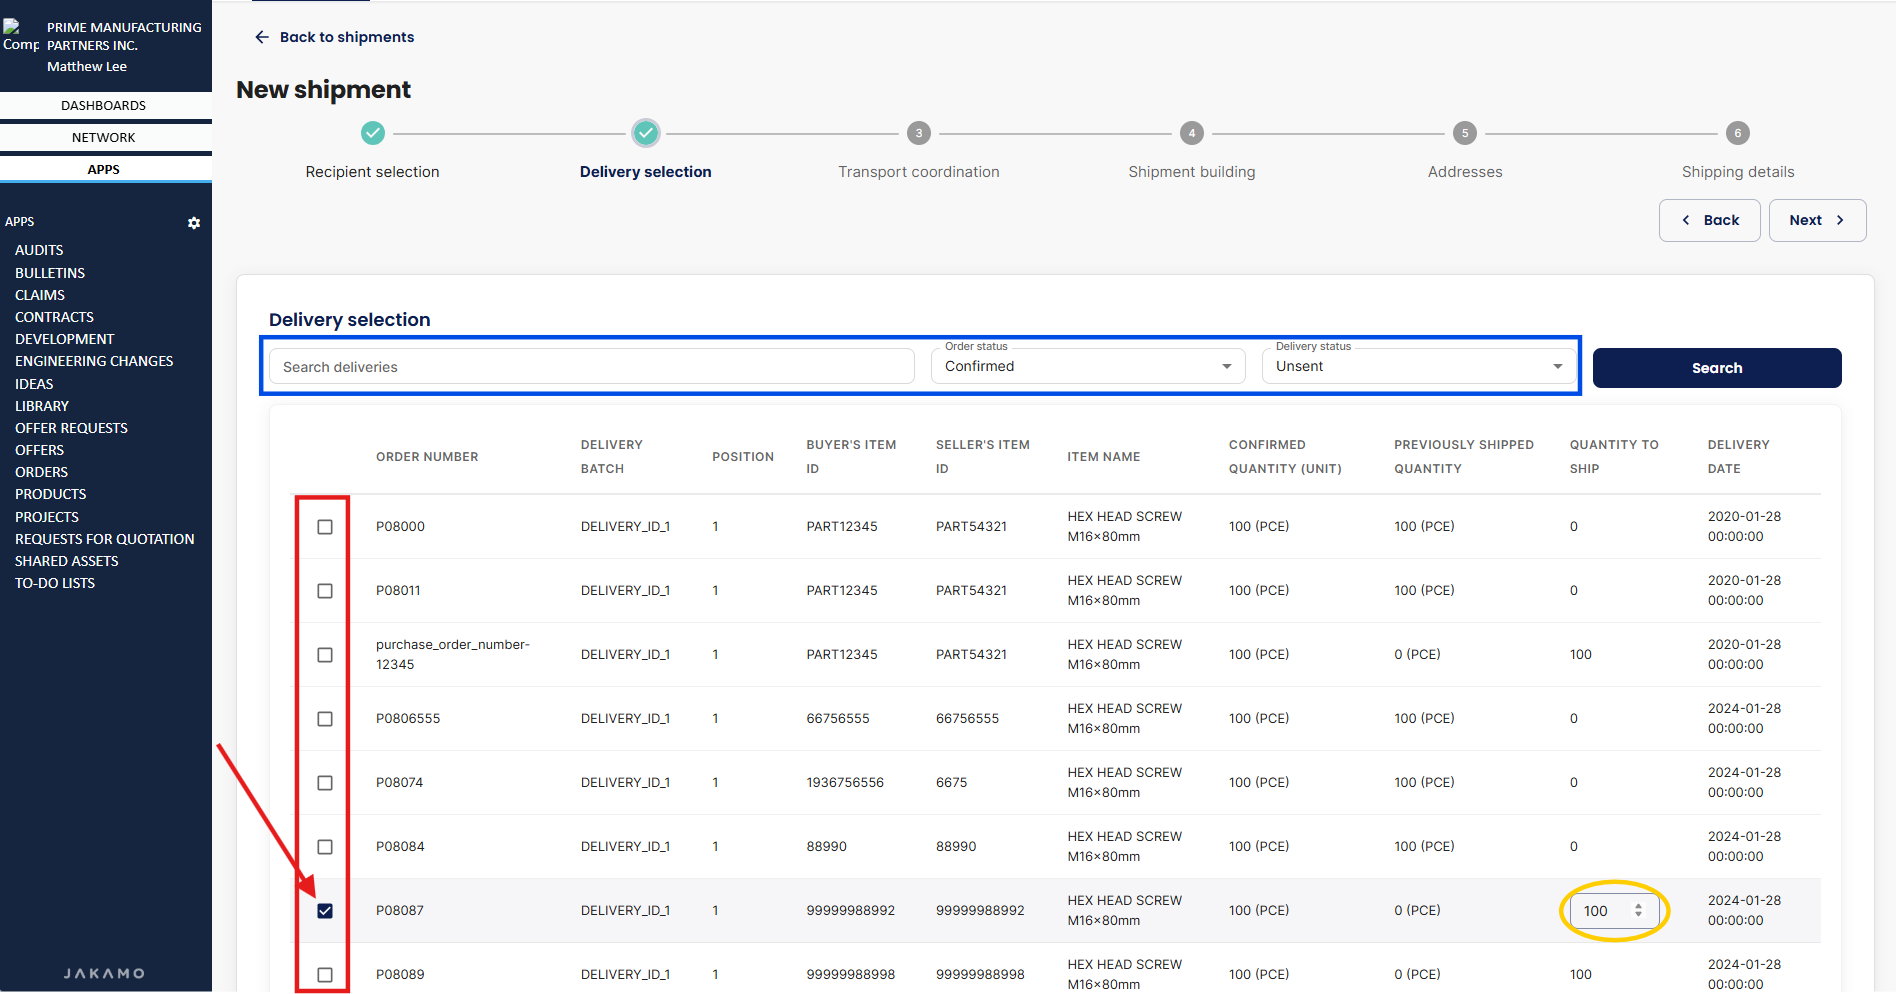
Delivery selection
Select deliveries (delivery batches) you are about to deliver with this shipment by selecting the tickbox of the delivery - marked red. If you are not delivering the full PO line, you can select the quantity to be delivered from the Quantity to ship field - marked yellow. Find desired deliveries by searching with PO number, delivery batch number, item name or item number. User may also filter the search by order status (confirmed or not confirmed) or by the shipment status (all, sent, unsent, received) - marked blue. By default, Jakamo displays confirmed and unshipped orders and delivery batches in the list. To view unconfirmed orders and delivery batches, adjust the search filters by modifying the Order Status and Delivery Status search filters.
 (Please note that you may search multiple different deliveries from different orders, and your selections will remain.)
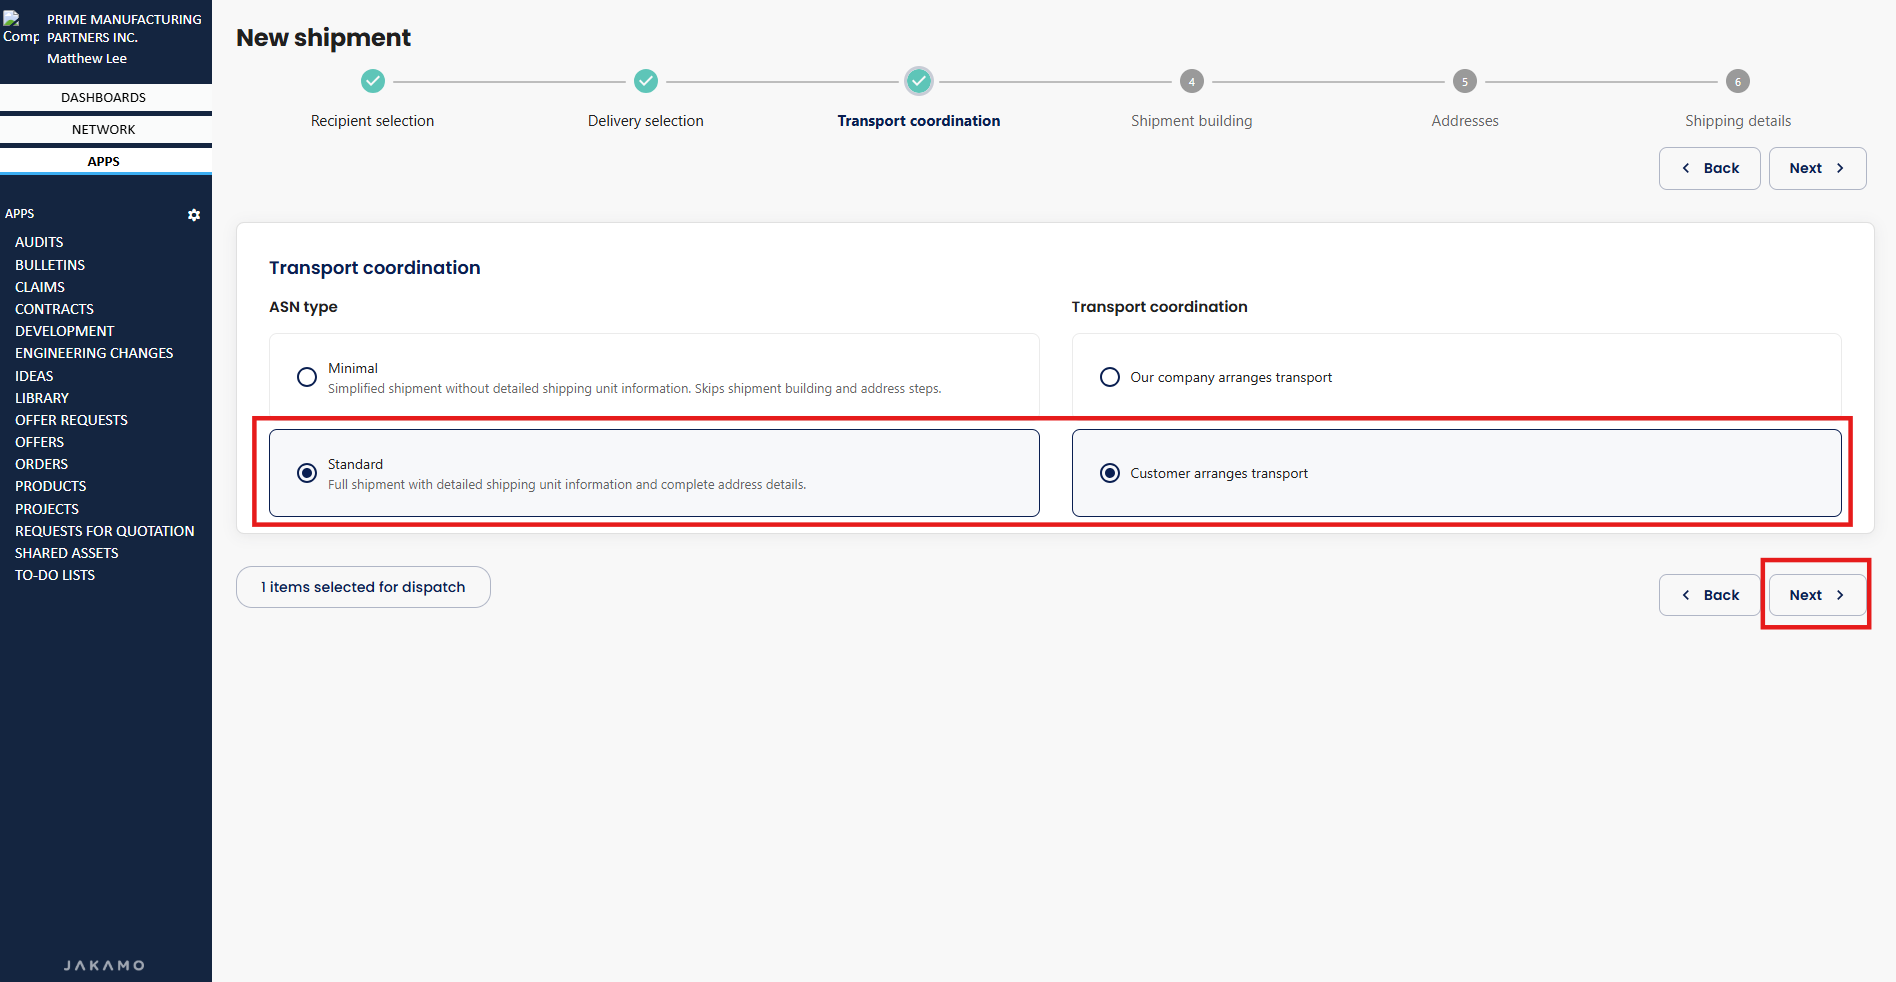
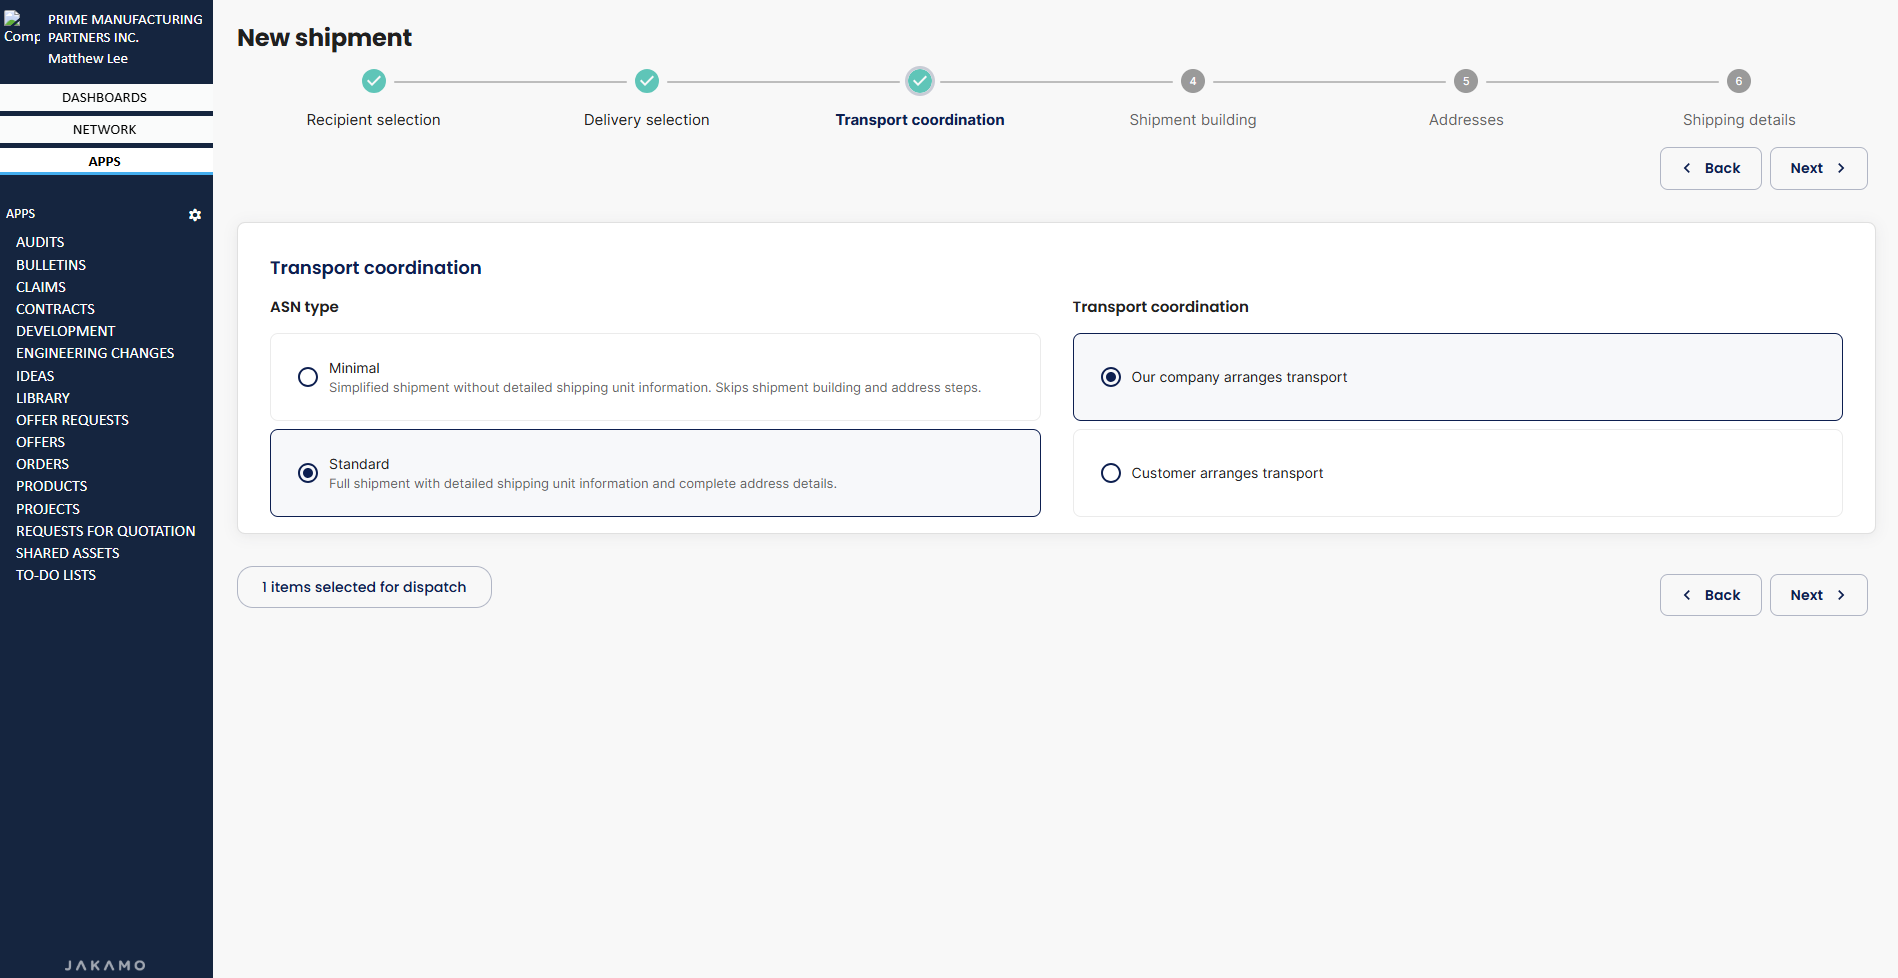
Transport coordination
This step defines who is responsible for arranging the transportation and what will be the content for ASN.
The ASN type determines the required content of the ASN, while Transport coordination defines which party is responsible for arranging the transportation:
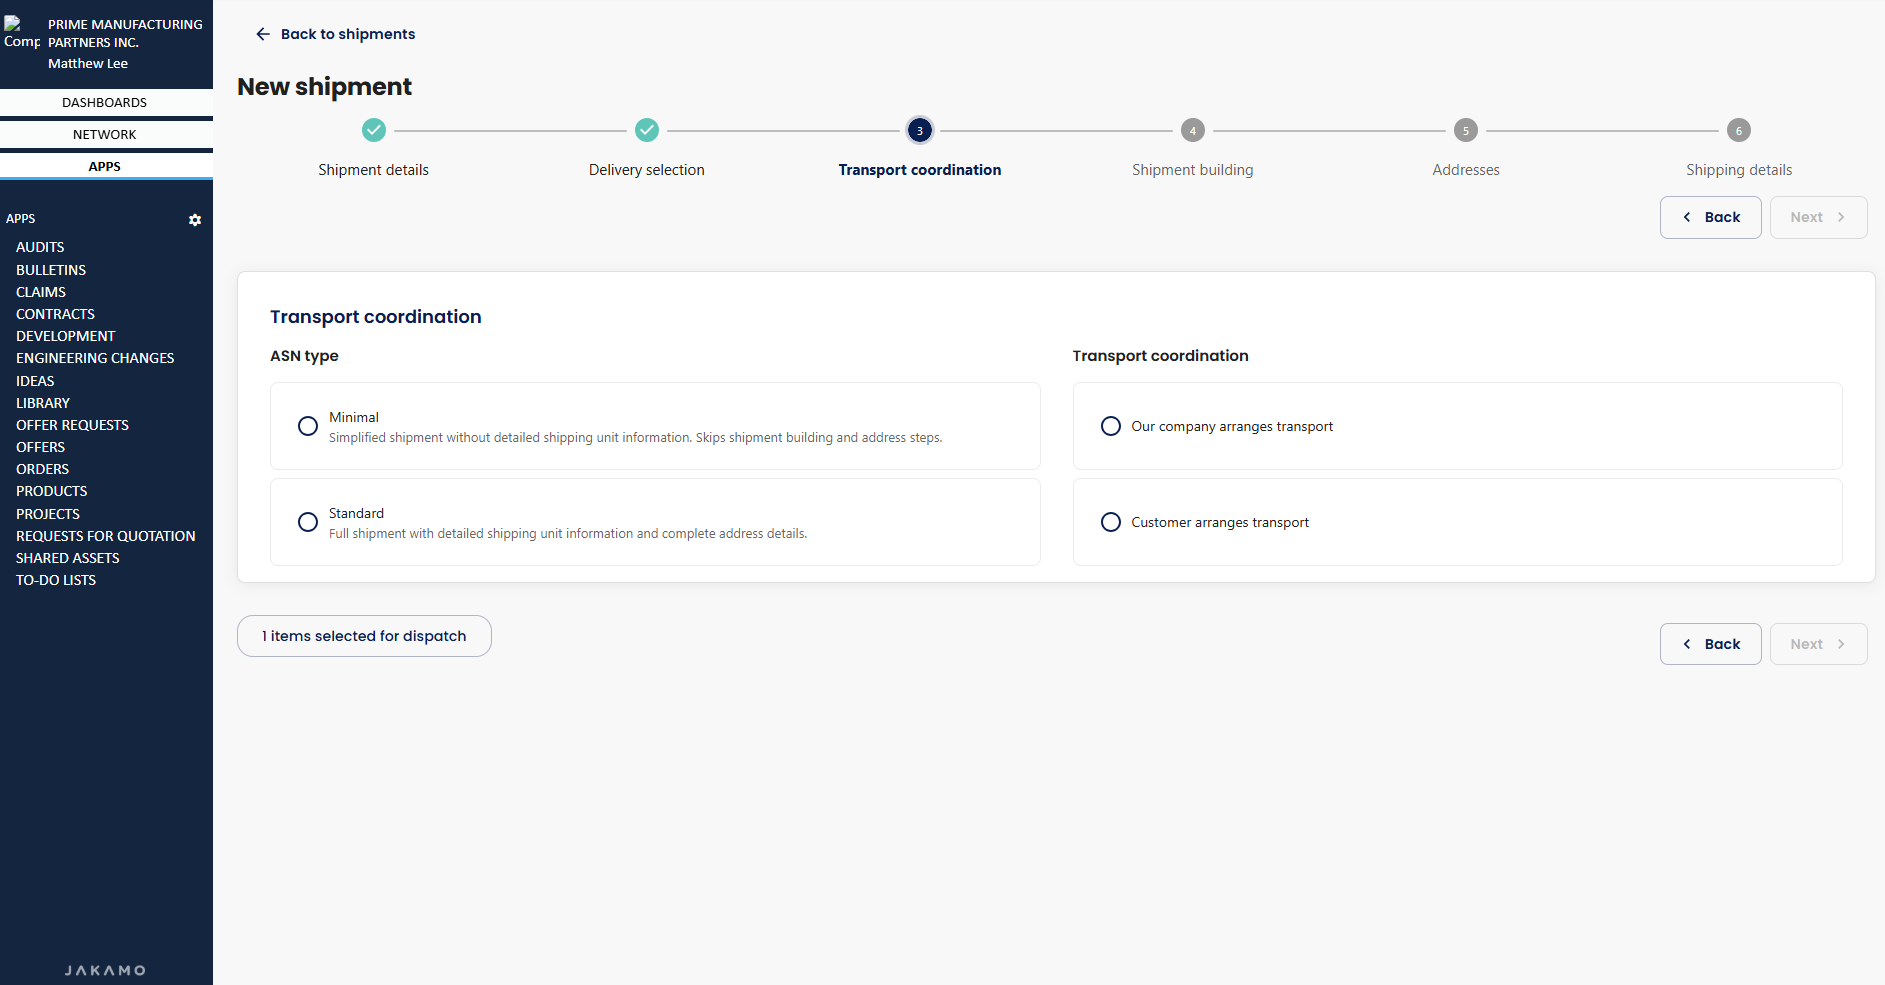
Please note that these options are typically preselected and locked. They usually follow one of these setups:
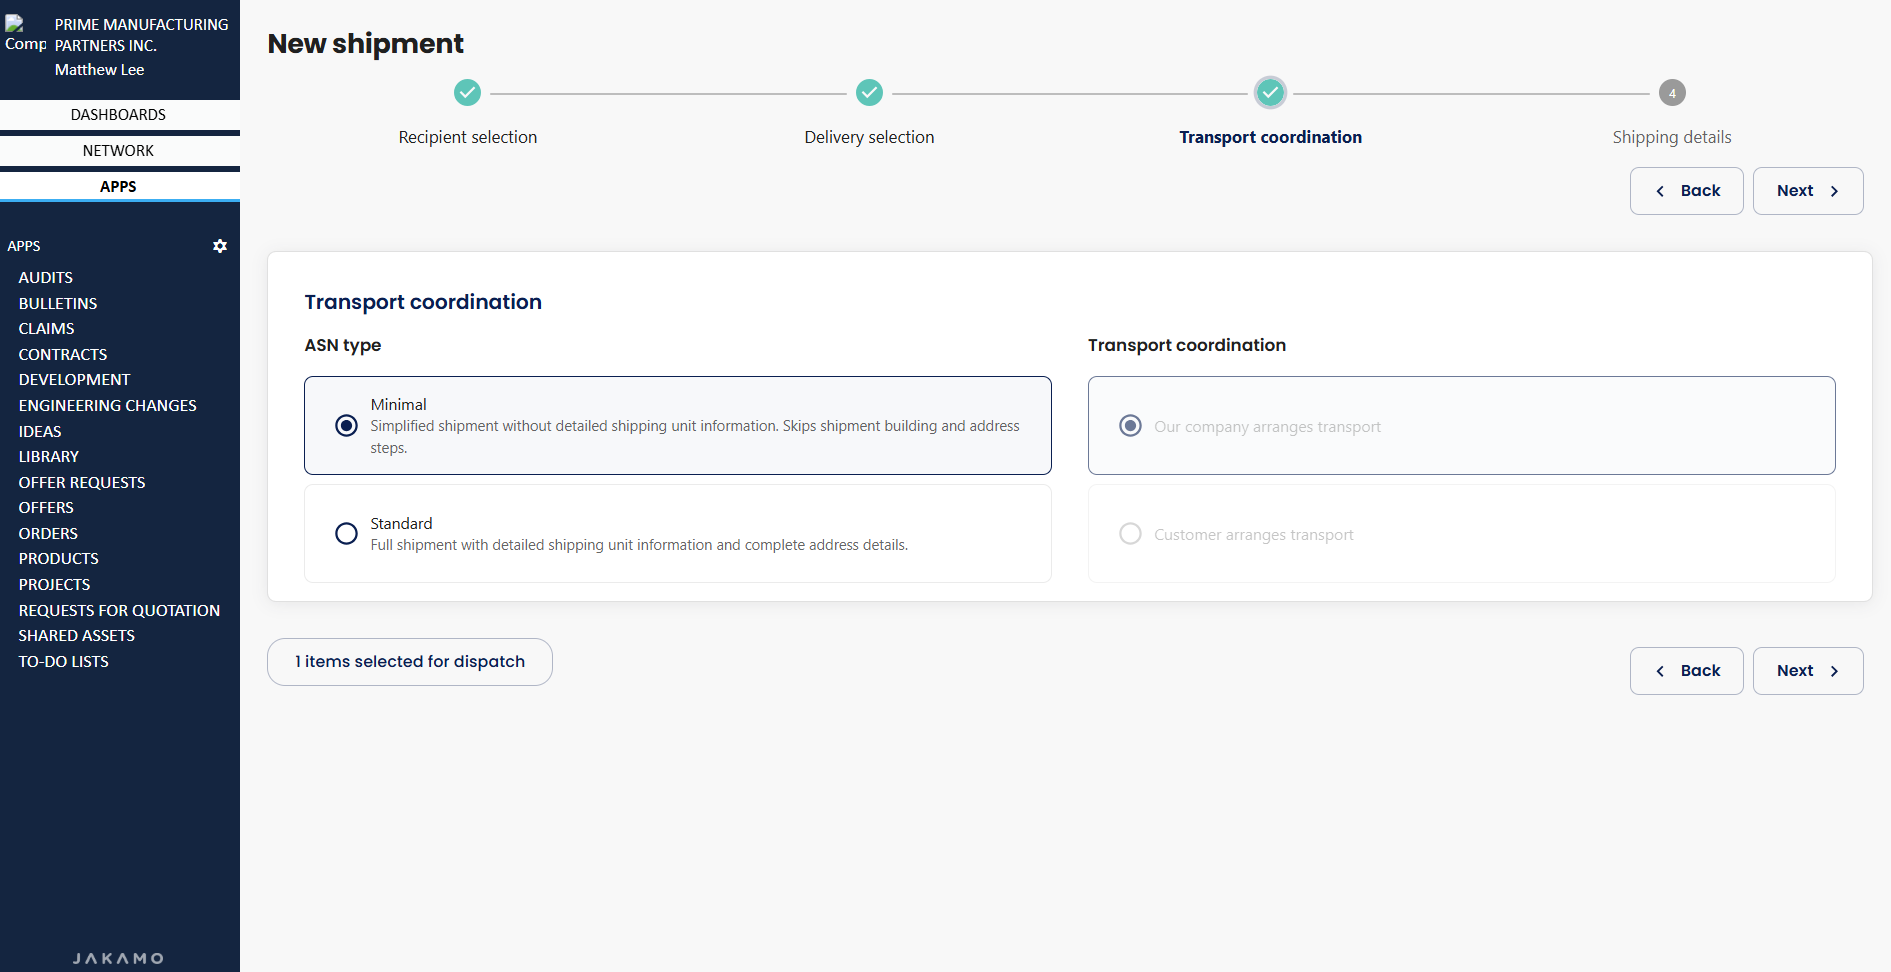
Minimal process (supplier aranges the transportation)
Transport coordination
When the Minimal ASN type is used, the seller (supplier) arranges the transportation. As the buyer (customer) does not need detailed information such as how items are packed, the process is simpler and more straightforward. Before proceeding, make sure to book the transportation in an external system.
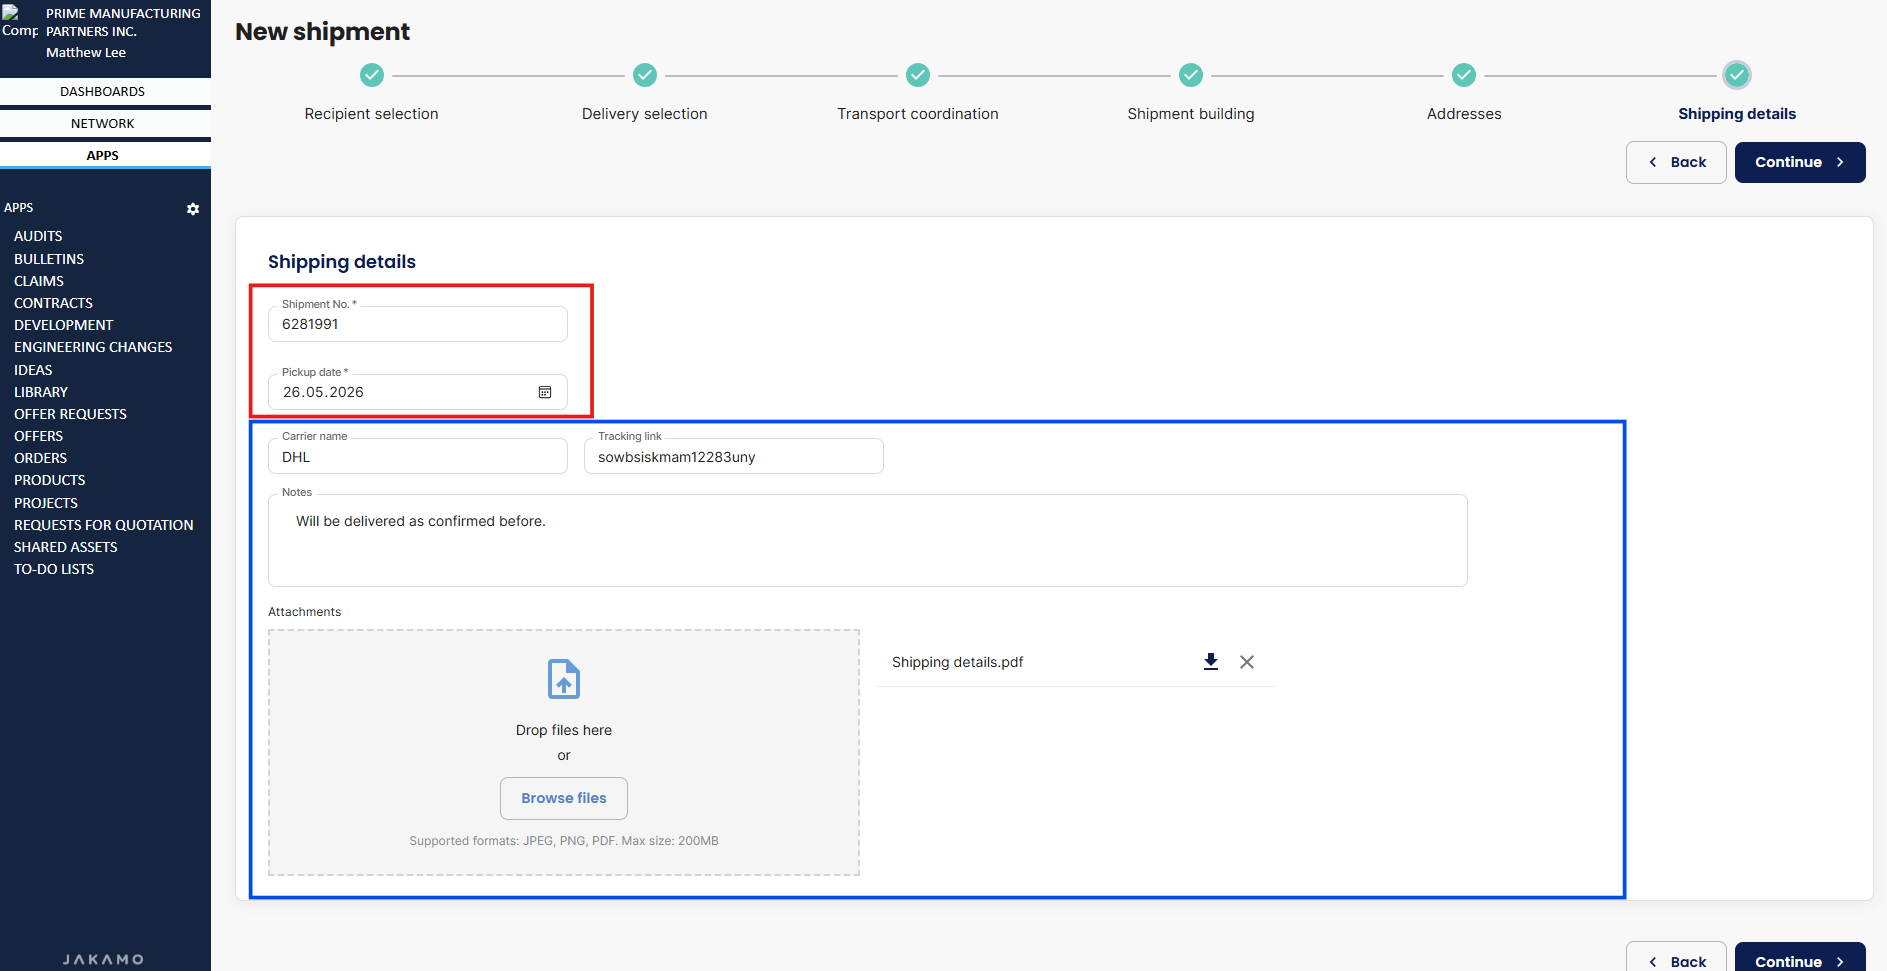
Shipping details
Provide the Shipment No. and Pickup date if they are marked as required with a star icon (*) (shown in red). Since you are arranging the transportation, also provide the required details for the customer, including carrier name, tracking link, notes, and attachments (shown in blue).

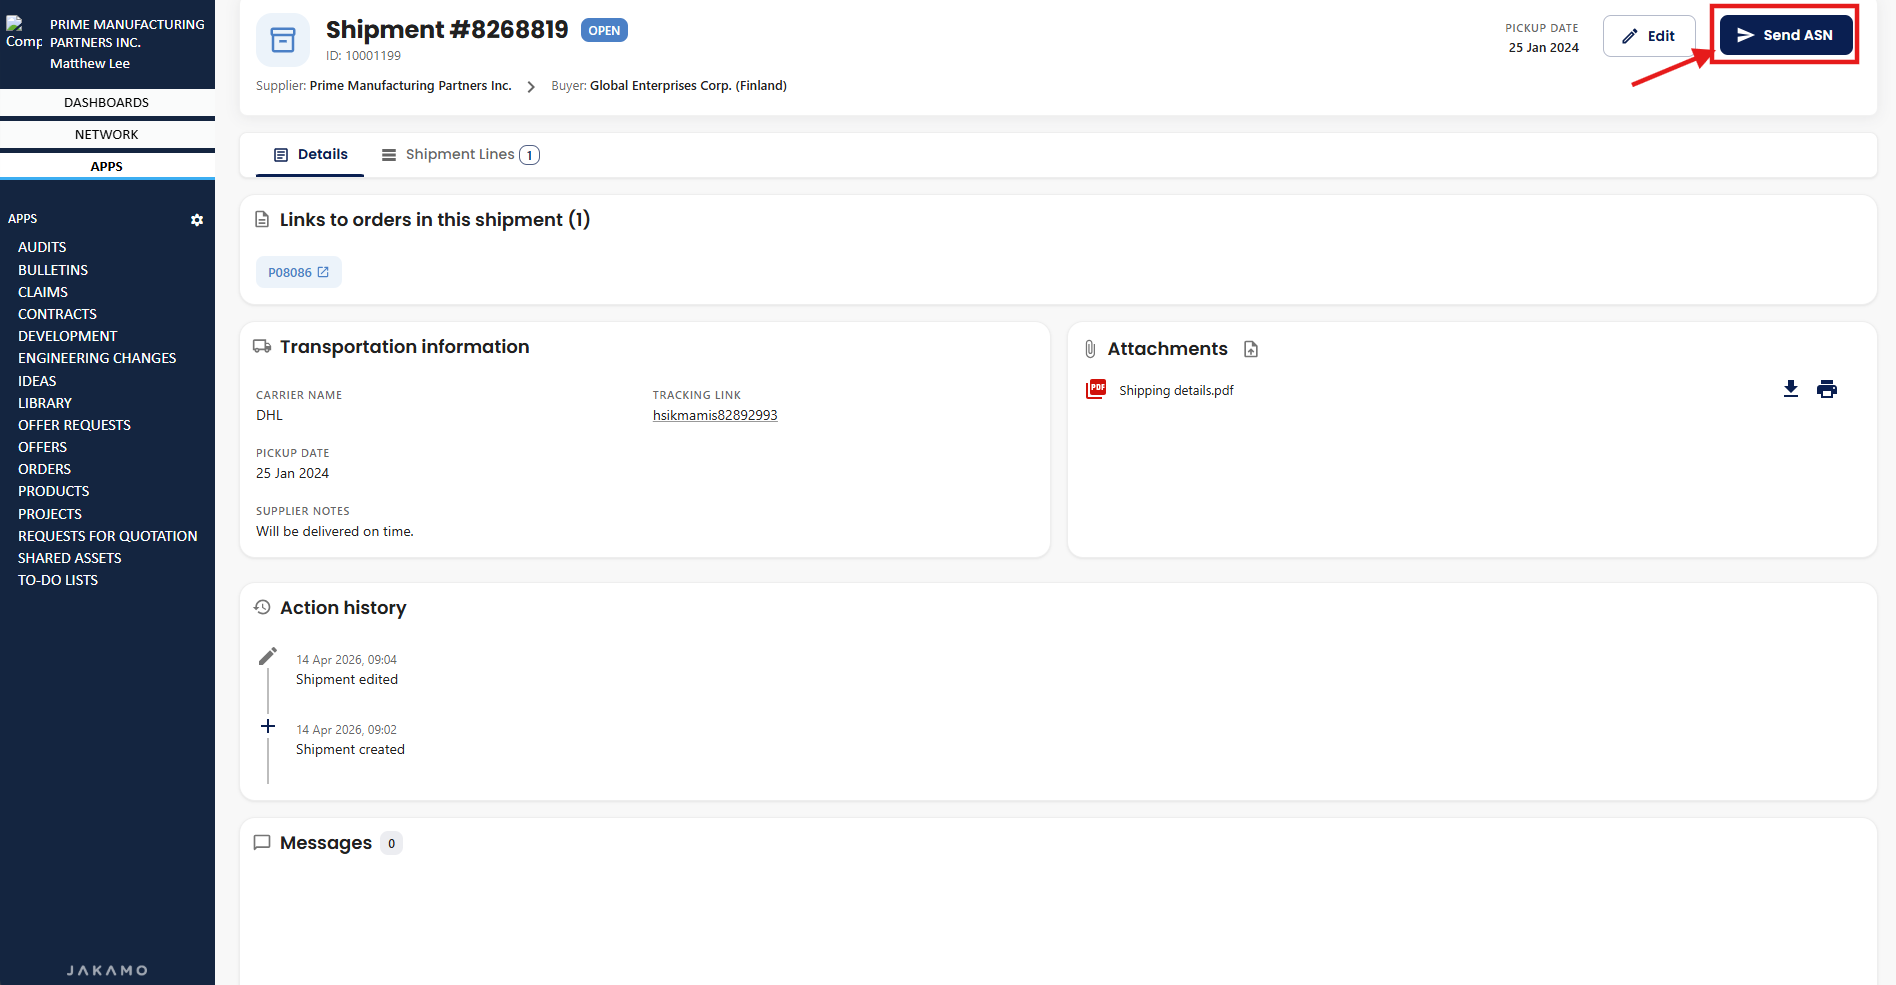
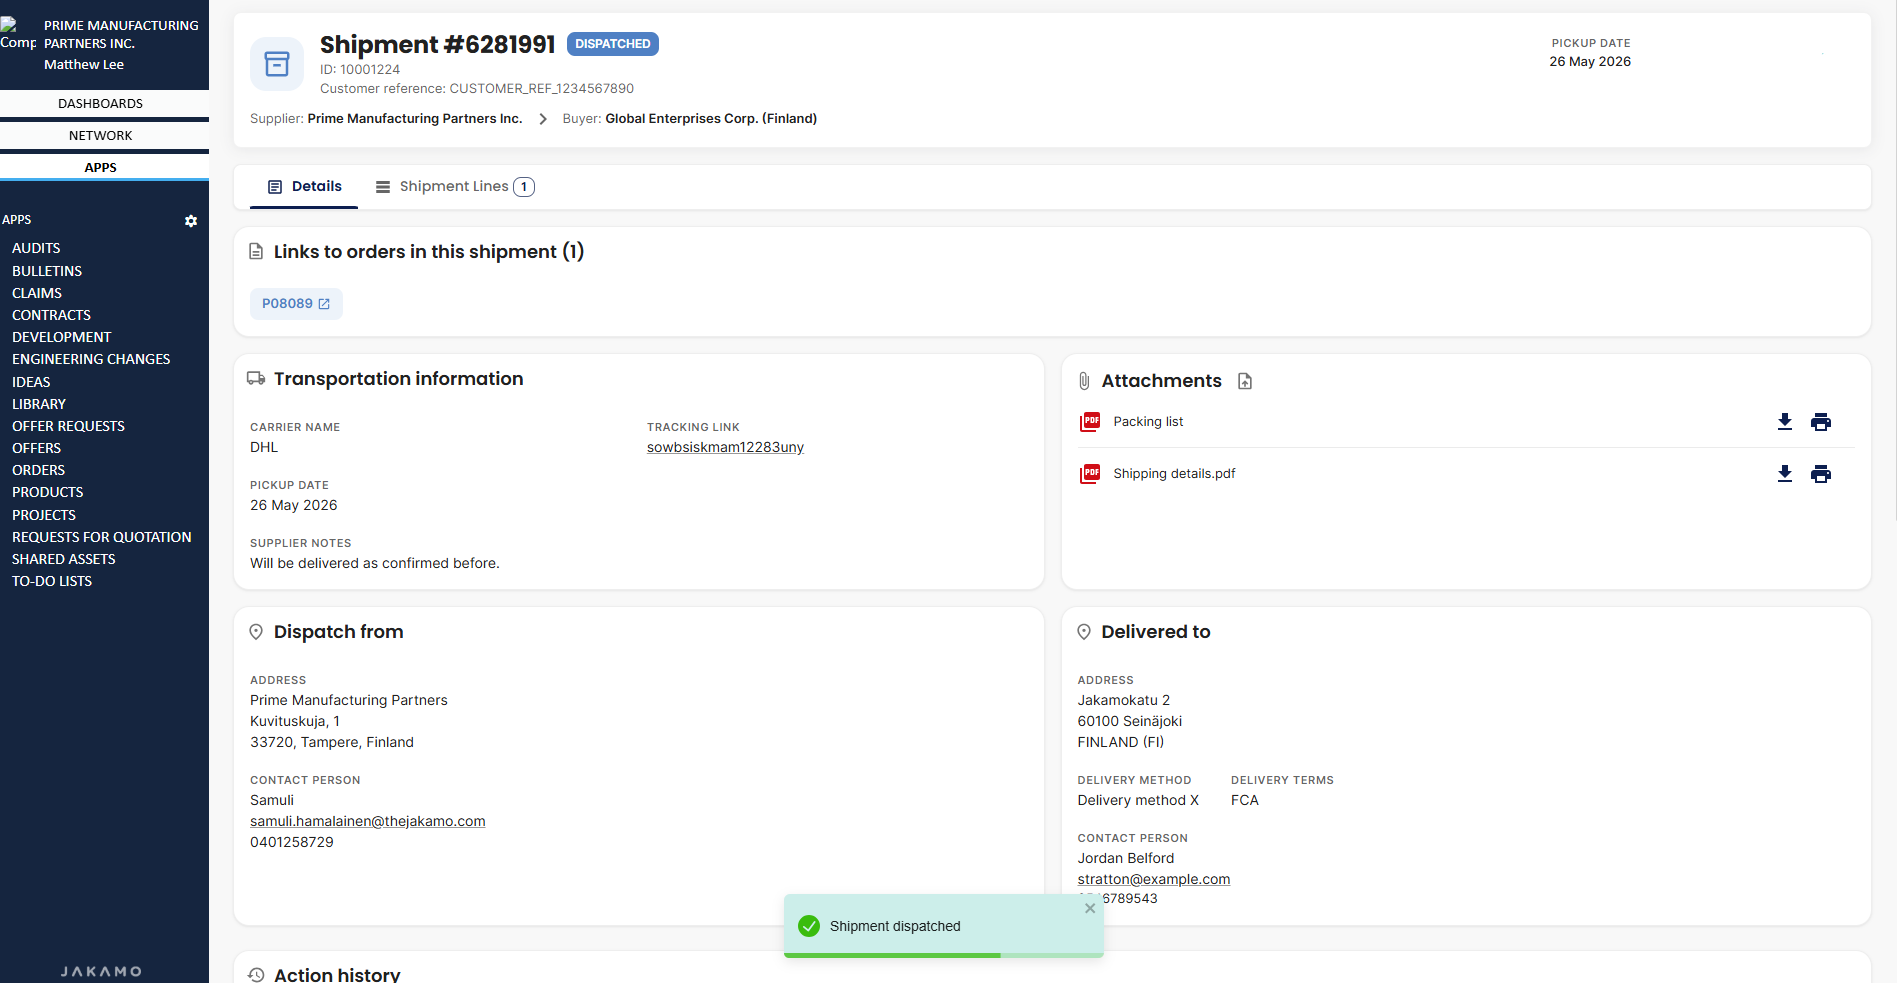
The ASN has now been created and saved, but no notification has yet been sent to the customer. In other words, the customer has not received the ASN information via email, even though the ASN is now visible in the ASN list view. See more about ASN list view and how to access it from here: Jakamo ASN - How to access it? You can also discuss this specific ASN in the Messages section below. This replaces email and other external communication channels, centralizing all information related to the ASN in one place.
Send ASN
The created ASN can still be edited from the top-right corner. Once you are confident that all details are correct, select Send ASN from the top-right corner to notify the customer of the upcoming delivery and share all transportation details.
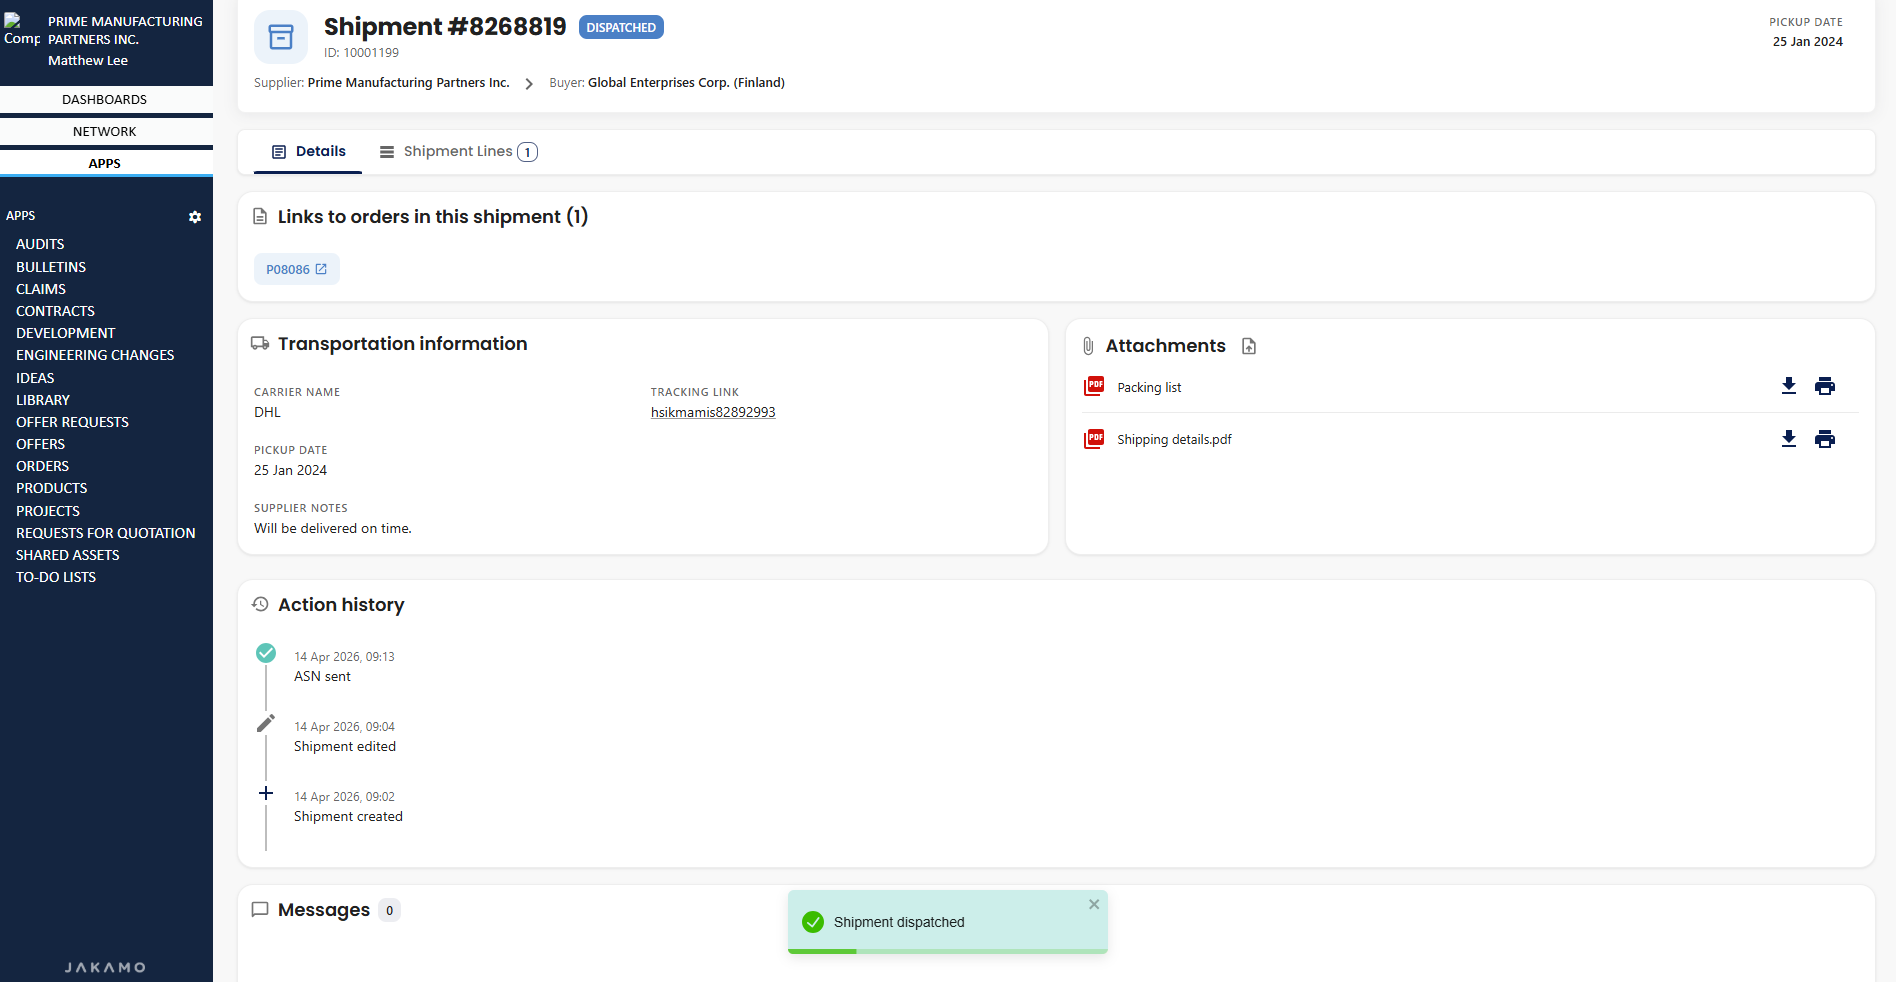
 (Please note that the carrier name, tracking URL, notes, and attachments have been provided and are therefore visible in the Transportation Information section.)
Once Send ASN is selected, the customer is notified with all relevant details, and no additional actions are needed.
Standard process - option 1 (customer aranges the transportation)
Transport coordination
When the Standard ASN type is used, the buyer (customer) is usually responsible for arranging the transportation. This requires the seller (supplier) to provide detailed information about item packaging.
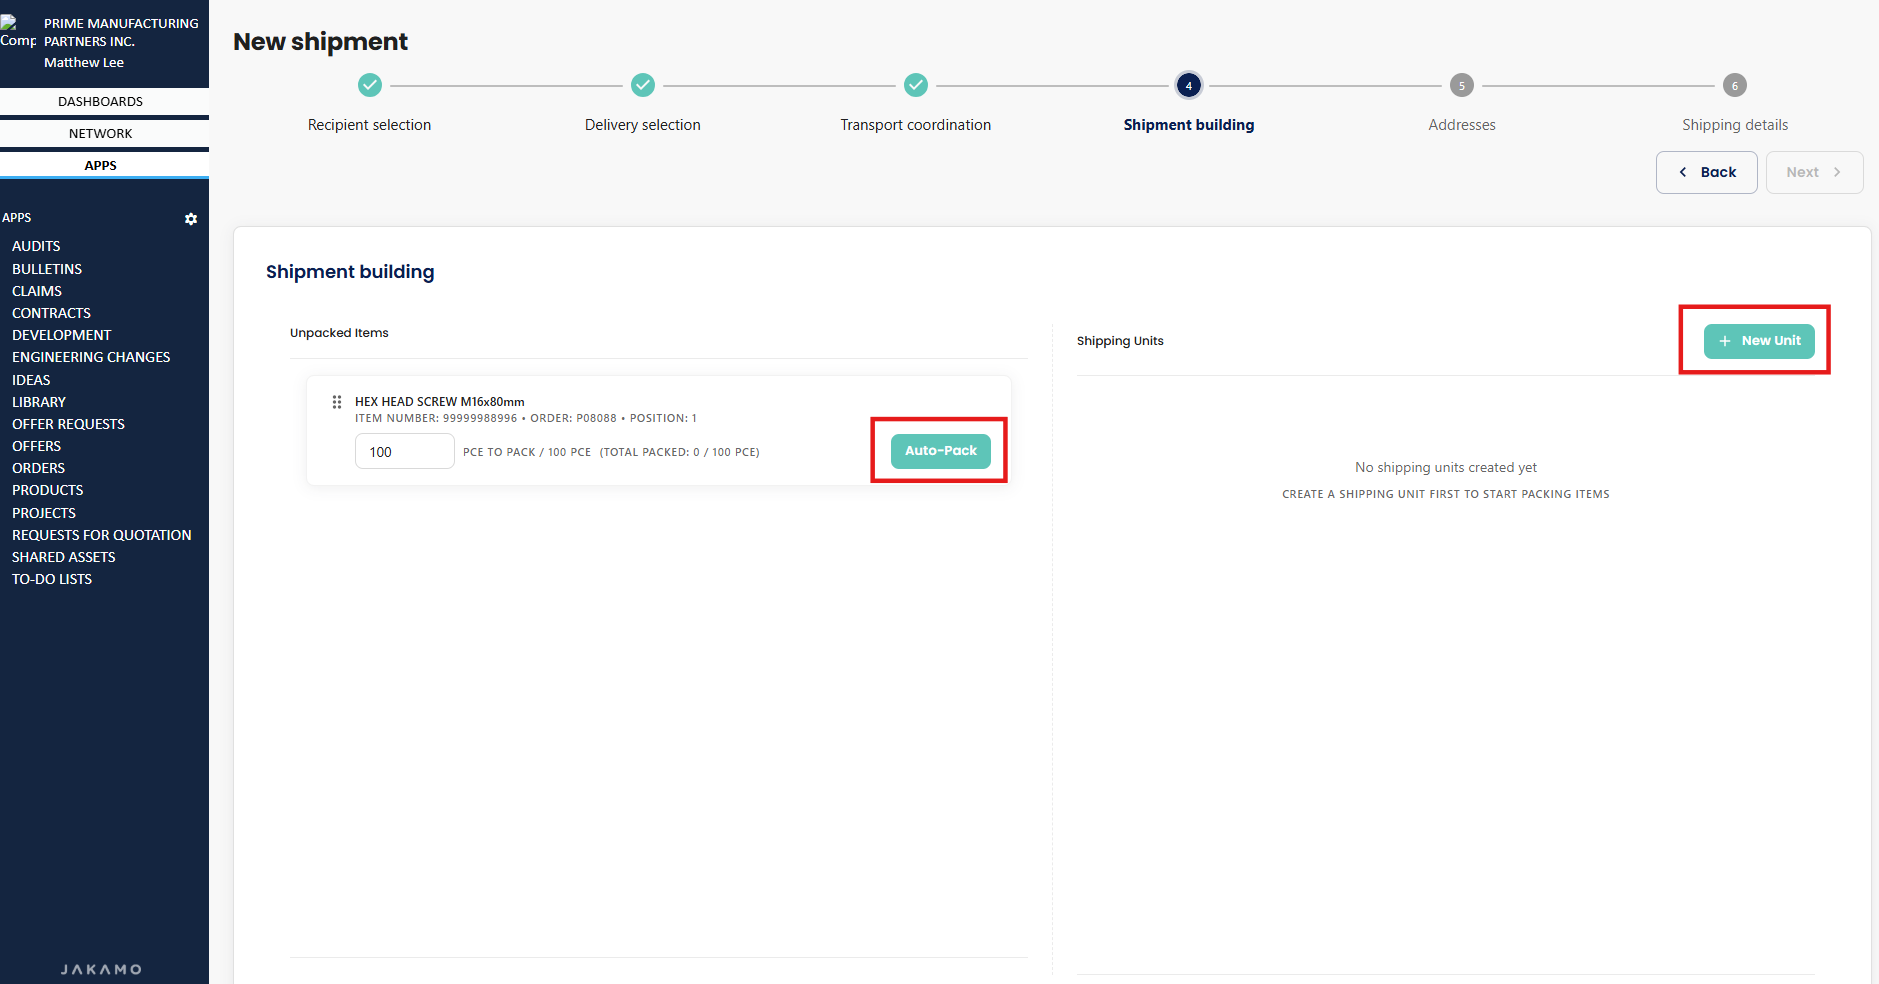
Shipment building
After selecting Next, you are prompted to provide information on how the items have been packed. You can choose between Auto-Pack and Manual Pack (+ New Unit):
- Auto Pack is useful when items are packed into multiple pallets or shipping units. More information is available here: Create multiple shipping units with Auto-pack.
- Manual Pack (+ New Unit) is useful when all items are packed into the same shipping unit. More information can be found here: Create shipping units manually.
Addresses
The Addresses section defines where the items will be collected (dispatch information) and where they will be delivered (delivery information). For more details, see here: Addresses.
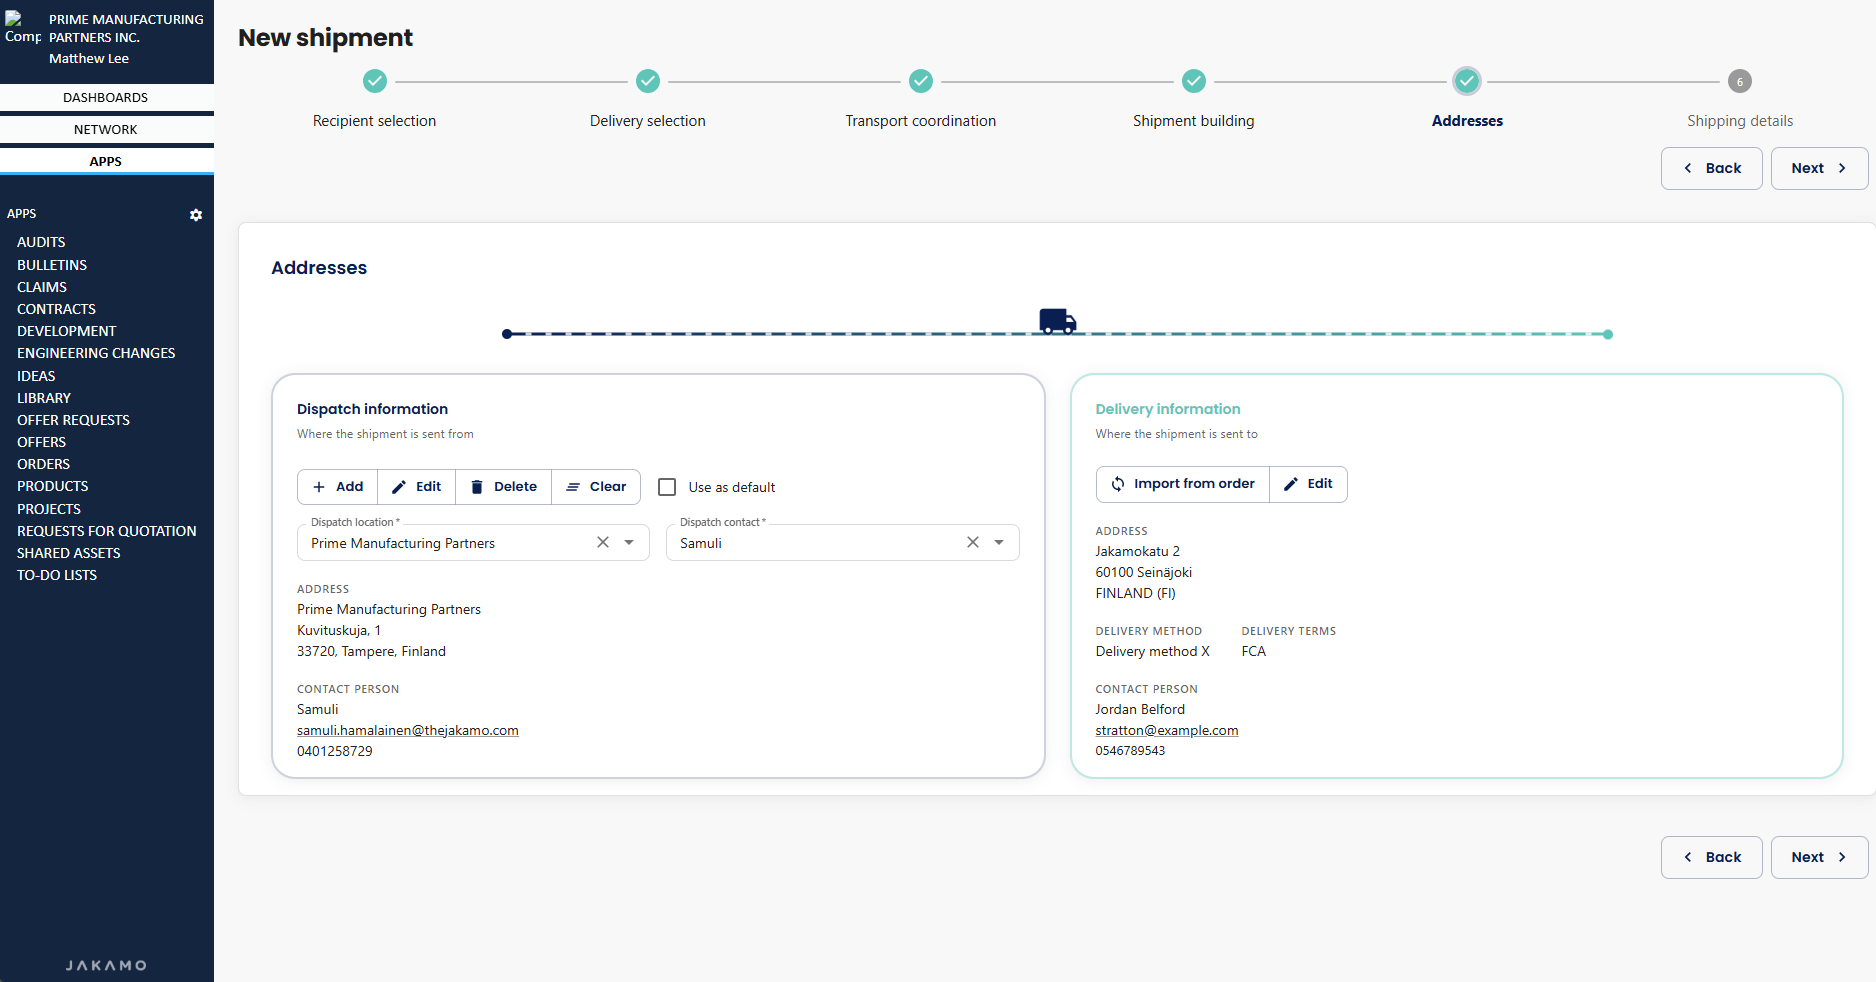
Shipping details
To finish creating the ASN and save all details, provide the Shipment No. and Shipping date if they are marked as required with a star icon (*). Then select Continue.
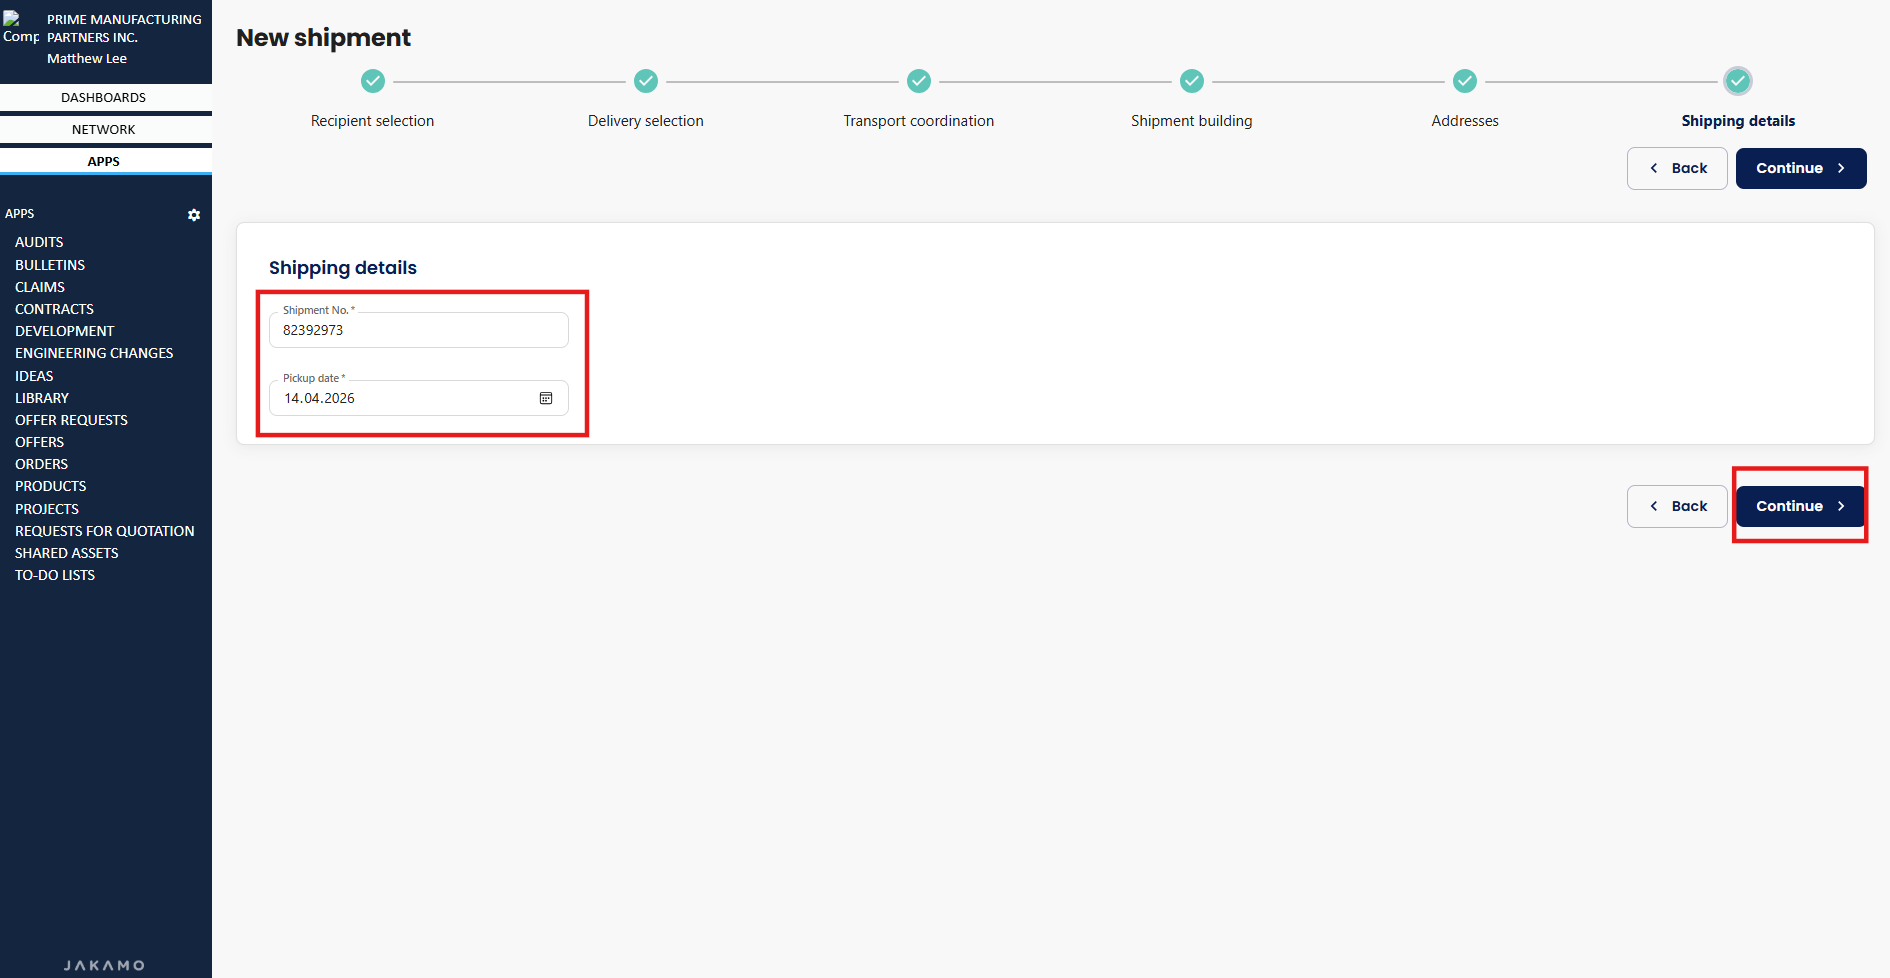
The ASN has now been created and saved, but no notification has yet been sent to the customer. In other words, the customer has not received the ASN information via email, even though the ASN is now visible in the ASN list view. See more about ASN list view and how to access it from here: Jakamo ASN - How to access it? You can also discuss this specific ASN in the Messages section below. This replaces email and other external communication channels, centralizing all information related to the ASN in one place.
Request transportation
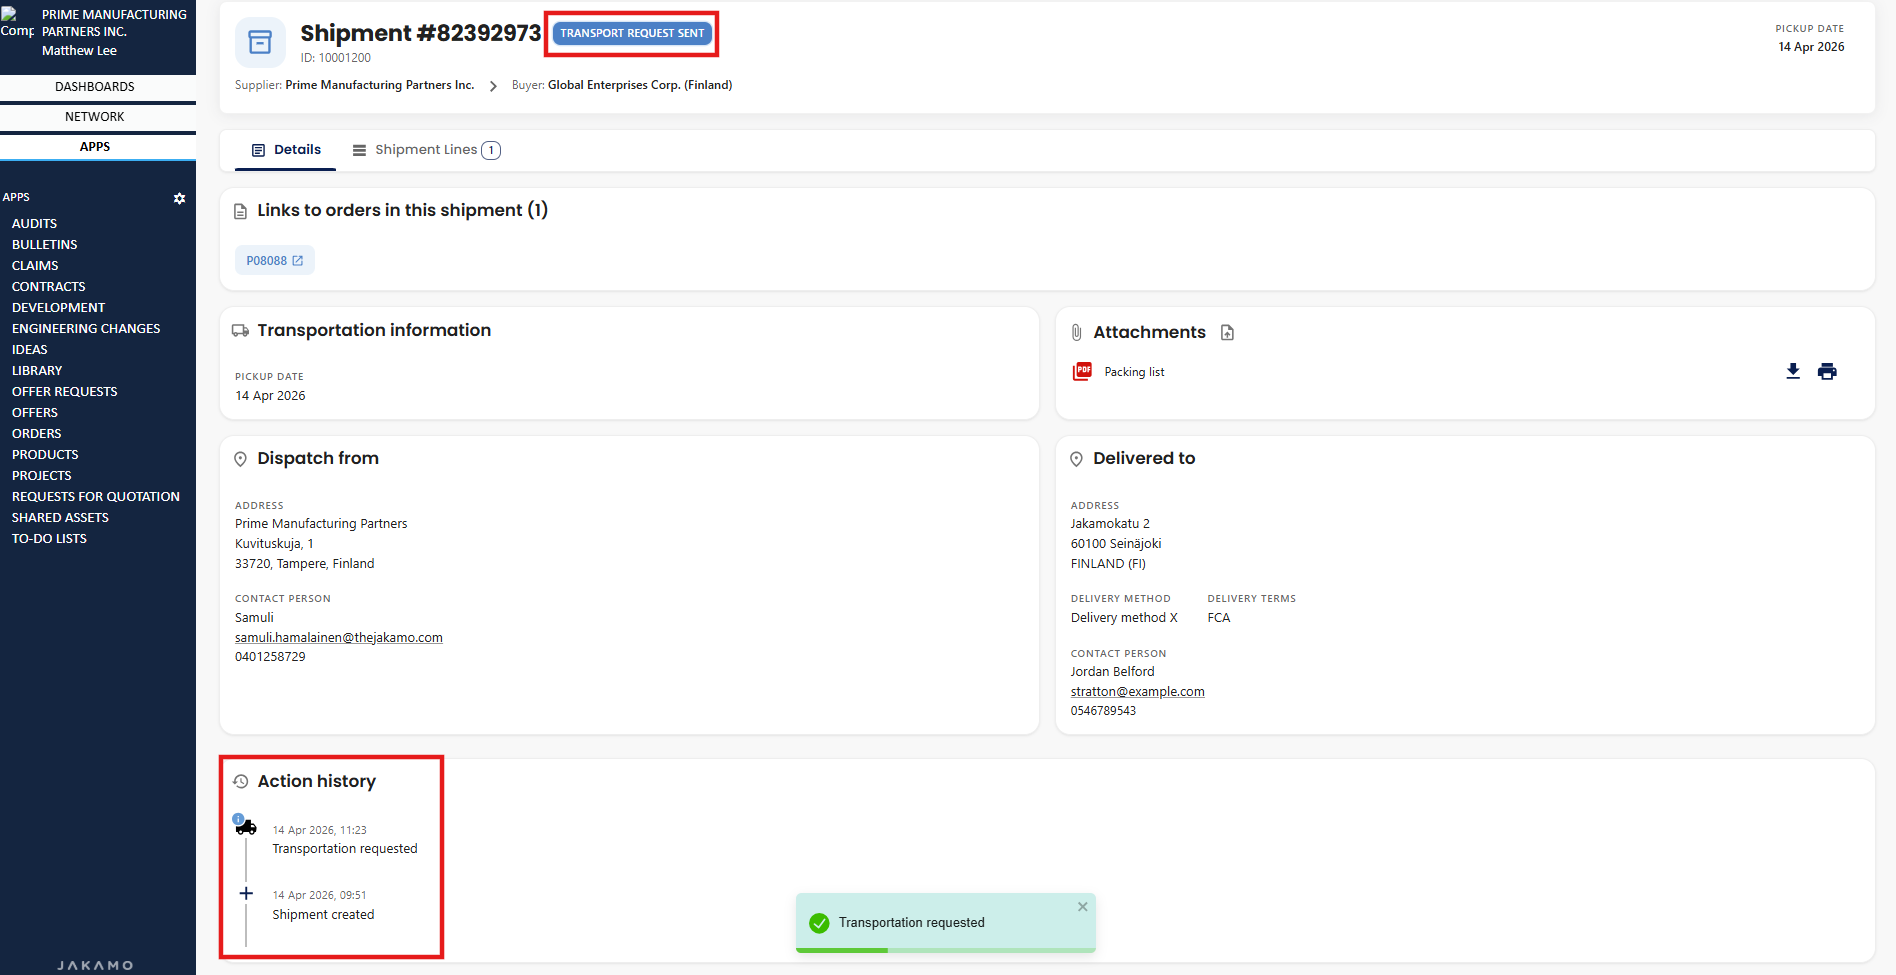
The created ASN can still be edited from the top-right corner. Once you are confident that the details will not change and you are ready to request the customer to arrange transportation, select Request transportation from the top-right corner. This will send an email notification to the customer regarding the transportation request.

The transport request has now been sent, and you can verify this from the status and action history. The customer (buyer) has also received an email notification about the request.
Send ASN
Once the customer has booked the transportation, they will provide all required details—such as the carrier name, tracking URL, notes, and attachments—which you can view from Transport information (marked red). If the details are correct, select Send ASN to confirm them (marked blue). Otherwise, contact the customer using the Discussion section.
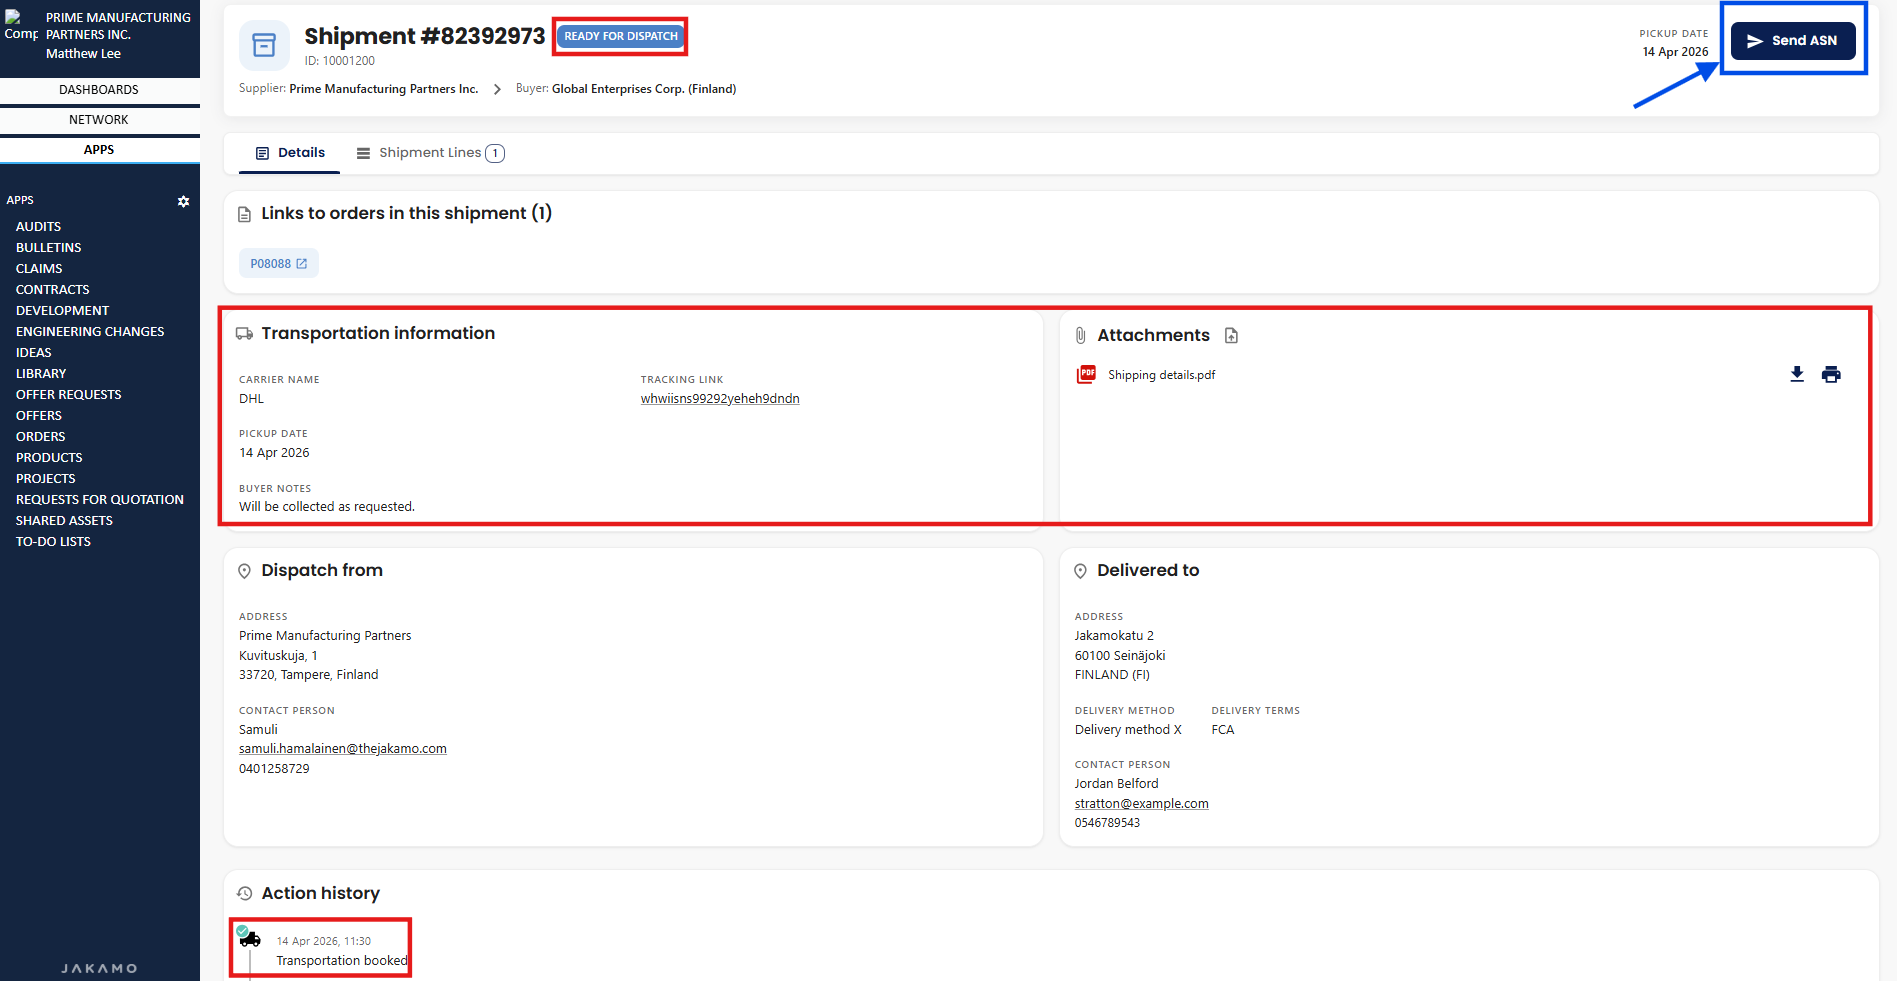 (Please note that you will also receive an email notification when this information is provided, if email notifications are enabled. See more about notifications from here: Notifications.)
Mark as collected
The final step is to select Mark Collected and provide the collection date and time. Please note that this should be the actual date and time when the items were physically collected from your site by the carrier.
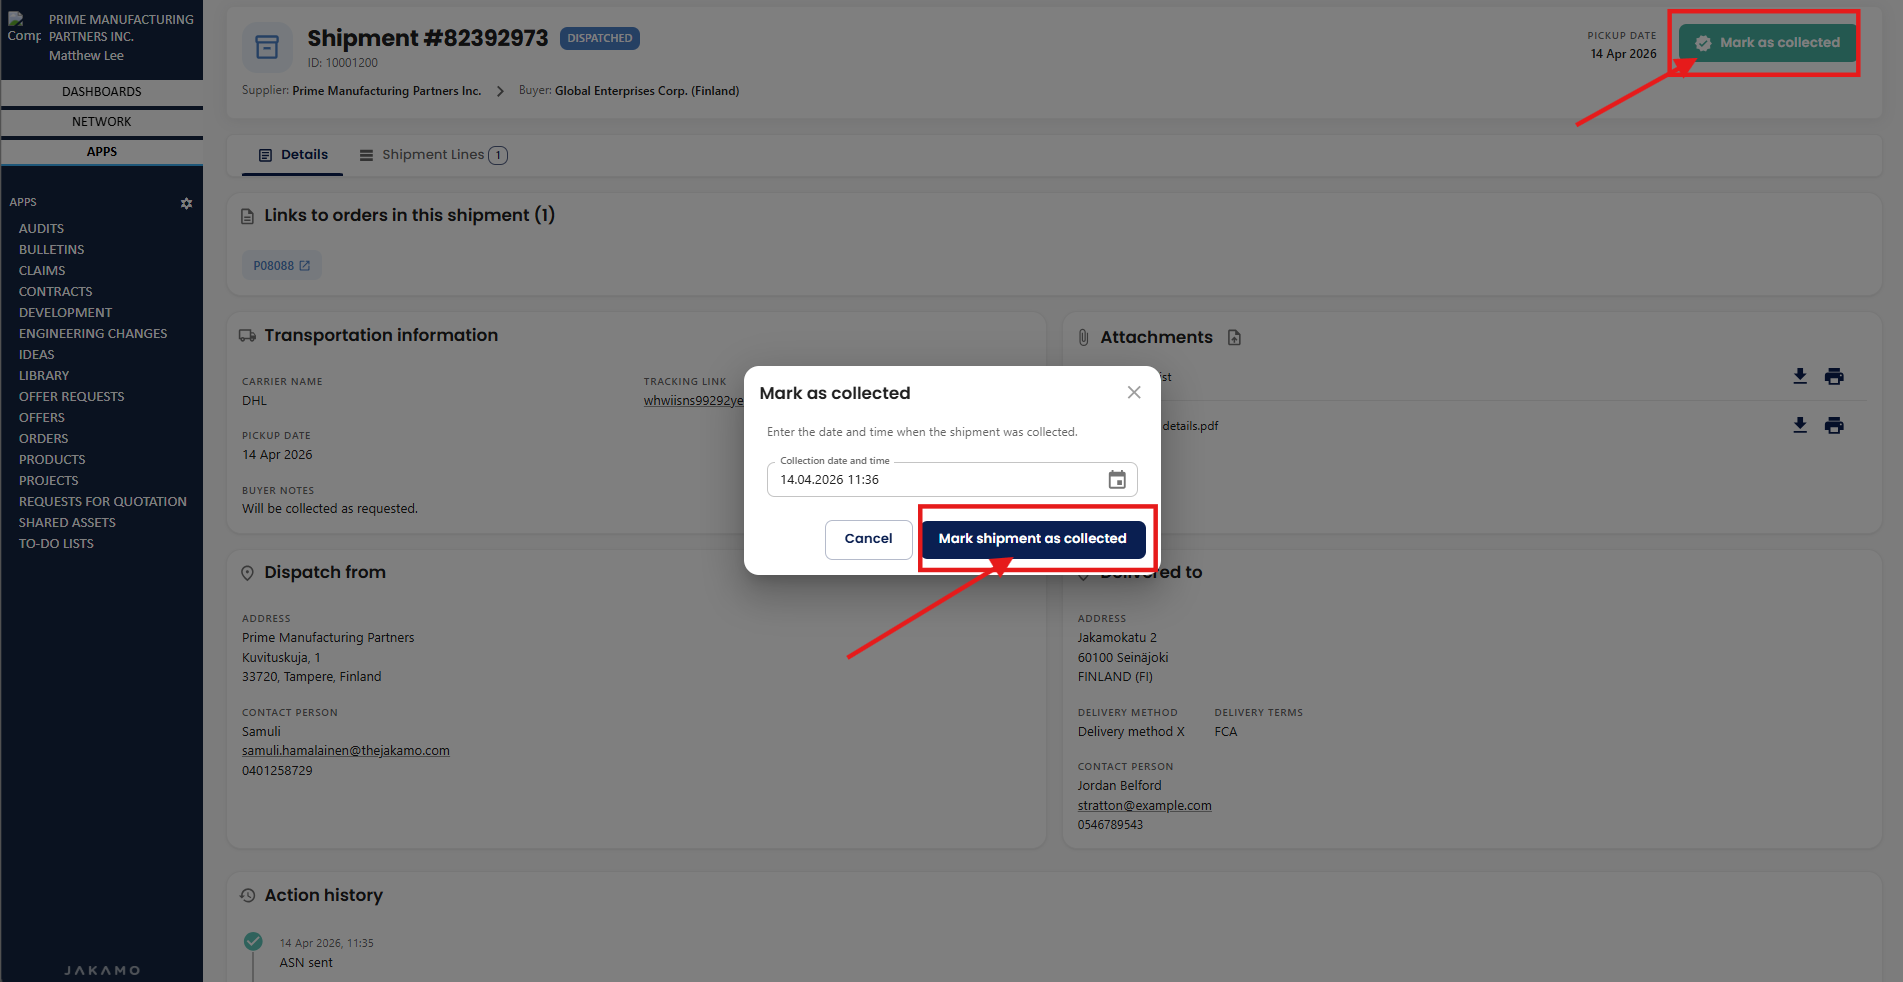
All steps are now complete. (You can view the action history and still communicate with the other party via the discussion section if needed.)
Standard process - option 2 (supplier aranges the transportation)
If the customer needs information about how items have been packed and the supplier is responsible for arranging transportation, follow the instructions below.
Transport coordination
Shipment building
After selecting Next, you are prompted to provide information on how the items have been packed. You can choose between Auto-Pack and Manual Pack (+ New Unit):
- Auto Pack is useful when items are packed into multiple pallets or shipping units. More information is available here: Create multiple shipping units with Auto-pack.
- Manual Pack (+ New Unit) is useful when all items are packed into the same shipping unit. More information can be found here: Create shipping units manually.
Addresses
The Addresses section defines where the items will be collected (dispatch information) and where they will be delivered (delivery information). For more details, see here: Addresses.
Shipping details
Provide the Shipment No. and Pickup date if they are marked as required with a star icon (*) (shown in red). Since you are arranging the transportation, also provide the required details for the customer, including carrier name, tracking link, notes, and attachments (shown in blue).
The ASN has now been created and saved, but no notification has yet been sent to the customer. In other words, the customer has not received the ASN information via email, even though the ASN is now visible in the ASN list view. See more about ASN list view and how to access it from here: Jakamo ASN - How to access it? You can also discuss this specific ASN in the Messages section below. This replaces email and other external communication channels, centralizing all information related to the ASN in one place.
Send ASN
The created ASN can still be edited from the top-right corner. Once you are confident that all details are correct, select Send ASN from the top-right corner to notify the customer of the upcoming delivery and share all transportation details.
 (Please note that the carrier name, tracking URL, notes, and attachments have been provided and are therefore visible in the Transportation Information section.)
Once Send ASN is selected, the customer is notified with all relevant details, and no additional actions are needed.
5. Settings
Customers can customize the requested / optional fields and process phases in the settings:
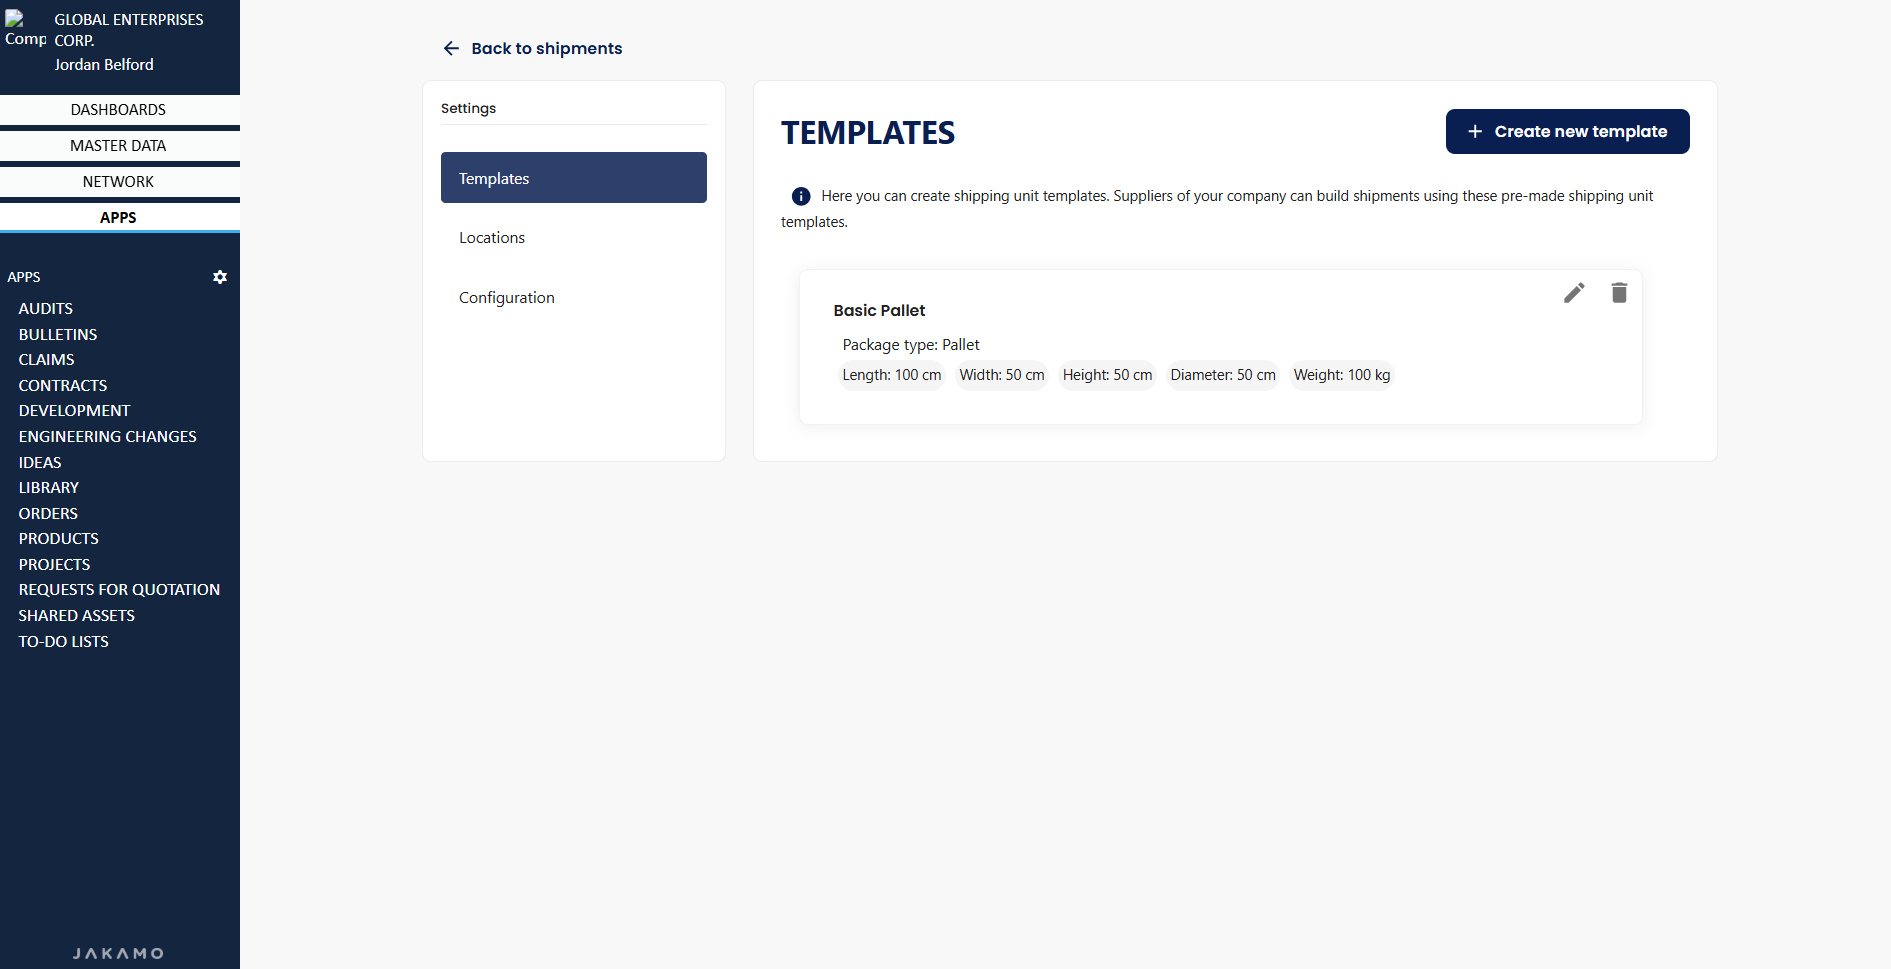
5.1 Templates
Templates can be used to standardize the shipment units and the their measurements. Templates are dedicated for customer company to pre-define shipping units, for example pallets or boxes with spesific sizes. Suppliers can then build shipments faster and easier by using these pre-made shipping units.
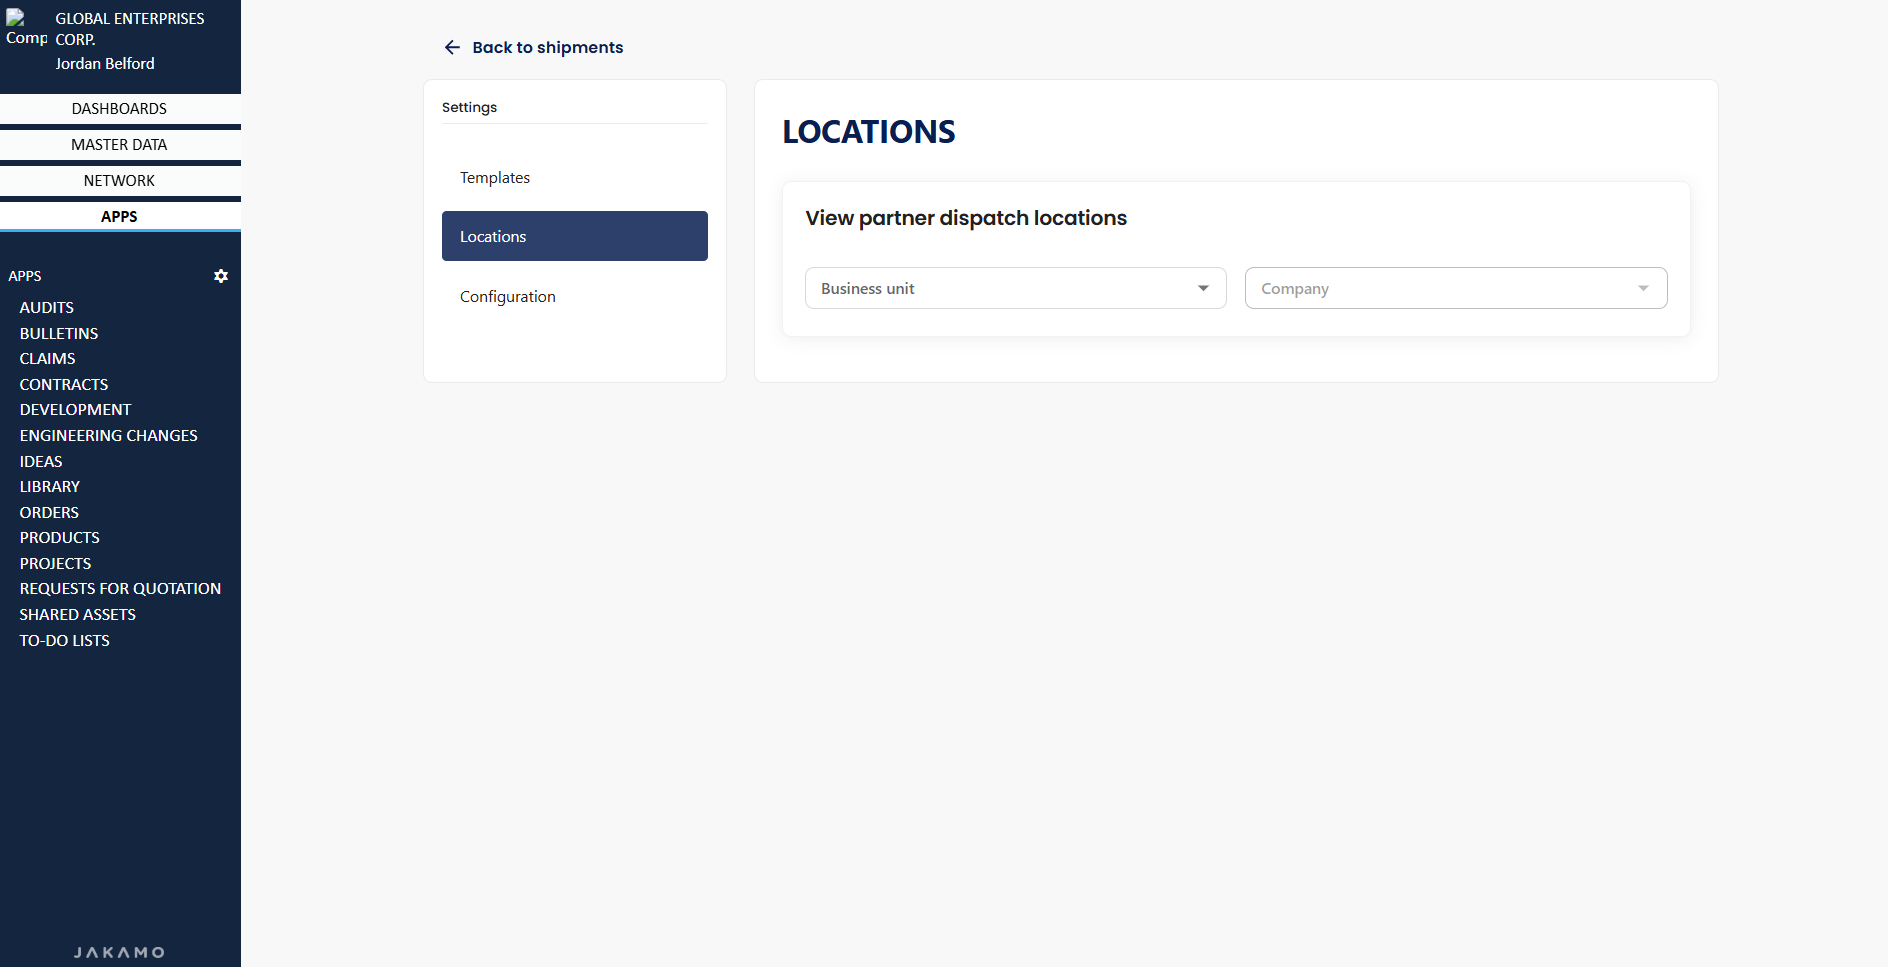
5.2 Locations
View your partner's dispatch locations they have saved in Jakamo.
5.3 Configurations
The customer company can customize which fields are required and visible for suppliers when creating ASNs in Jakamo.
Custommize required FIELDS which supplier needs to fulfill.
- Not used: not visible in the ASN creation process
- Optional: visible in the ASN creation process, but not mandatory to fulfill
- Required: mandatory to fulfill
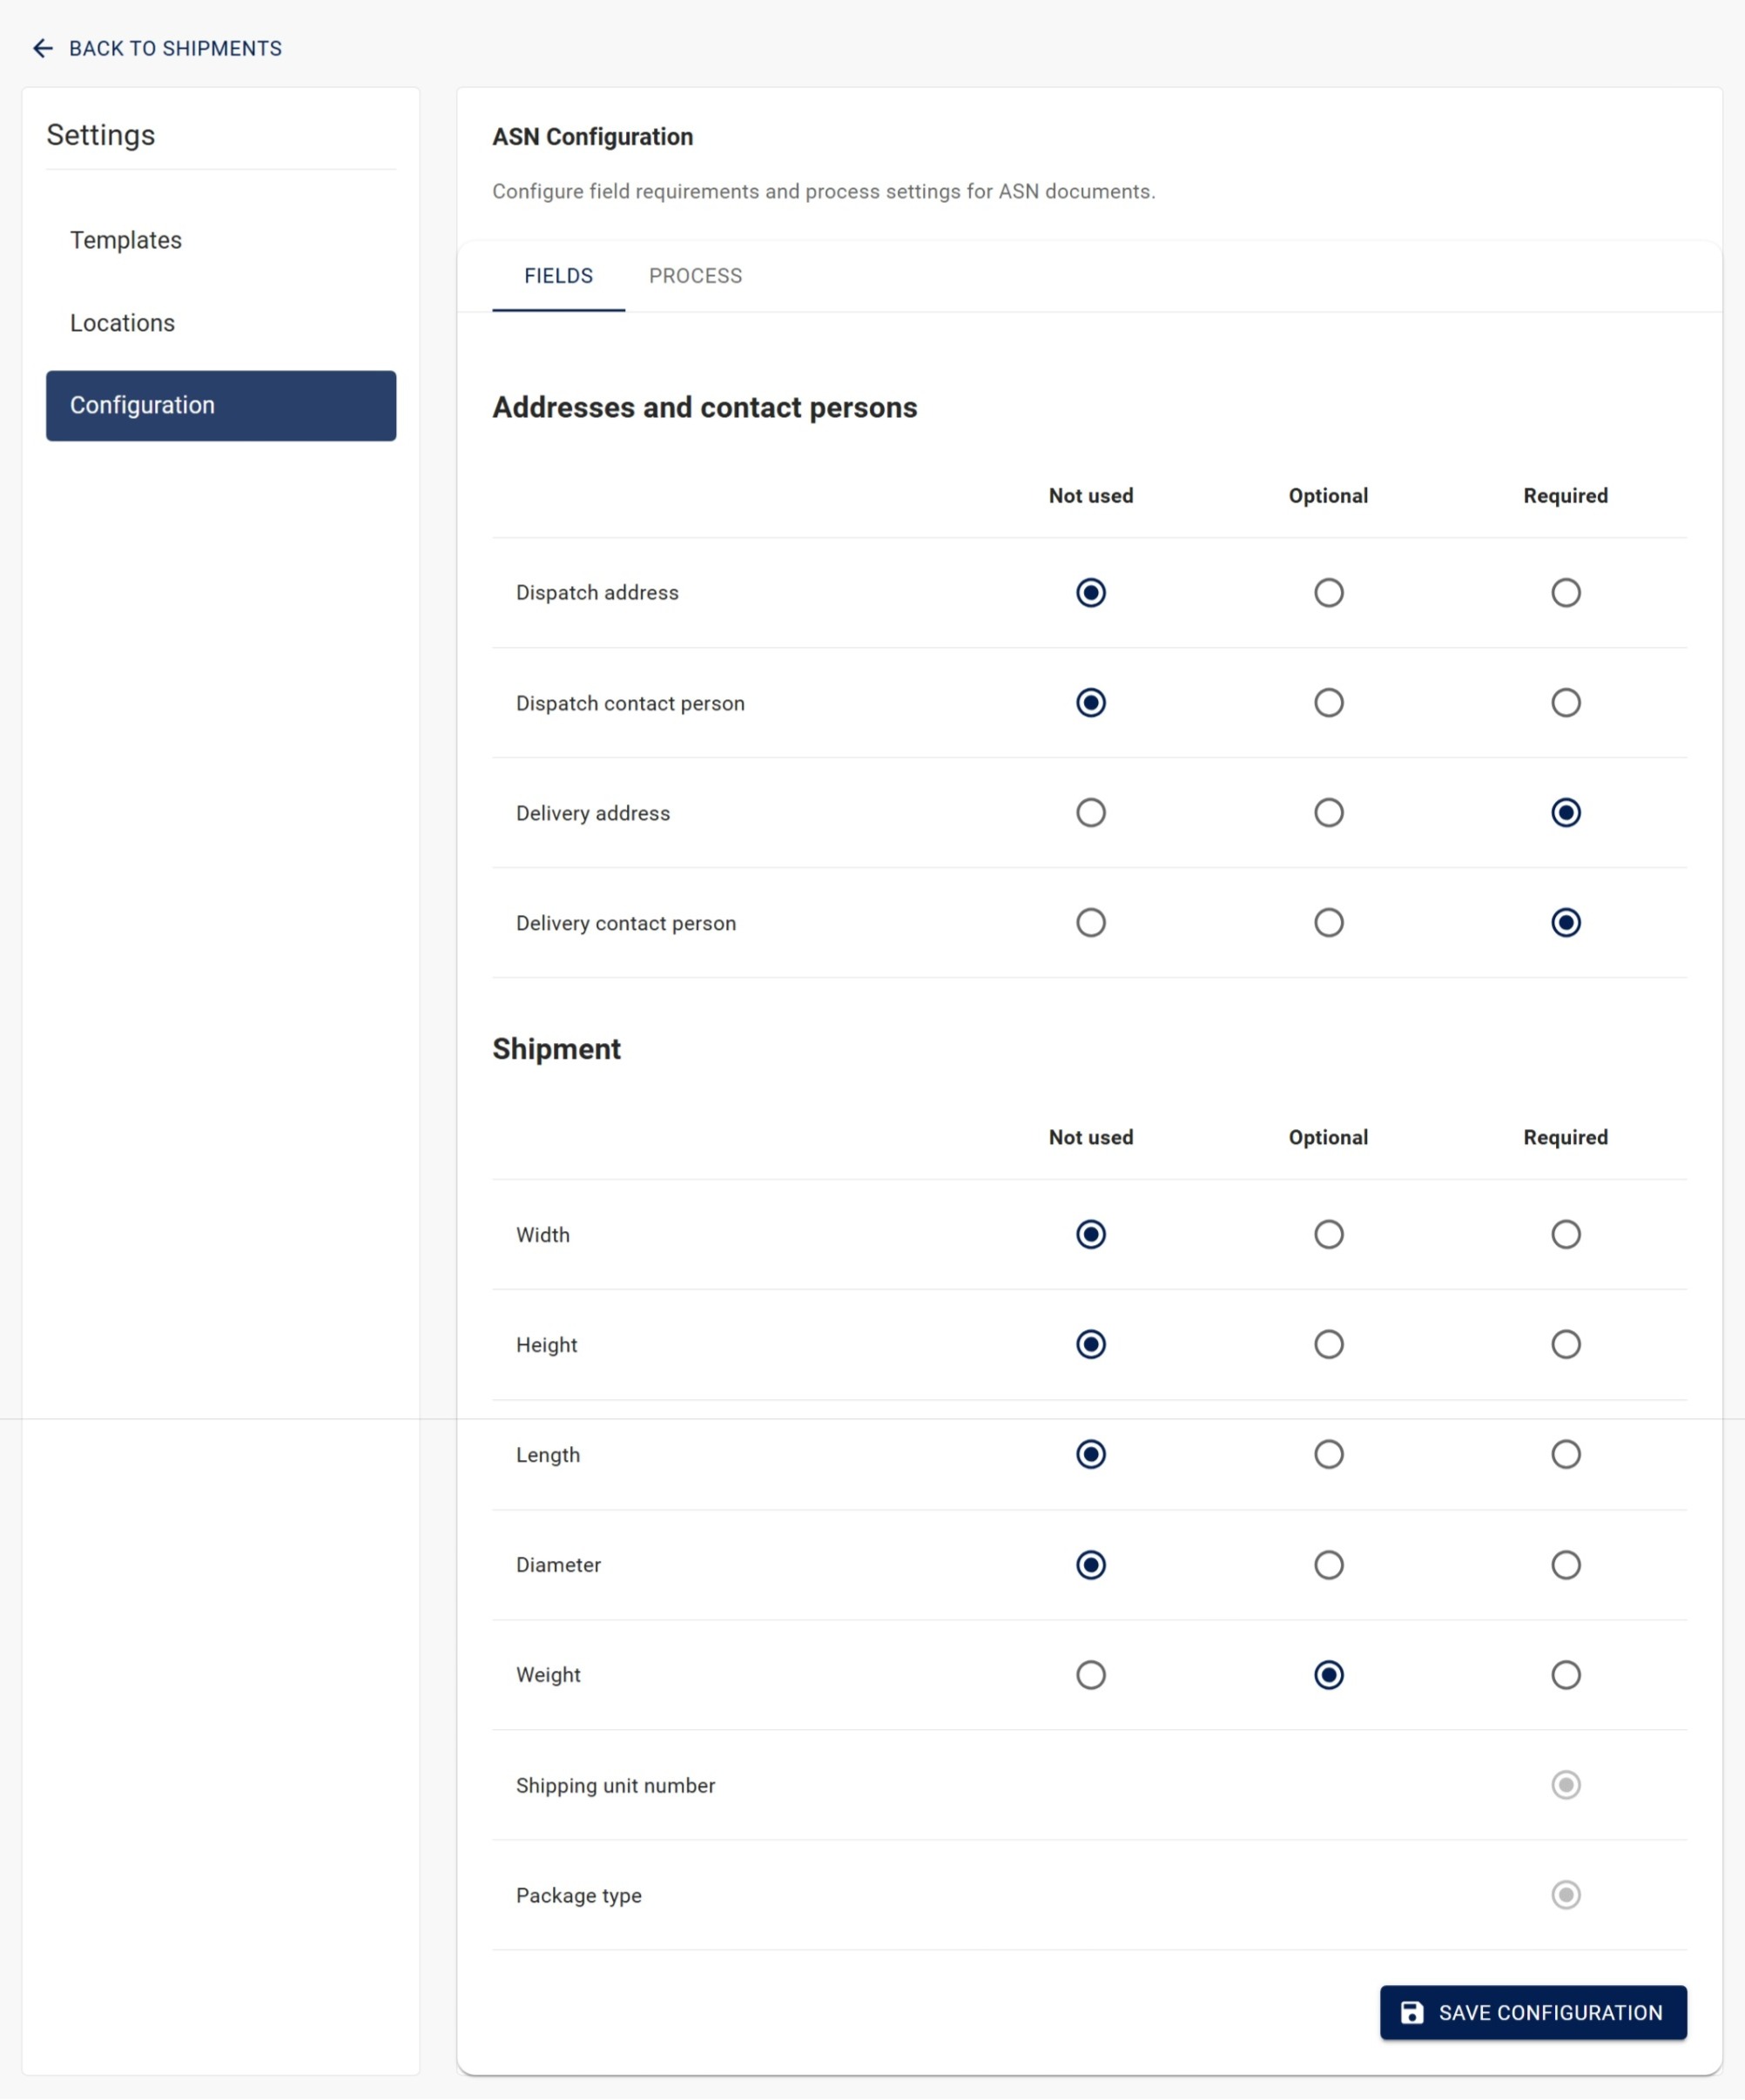
Customize your ASN PROCESS by selecting which phases are included in your ASN creation workflow:
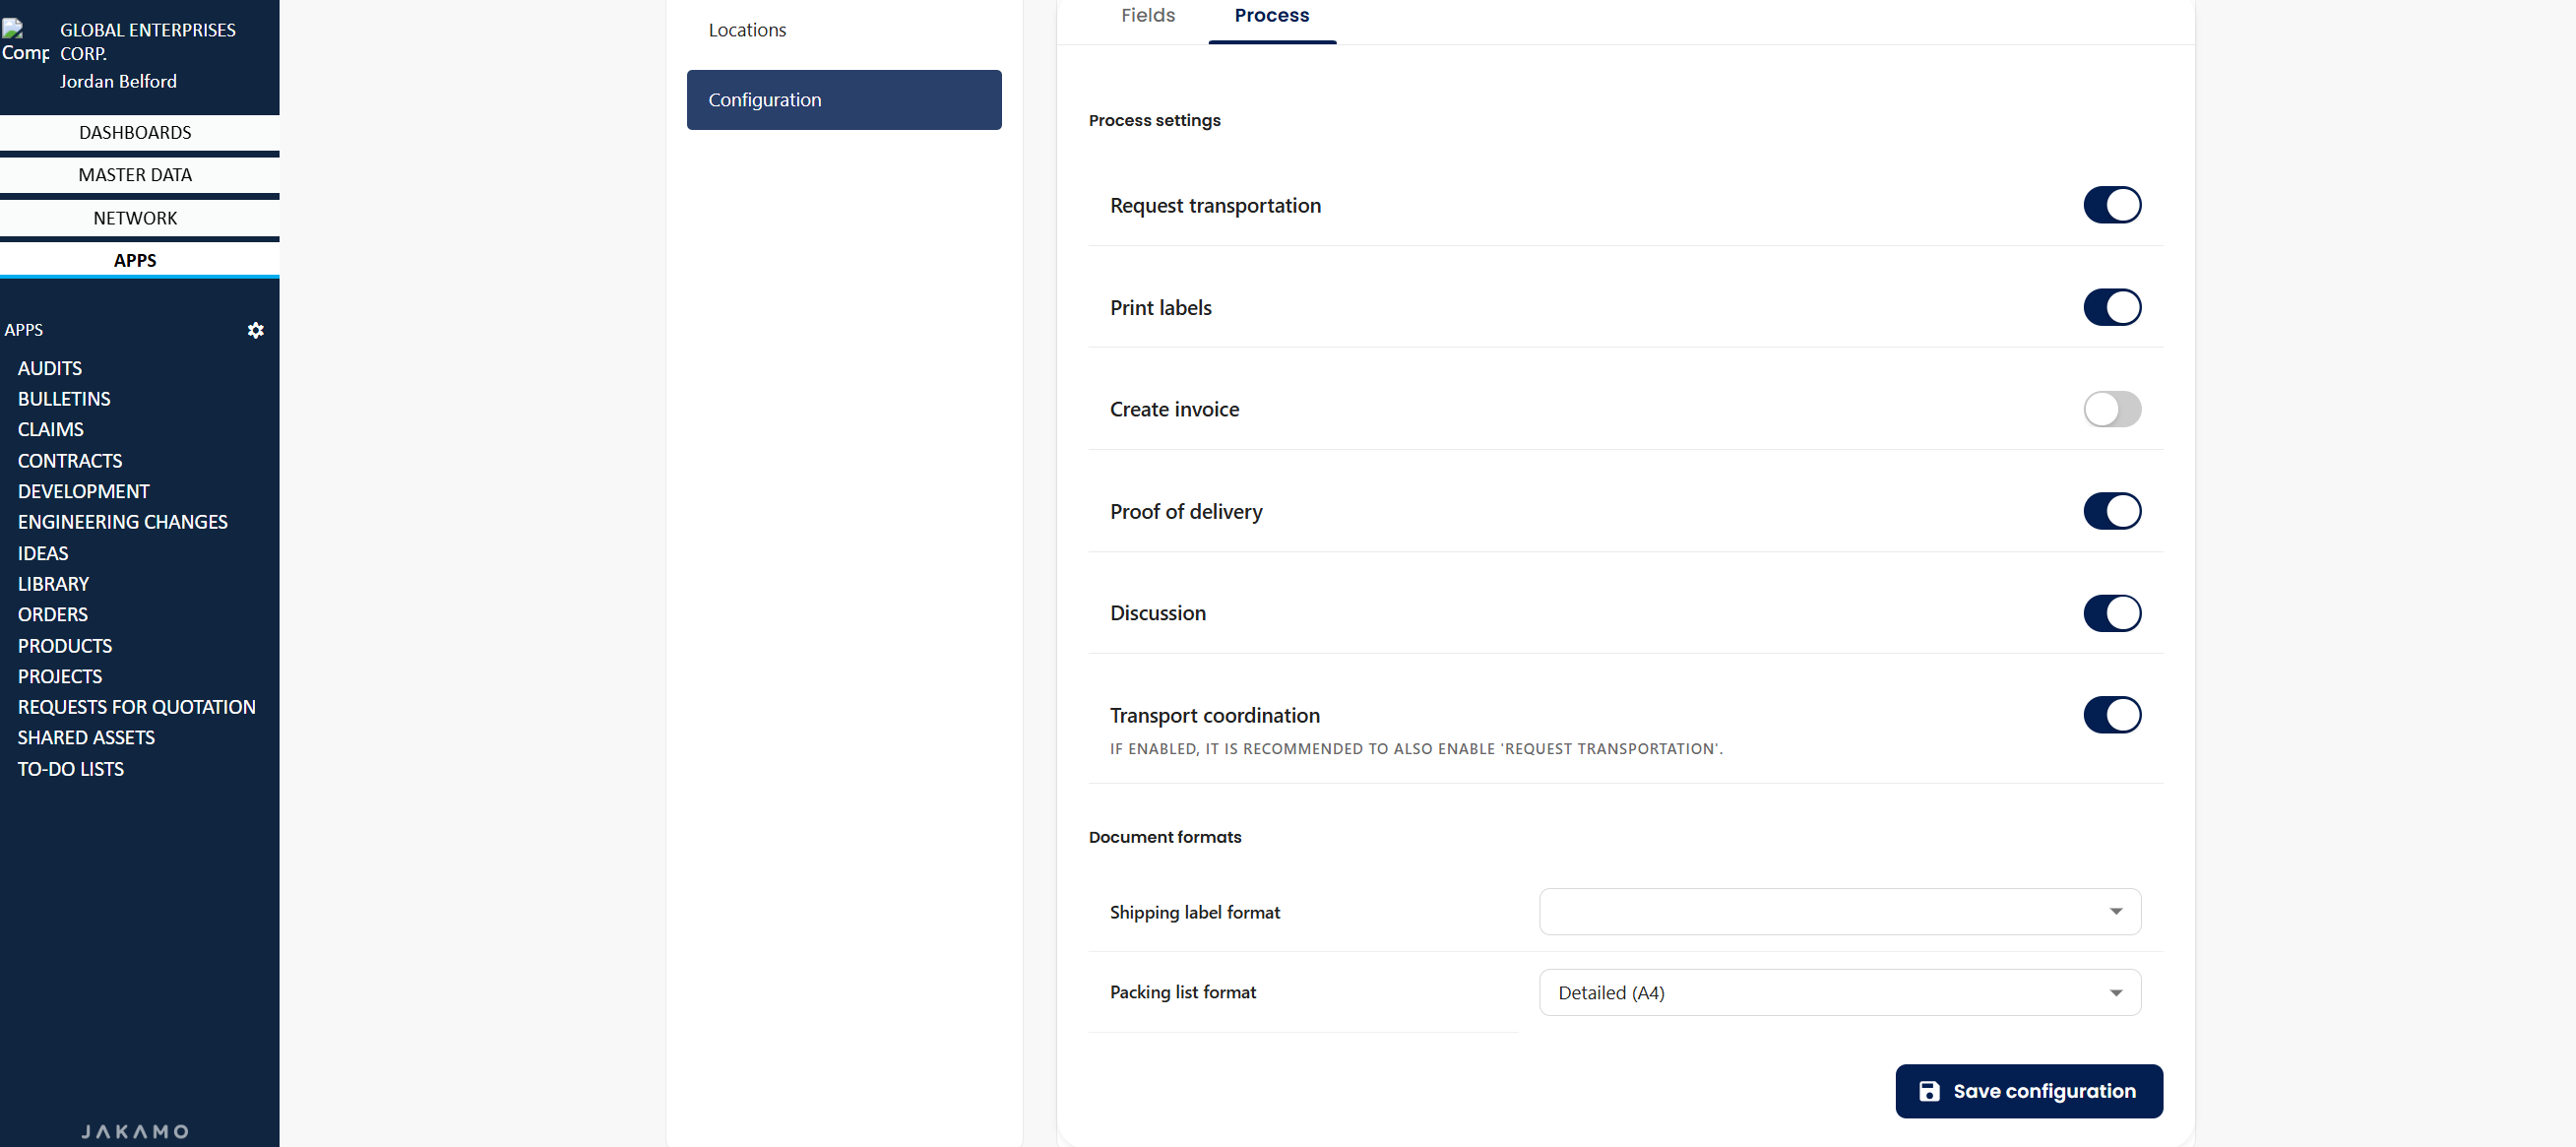
- Request transportation: Activate this function if you have an integration with a TMS or transportation booking system.
- Print labels: Enable this option if printed labels are required to be attached to the shipment by the supplier.
- Create invoice: Use this function if your invoice receiving process is integrated through Jakamo.
- Proof of delivery: Enable this setting if your ASN process follows Transportation-oriented ASN process
- Discussion: Enable this setting if you want to allow discussion inside ASN.
- Transport coordination: Enable this setting if your ASN process follows Transportation-oriented ASN process. If enabled, it is recommended to also enable Request transportation.
- When transport coordination is activated, you can also choose whether to use Jakamo‑generated shipping labels and packing lists, and configure their format if needed.
Didn't you find what you were looking for? Send an email to Jakamo support (support@thejakamo.com) and we will help you.