Settings
Users with the COMPANY_ADMIN role can edit different settings for the company account in Settings.
Functionalities in Settings that depend on the used plan are marked with *
Different Jakamo plans are shown for COMPANY_ADMINs in the Plans & Billing section.
1. Tag Groups*
General introduction to tags can be found from here.
Tag groups can be used for the categorization of different tags. This is useful for instance in linking certain tags to certain Apps. For instance, a unique tag group can be assigned to Orders App, and a completely different unique set of tags can be assigned to Claims App.
A new Tag Group can be added by hitting ADD NEW in the Tag Groups window. A tag group is named and added to an App or App by hitting ADD TO APPS. Tags are added by writing the name for the tag and hitting ADD TAG. Tags can also be added to the Tag list by opening the tag list which includes tags that already exist.
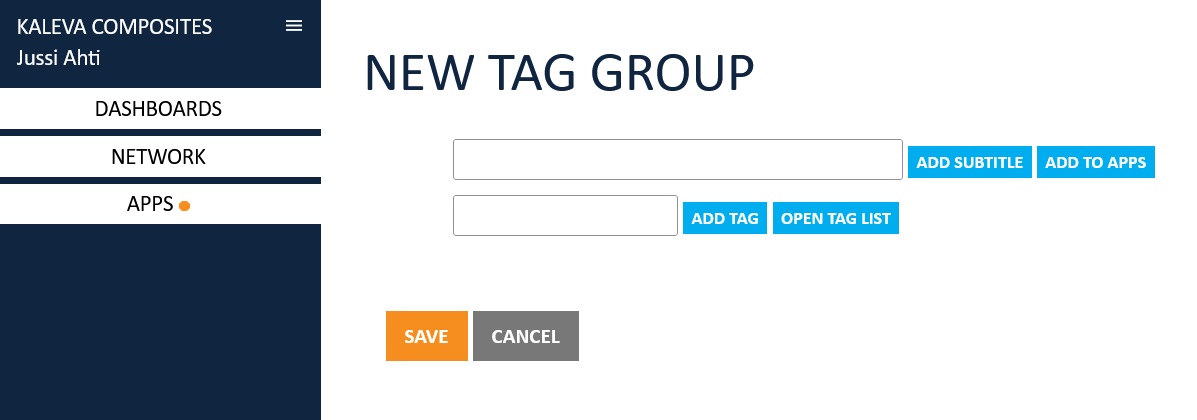
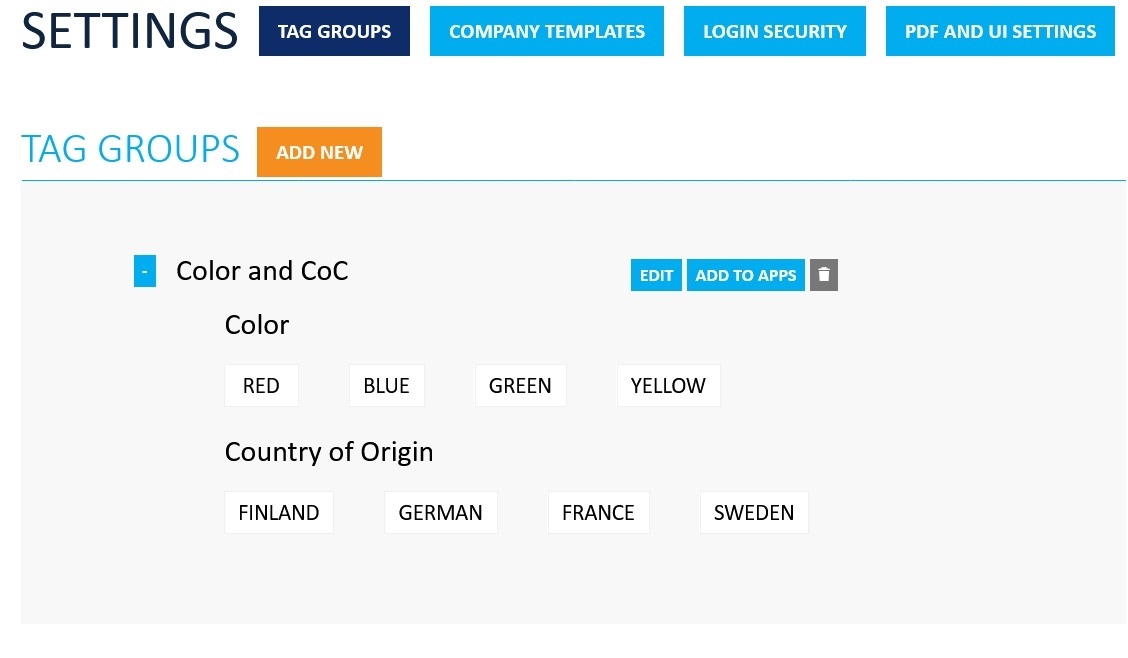
Tags can be added to one or several levels. When creating a new tag group, or editing existing groups, by hitting ADD SUBTITLE, a new sub-level is formed and tags can be added. In the picture below, "Color" and "Country of Origin" are subtitles in the "Color and CoC" tag group.
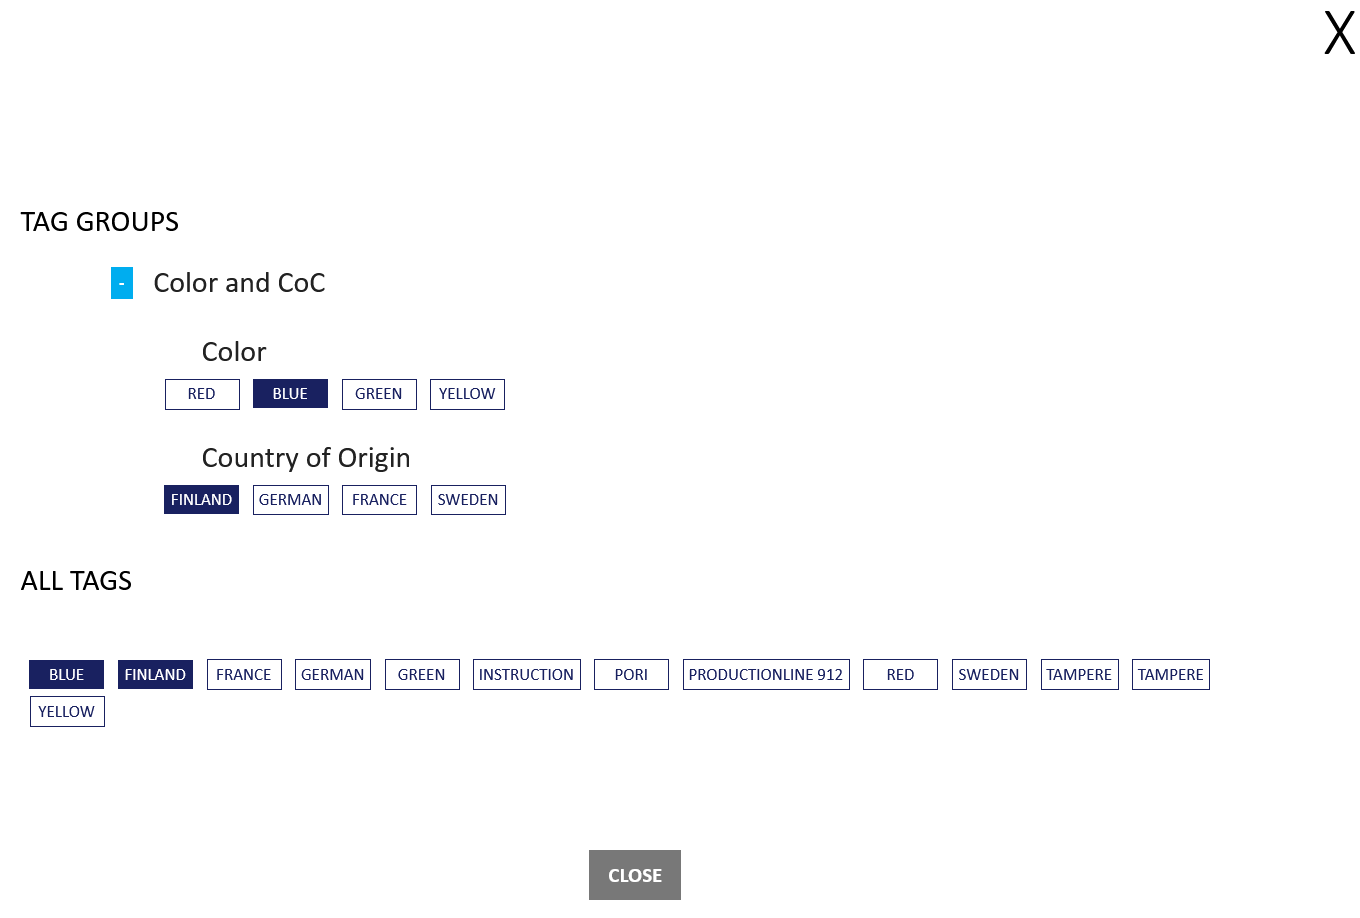
In Apps in which a specific Tag Group is added, users can expand the Tag Groups and select proper tags for the case in hand by clicking those from the list as in the picture below.
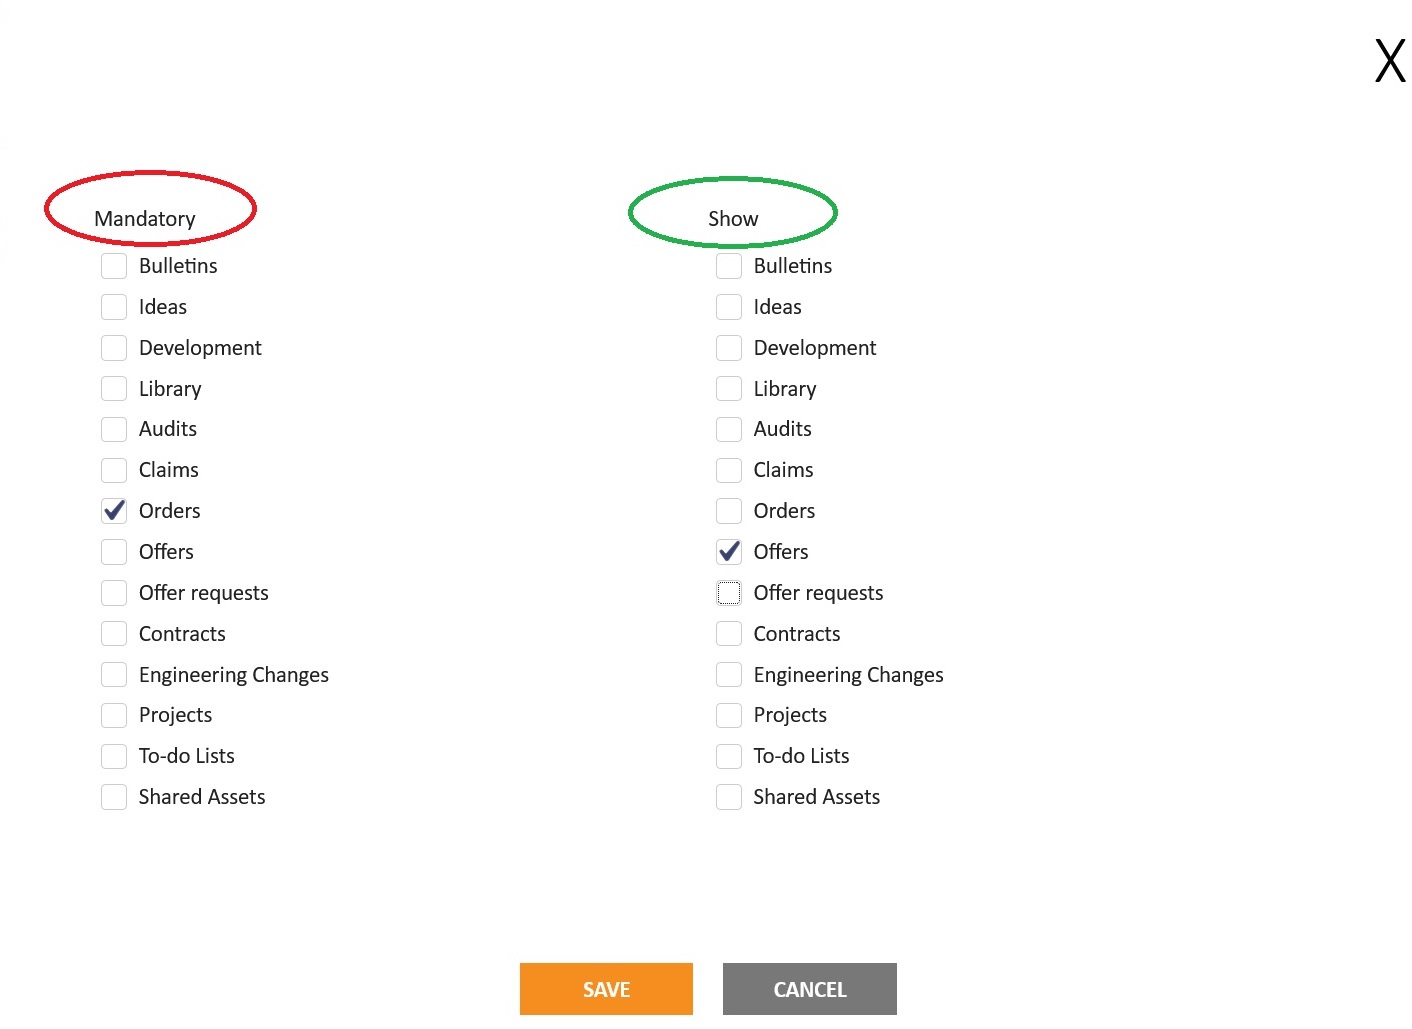
Tag groups can be assigned to different Apps either as Mandatory or Shown groups. In the picture below, the tag is required to choose in Orders App and can be chosen in Offers App from the specific tag group in question.
2. Company Templates*
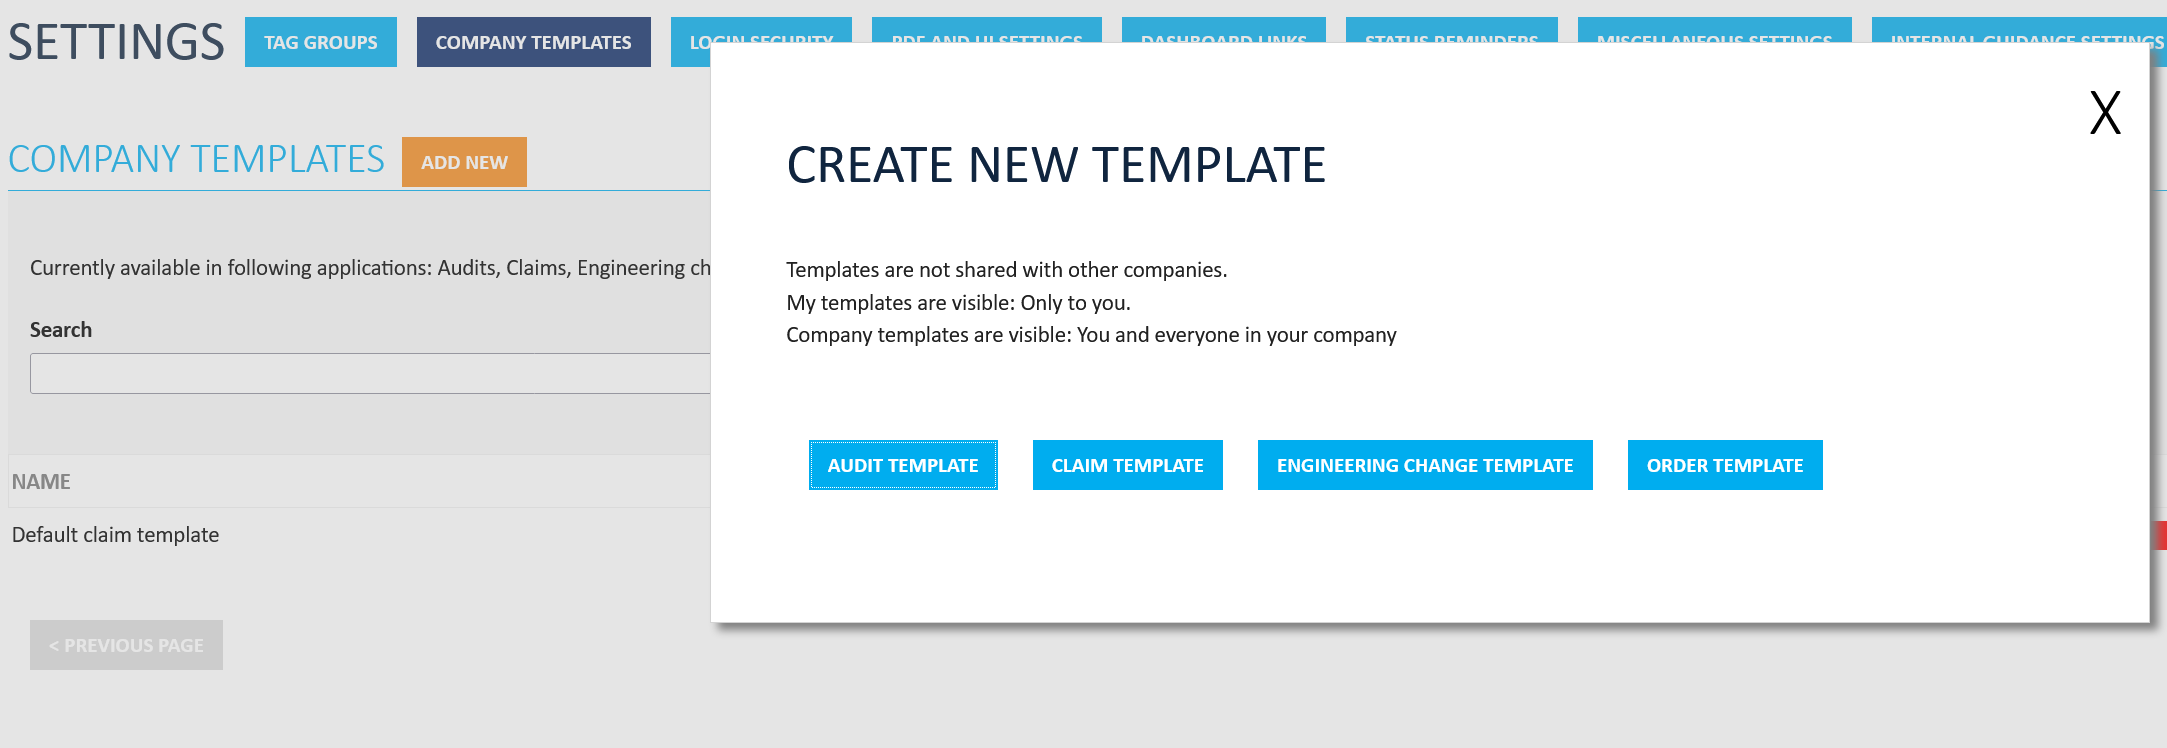
Company Templates can help to standardize processes and practices and speed up the processes with ready-made templates in the four statistically most frequently used Jakamo Apps: Audits, Claims, Engineering Changes, and Orders. Templates are available for use when creating new items from the Jakamo user interface (i.e. the company does not have integrations in use yet for those applications). In addition to Company Templates, My Templates can be added. Company Templates are visible and thus available for all users within one company, while My Templates are only available for You.
New Template can be added by hitting ADD NEW. In the first phase, choose the App you want to create a template for.
After choosing the App, content for the Template can be added similarly to adding a new item for the chosen App itself. However, date fields are usually blocked since Templates are intended to be used for now, whenever suitable.
On many occasions, at least with Audits, Claims, and ECs, the process forms out of different tasks. You can learn more about Tasks from here.
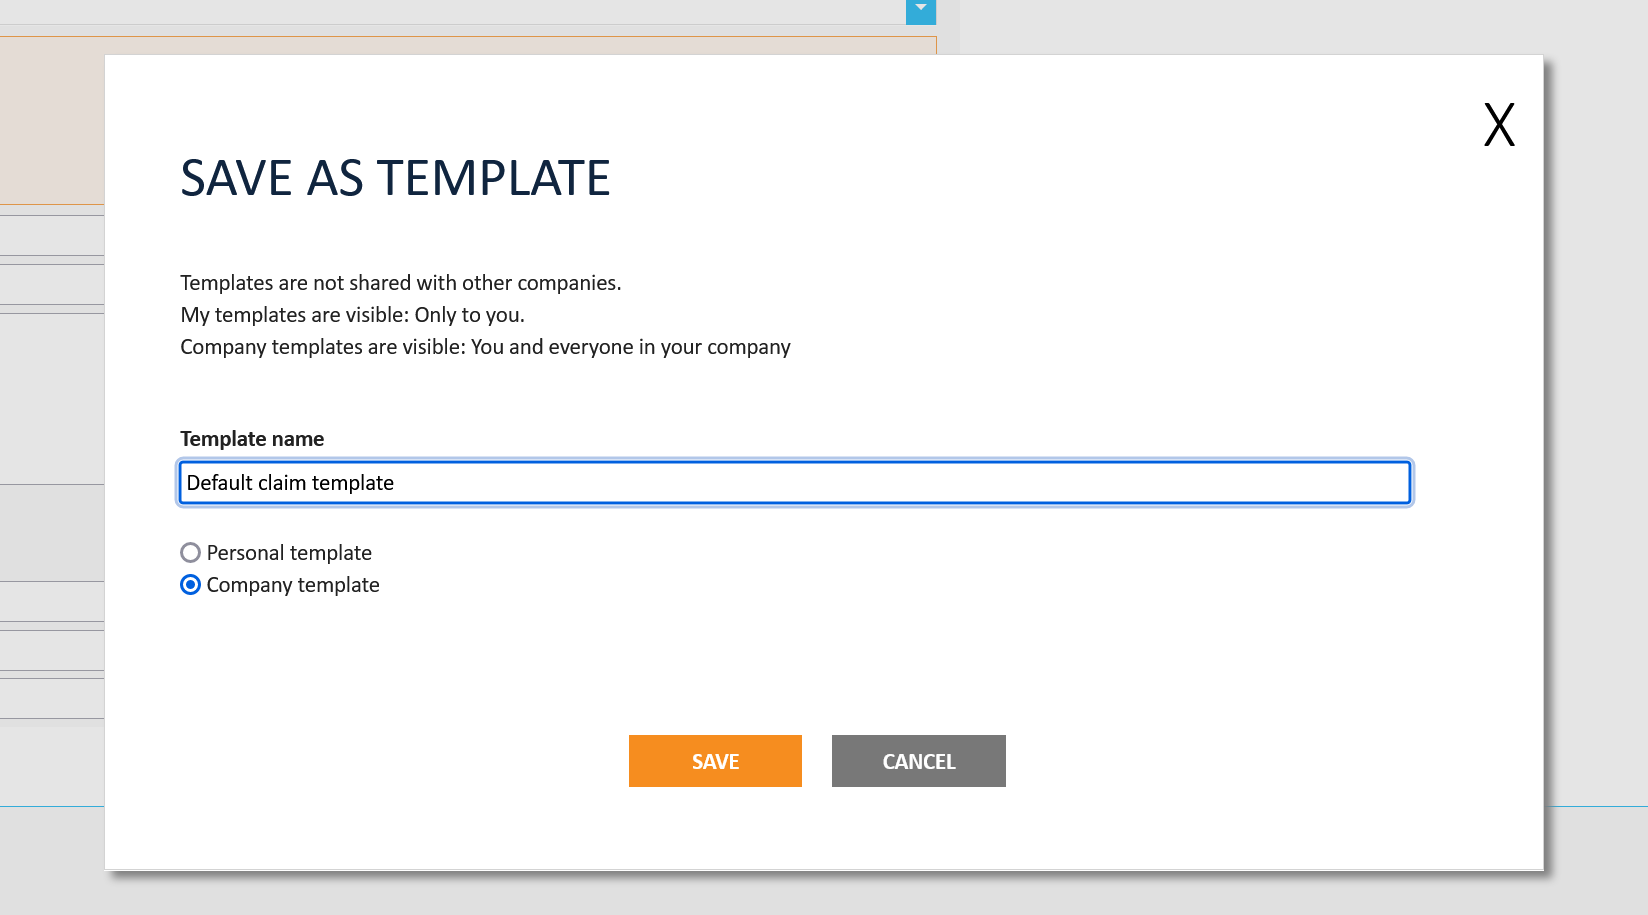
When the text fields, tasks, possible files, etc. are added, the Template needs to be saved by hitting SAVE. In this phase, a name is given to the Template as well as chosen whether the Template in hand is a Personal or Company Template.
If Company Template for a certain App, for instance for Claims App, is added, a blue USE TEMPLATE is shown. Jakamo users can choose and in this case, thus utilize the template when creating a new Claim by hitting the name of the template (here "Default claim template"). Templates can be chosen similarly in each App:
- Navigate to the App
- Select
ADD NEW - Select
USE TEMPLATE - Choose the Template by clicking the template's name

3. Login Security*
Login security includes two areas, password management, and domain requirements.
Password management*
Requirements for the user passwords can be set and edited by hitting the EDIT icon from the top right corner. To introduce requirements for passwords, the selection on the top needs to be changed to "On".
Below the selection are requirements for passwords: minimum length, upper vs. lower cases, numbers vs. letters, the change interval for passwords in days, and the limit for failed login attempts before the user account in question is locked.
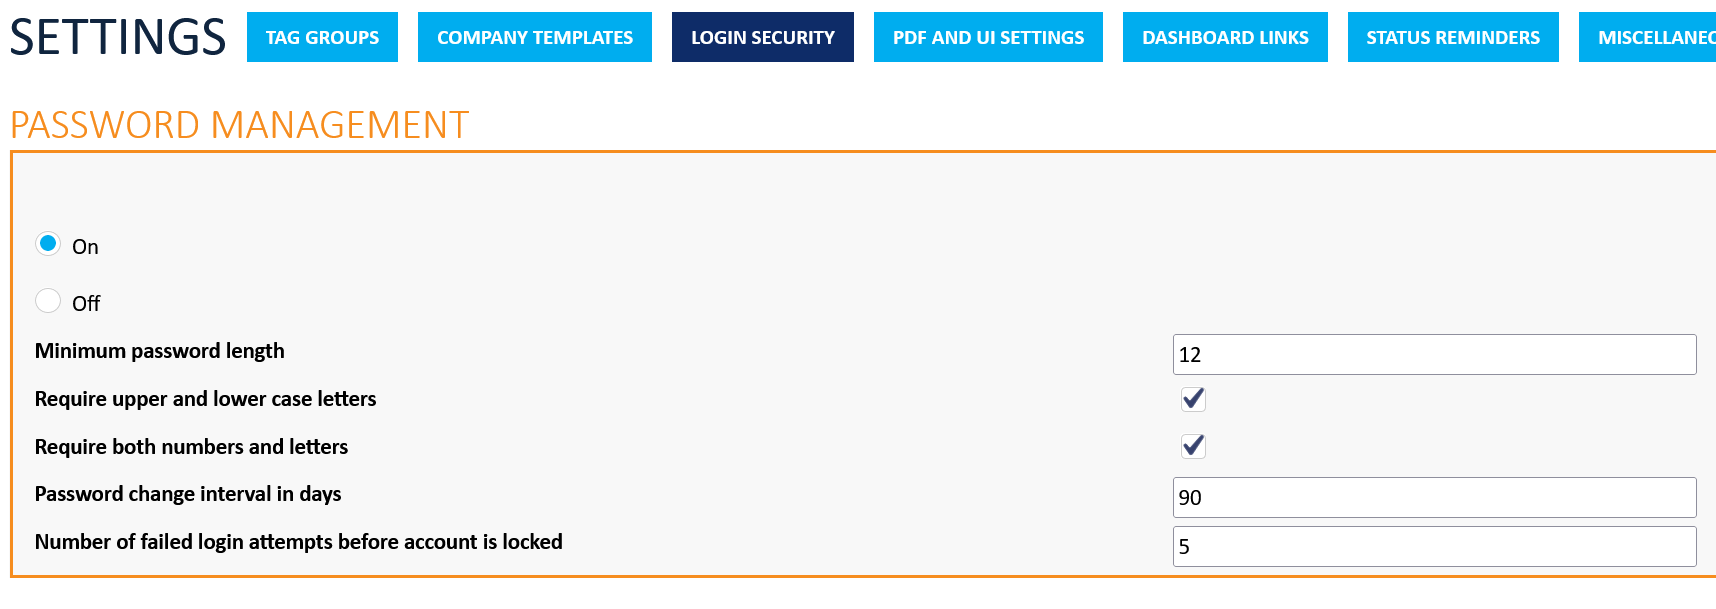
If fields requiring numbers are given a value of zero (0), the requirement in question is off. For instance, giving value 0 to "Password change interval" means password change is not required.
Domain Requirements*
To introduce domain requirements, the selection on the top needs to be changed to "On" after hitting the EDIT from the top right corner. Domain requirements prevent new users to be invited to other domains than required. However, requirements do not prevent current user accounts outside these requirements to log in. Therefore, it usually is reasonable to go through user email addresses after domain requirements are introduced.
One or more domains can be added simply by typing the domain and hitting ADD. After all required domains are added, changes must be saved by hitting SAVE.
Domains can be added with or without a "@" character, so both forms, "thejakamo.com" or "@gmail.com" are OK.
4. PDF and UI Settings
You can manage the footers shown in downloaded order item PDFs, as well as the General Terms displayed on ordered items, in your company account’s PDF and UI Settings.
General Terms
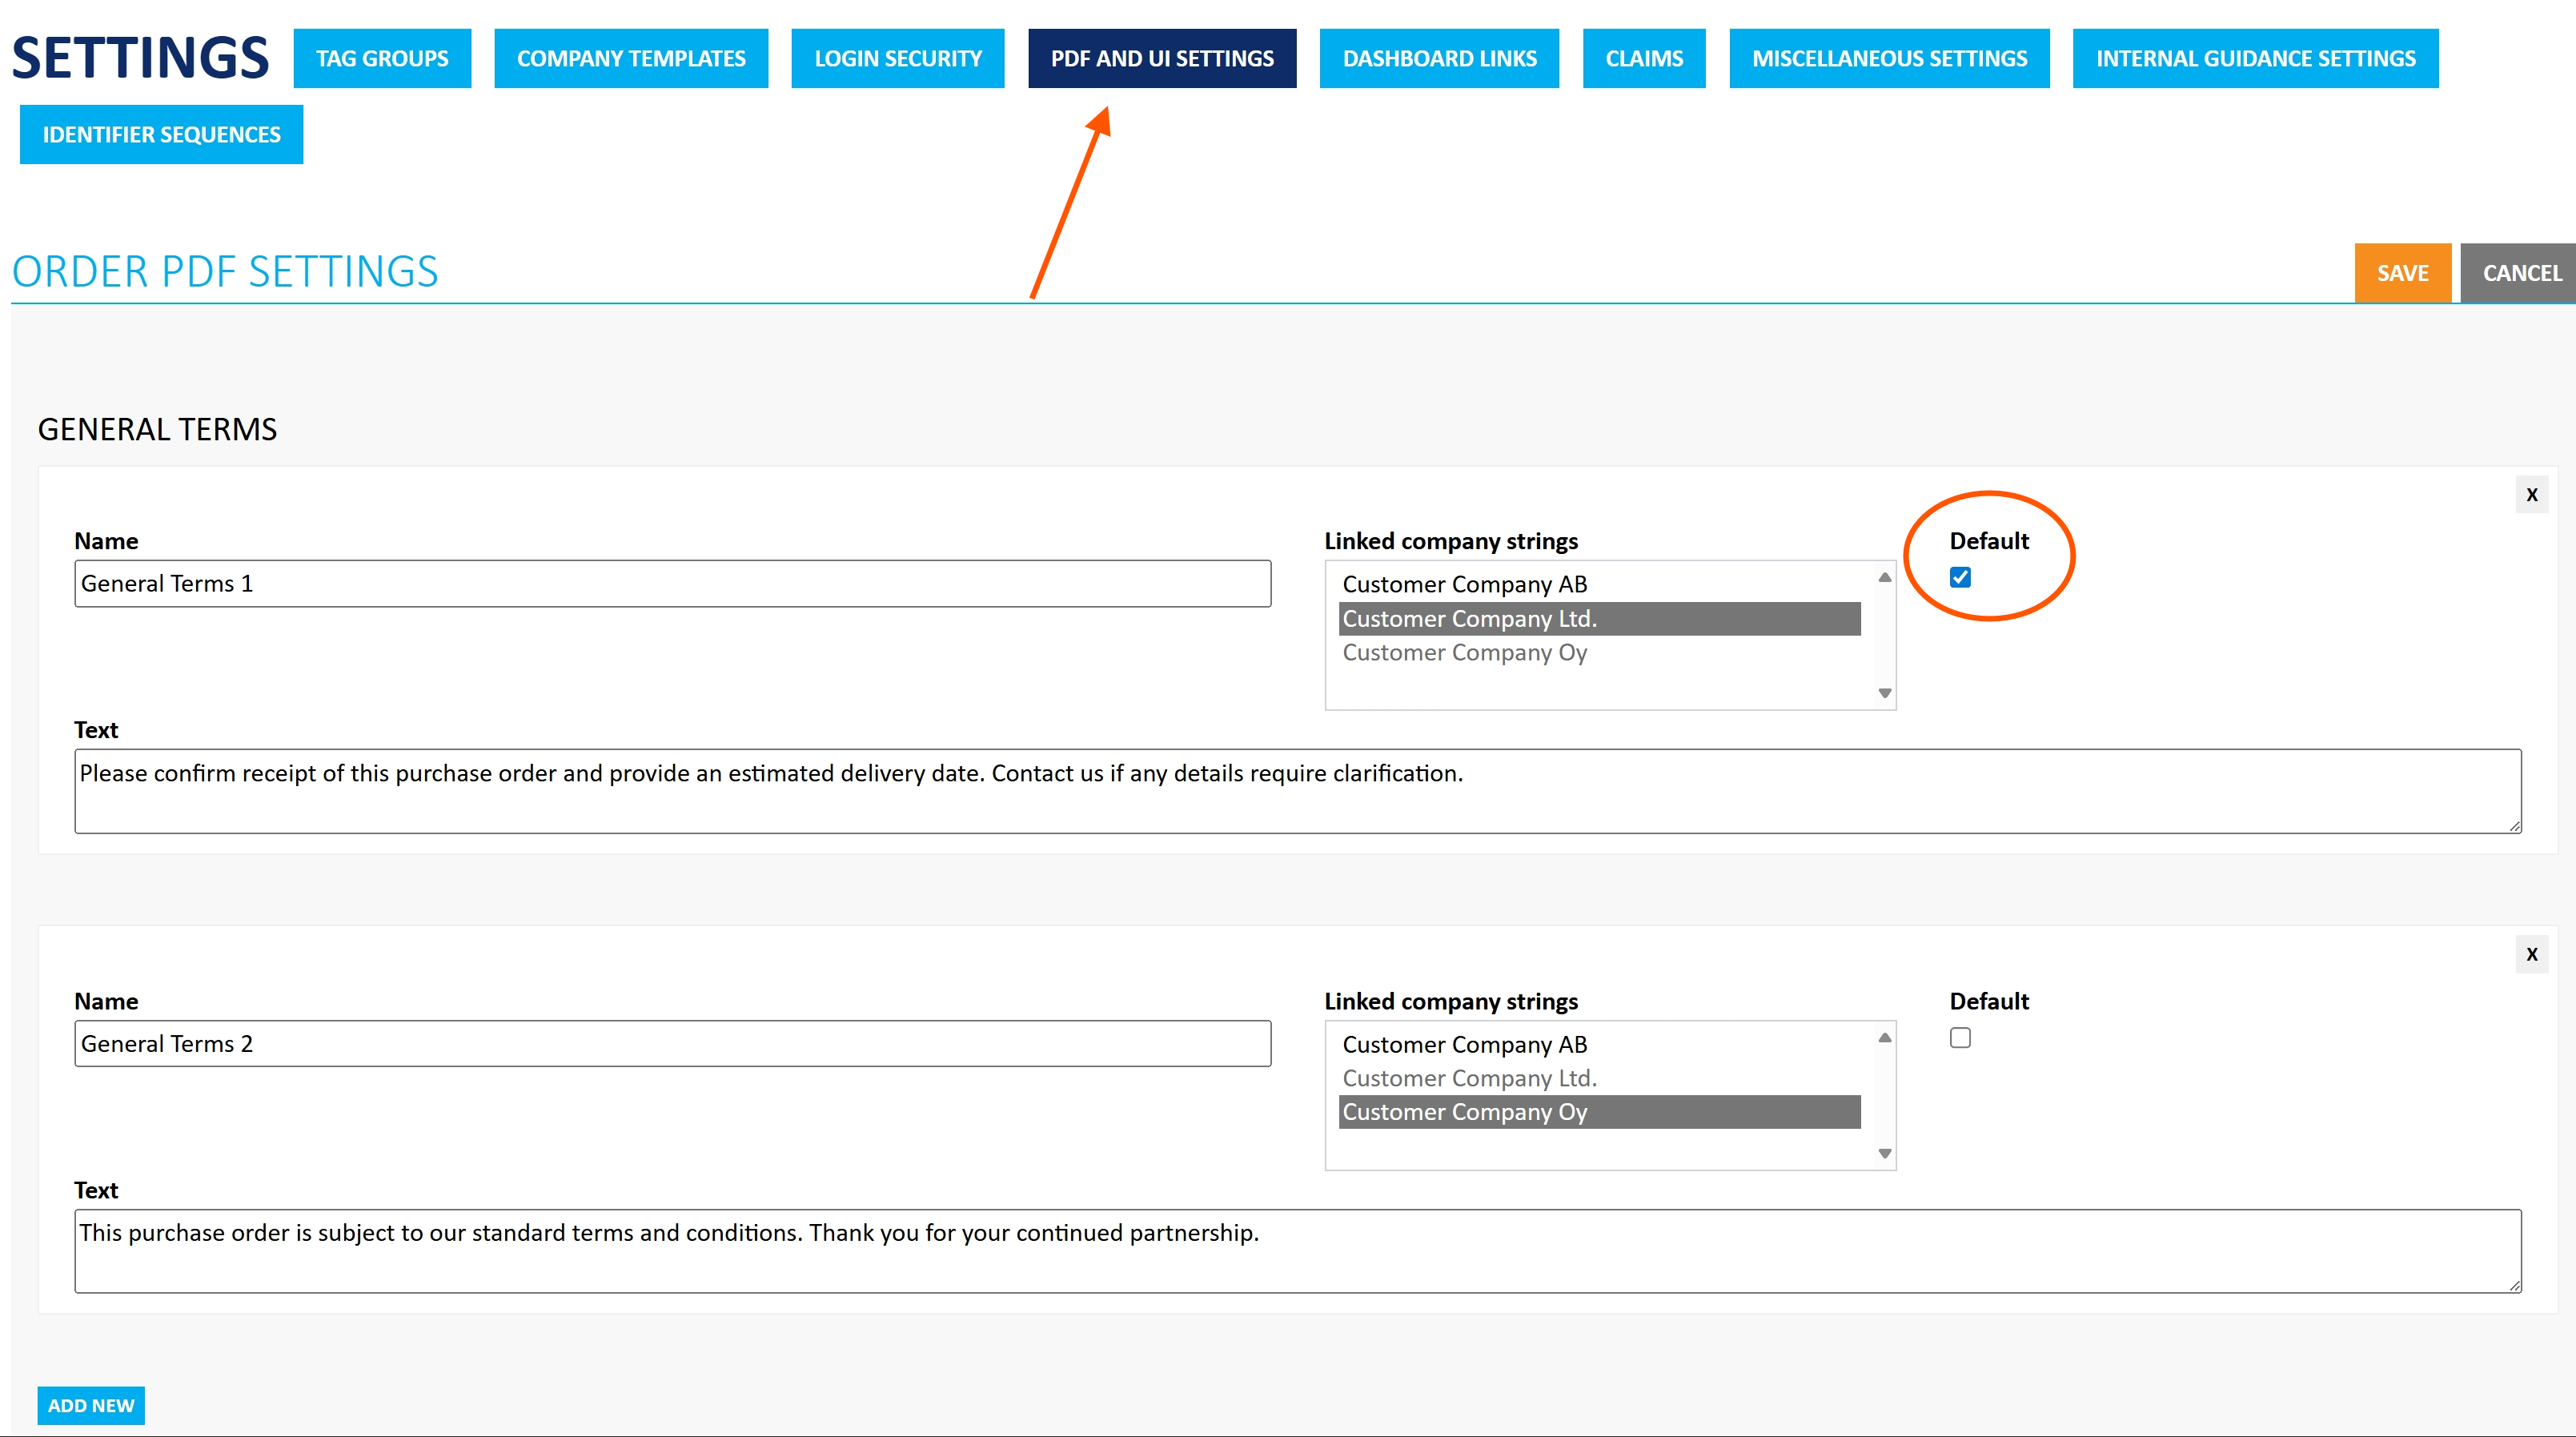
General Terms can be added to purchase orders to provide additional details, such as delivery terms, packaging instructions, delivery locations, and responsibilities. These terms will appear both in the Jakamo user interface and on the PDF version of the order.
In the Linked Company Strings section, you can define different terms for each your own business units (Jakamo's Business Units). By selecting one of your units from the list, you can specify which terms should appear for orders placed by this unit.
To add a new set of terms, click ADD NEW. You will need to provide both, a name and the text (the actual terms). If you select the Default selection, these terms will be added to the order if the conditions of other terms are not met.
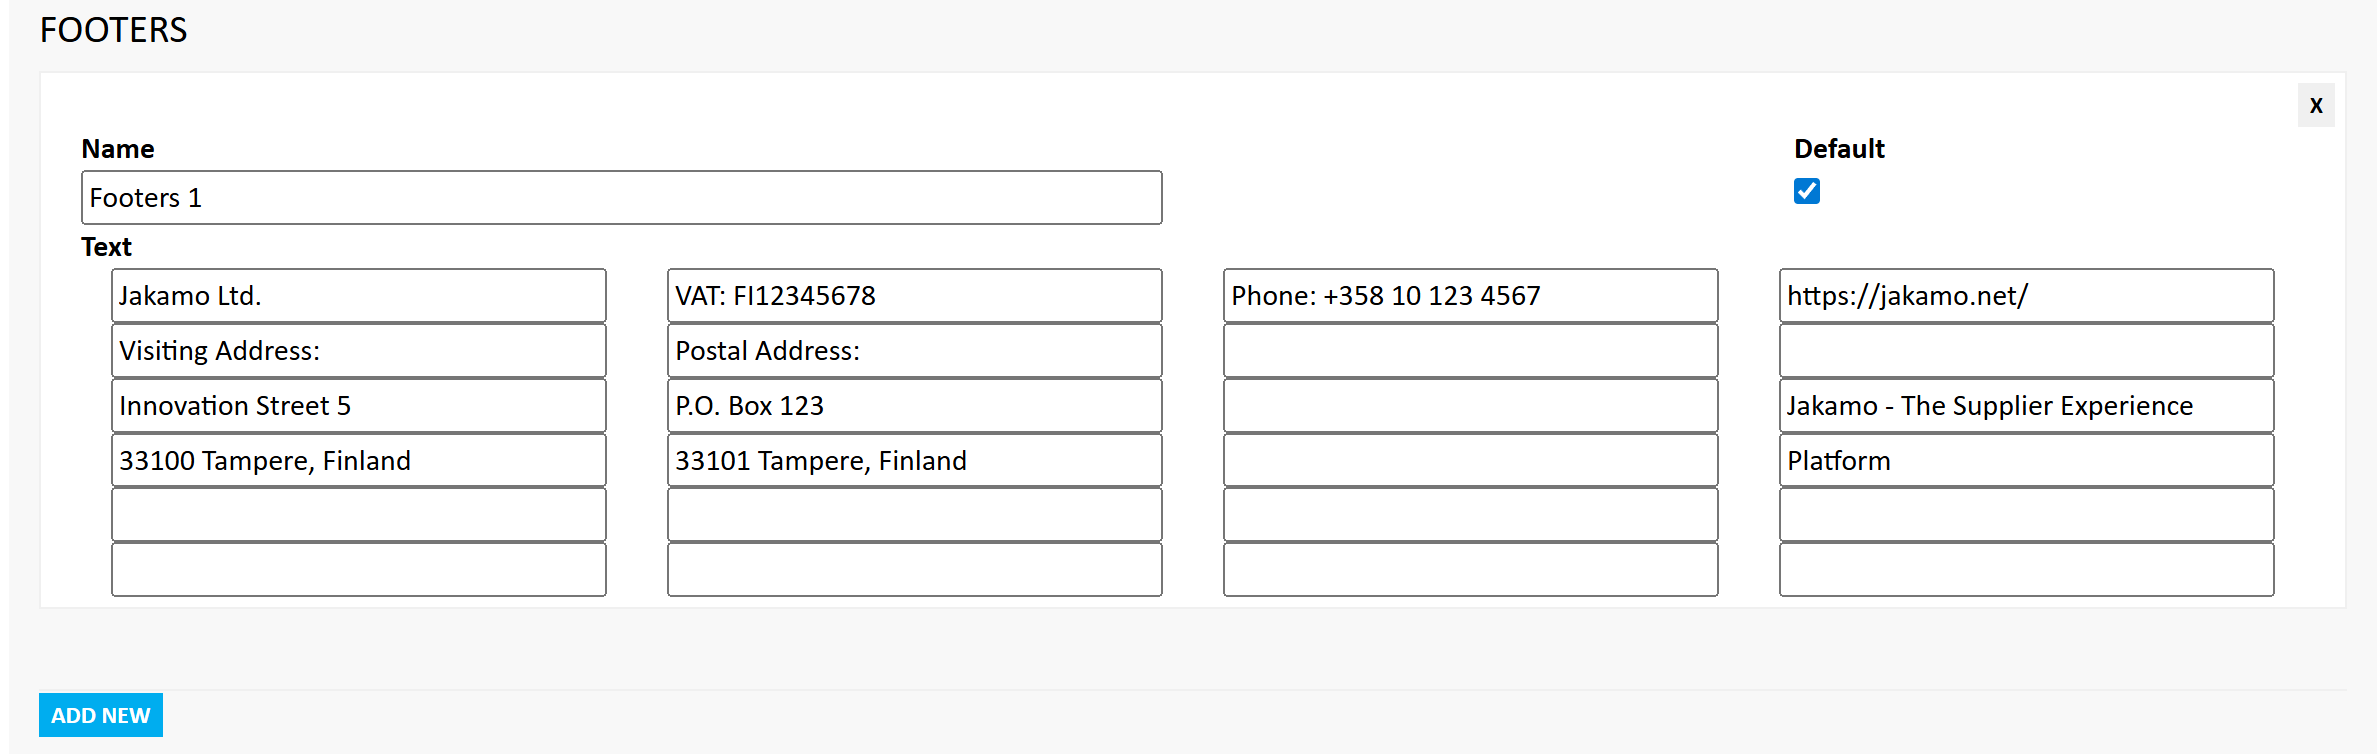
Footers
Footers appear at the bottom of PDF files generated in the Orders App in Jakamo. They typically include useful company details such as postal or visiting addresses, contact information (phone and email), VAT number, or even your company’s slogan or vision.
You can customize the footer using up to 4 columns and 5 rows. Each cell can contain a maximum of 32 characters.
In the PDF printout, the footer appears as follows at the bottom of the PDF:

Footer origins always from the Owner company for each item. This means for instance that if You have footers configured, but your customer has sent you an order, your customer's footer will be printed to PDFs.
5. Delivery Control*
Delivery Control is for reminding your suppliers about either upcoming delivery dates, or past order confirmation or delivery dates. Several reminders can be in use simultaneously. When delivery control is activated, reminder emails will be sent to supplier. Emails will include the message typed to reminder, and a link to the order in question. Reminders can be general, or supplier specific. In addition to global reminders added in delivery control section, reminders can also be added in item view of an specific odrer.
Adding global reminders
A new global reminder is added by hitting the ADD NEW REMINDER in the Delivery Control function. The template for adding the reminder will open a new window. Add the title for the reminder and choose the type from the dropdown menu. There are three types of reminders: Late order confirmation, Upcoming delivery date, and Late delivery date. Use cases for these three are:
Late order confirmation reminder
- Routine compares to the order creation date.
- The remainder is used only for orders that have the status
Waiting for supplier confirmationorPartially confirmed.
Upcoming delivery date reminder
- This reminder is for reminding the supplier of the upcoming delivery date.
- Routine compares to order row's confirmed delivery date, or, if the row has delivery batch(es), it compares the confirmed delivery date of the delivery batch.
- The remainder is used only for orders that have the status
Confirmed.
Late delivery date reminder
- This reminder is for reminding the supplier that the order is already late.
- Routine compares to order row's confirmed delivery date OR if the row has delivery batch(es), it compares the confirmed delivery date of the delivery batch.
- The remainder is used only for orders that have the status
Confirmed.
When calculating the reminder activating, Jakamo uses only working days (Monday - Friday) without considering typical days off, such as national bank holidays.
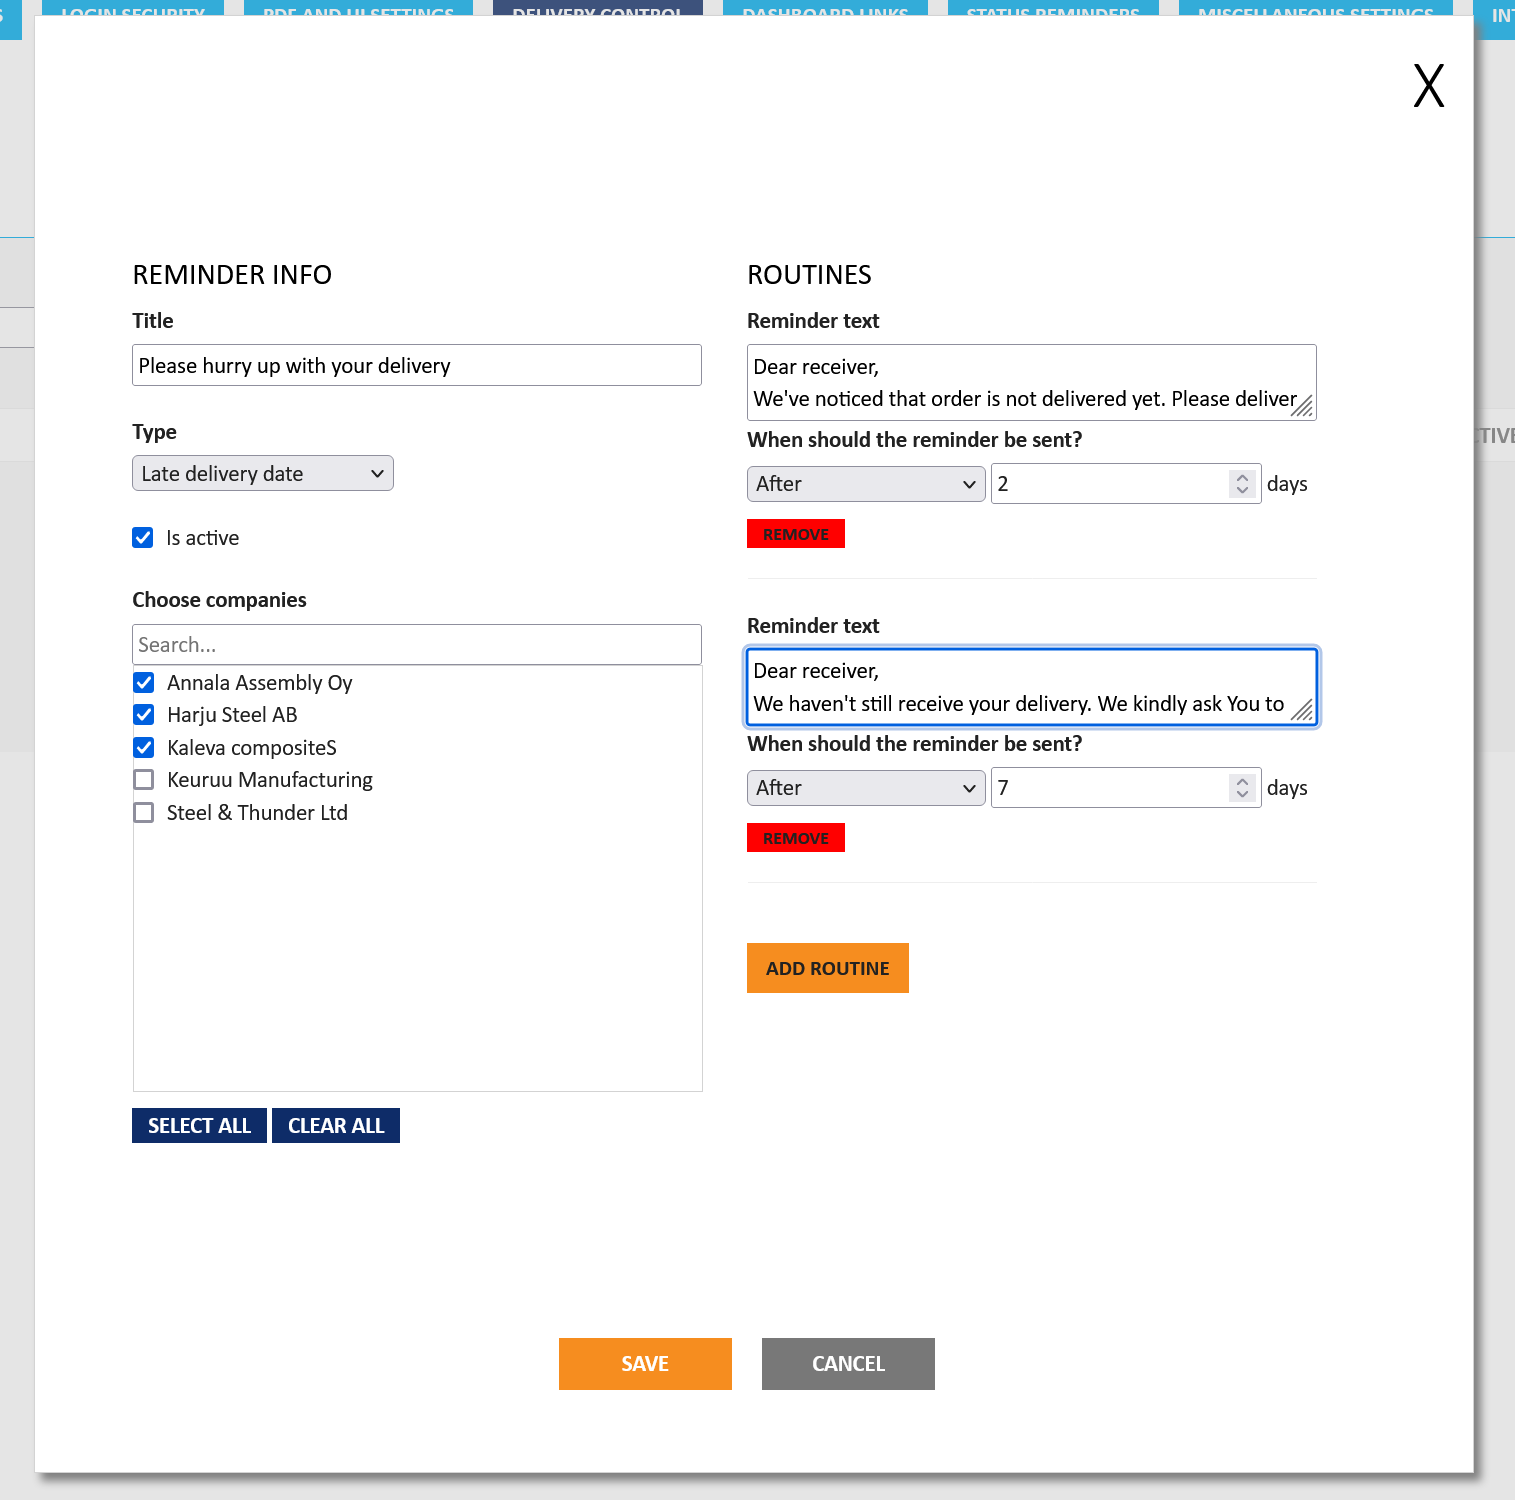
Activate the new reminder by checking the Is active selection, and choose at least one company you want to utilize the reminder in hand.
After those are done, the routine (i.e., the automation rule) for the reminder can be built by hitting the ADD ROUTINE. Text for the reminder is requested to be added. Beneath the text box, the timeslot(s) for sending the reminder are set. Several routines can be combined into the same reminder.
For instance, if the type for the reminder is a Late delivery date, the first reminder could be sent after two days after the delivery date agreed upon in the purchase order. If the Order remains undelivered, a second reminder could be sent seven days after the delivery date. Jakamo tracks the status of Orders and sends the reminders automatically according to the routines covering the dates and suppliers set to the reminder.
Adding order item specific reminder
In addition to global reminders, which applies to all of the orders for supplier linked to reminders, order specific reminders can also be implemented. This can be done on the order item view of the specific order. Order specific reminders can be set by navigating to order in question, and hitting the orange ADD NEW REMINDER icon.
If there is global reminders set to supplier of the order in question, implementing one order specific reminder will disable all possible global reminders for the order.
Order specific reminder can be set quite similarly as global reminders. Difference is that reminder concerns only one order. Hence supplier selection is left out. Another difference is that order specific reminder can be targeted to one specific row of the order. If order rows have different delivery dates, this can be useful.

Jakamo will check all the routines every 30 minutes and if the order row fulfills any of the routines, a reminder will be sent. If more than one of the rules is fulfilled per order, still only one notification will be sent per order. For example, if order includes 10 lines and a reminder routine refers to 5 of them, only one notification will be sent out.
6. Partner Categorisation*
Partner Categorisation helps in finding categorized companies from your network. It also helps in finding for instance all of the Claims or Orders sent or received from partners in one or more categories when using different Jakamo Apps. Categories are added in the Settings, and companies can be assigned to categories from their Profile page, which is accessible from the "Network" page on the left side column.
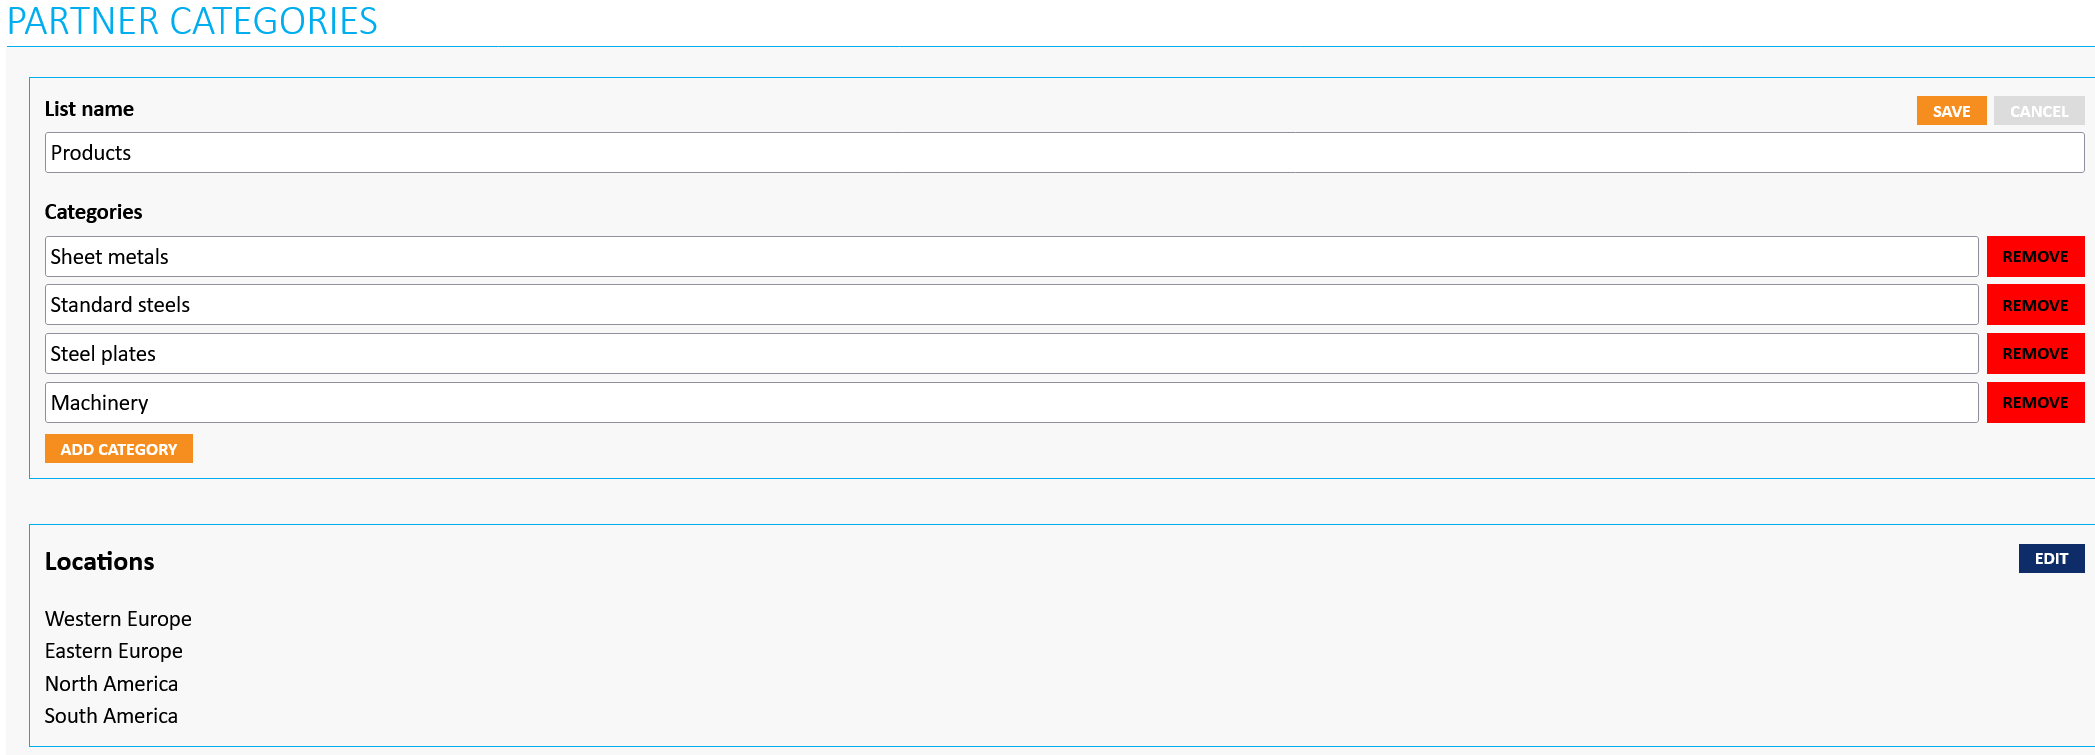
Use cases for partner categories can be for instance locations, products, or items Your partner supply. In the examples below, both are created and used. New category list with categories can be added by hitting the NEW CATEGORY LIST icon in the Partner Categorisation.
Type the name for the category list and add diffeent categories to it. You can add as many categories as needed under one list. When the first one is added, hit the ADD CATEGORY icon to add another. When all are added, save the list with the SAVE icon from the top right corner.
Category lists can be edited. If existing category that has companies assigned to it is removed, companies will be deassigned from that category without warnings.
Once category lists are added, companies can be assigned to categories from the company's profile page, which is accessable for instance from the "Network" page on the left side column in Jakamo. In the companies list, hit the company that wished to be added to a category. On its profile, hit the CATEGORIES icon and check the desired tickboxes from one or more categories.

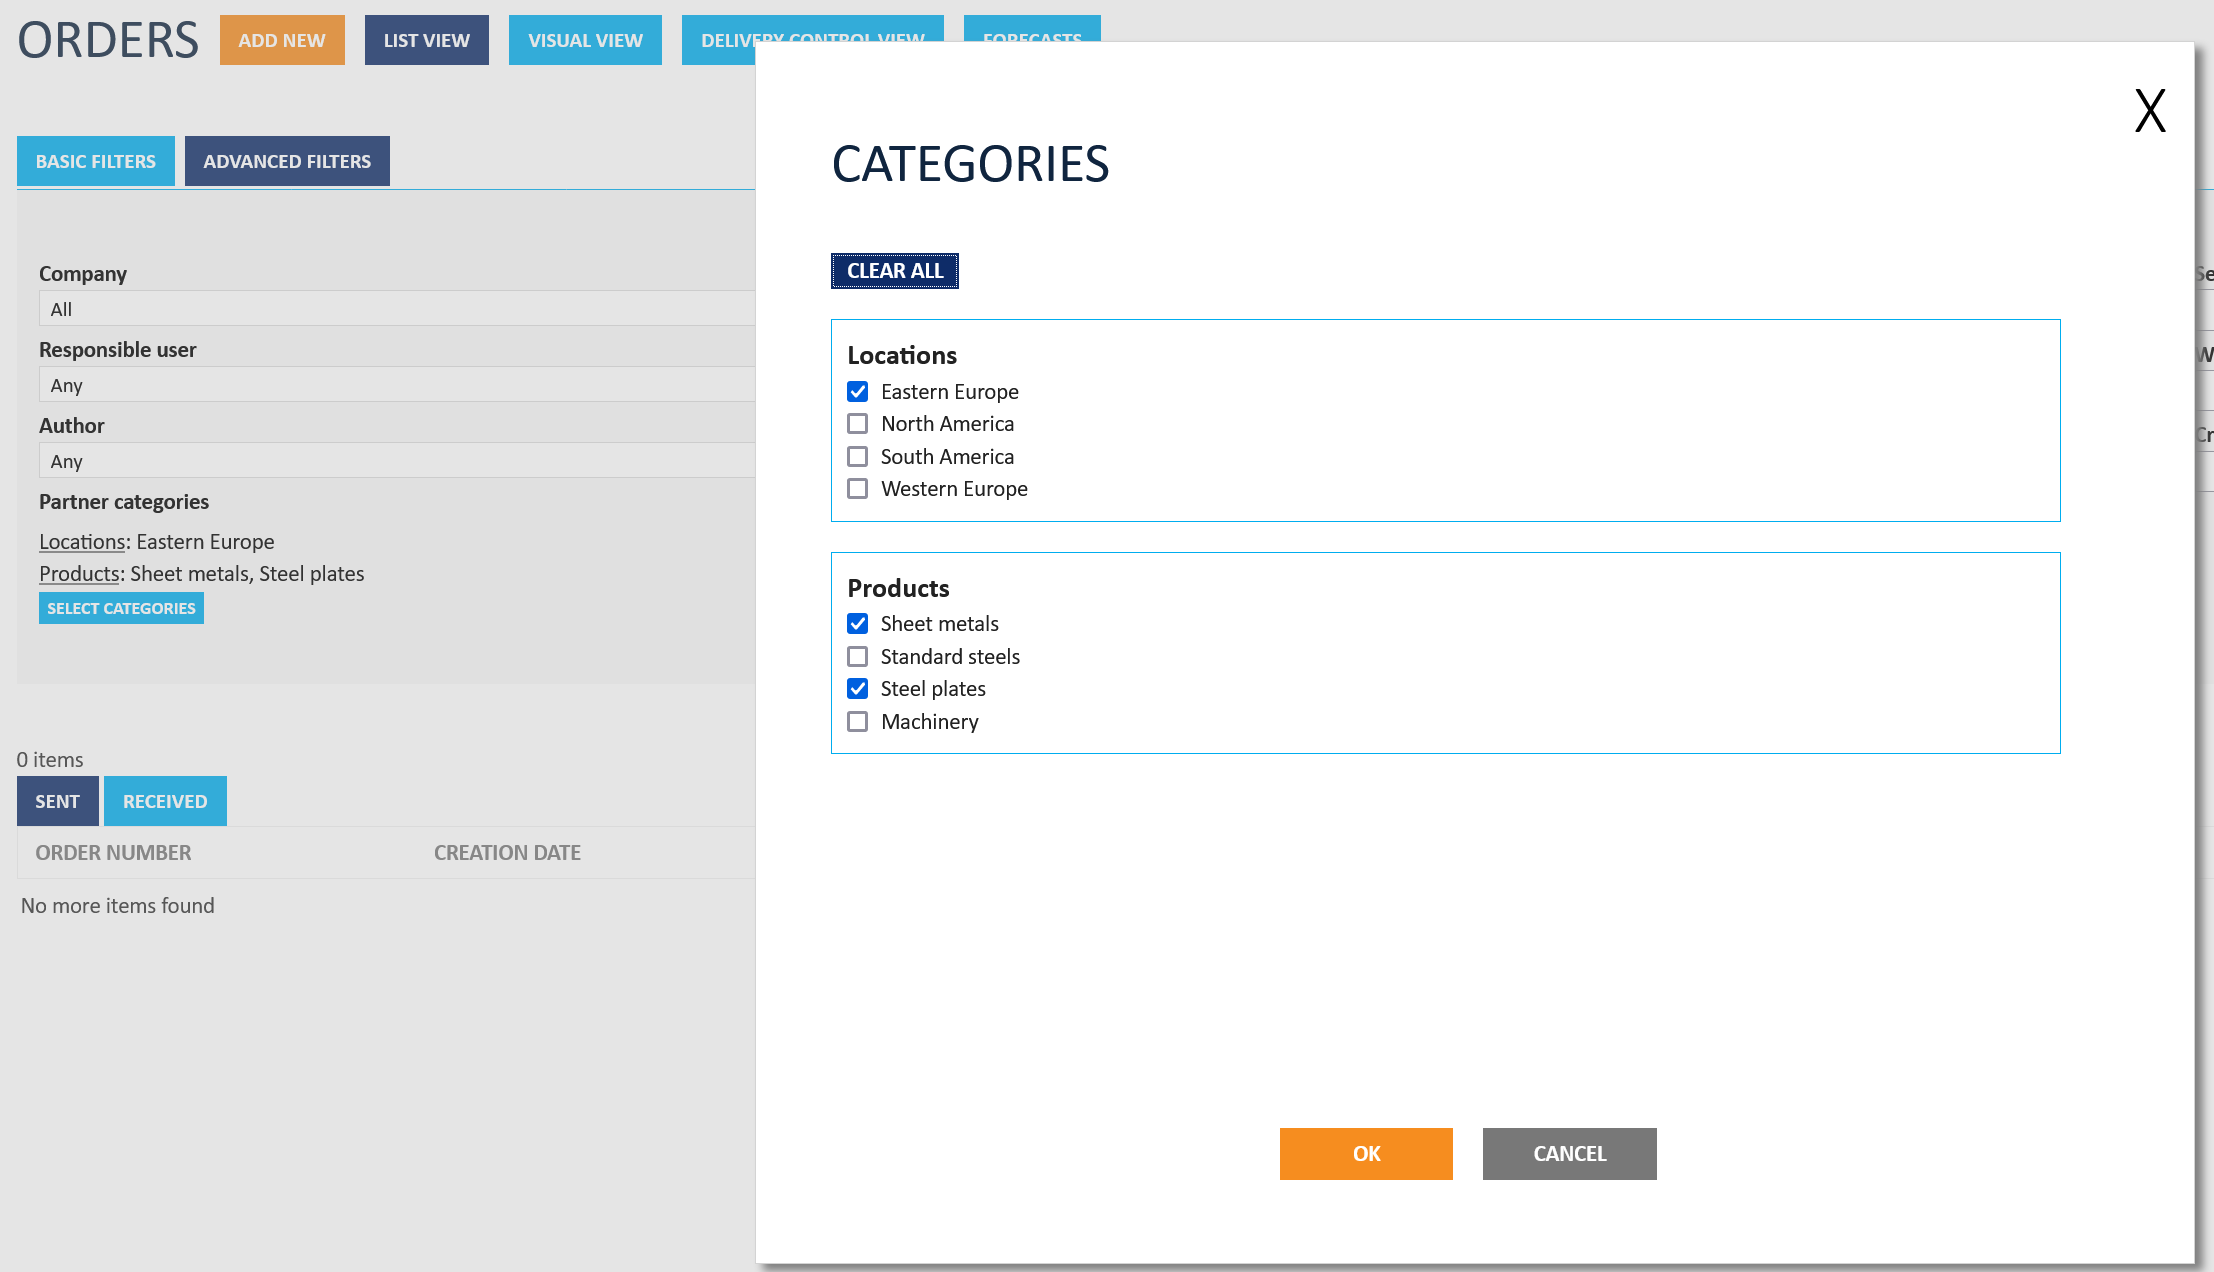
When companies are assigned to categories, Advanced Filters can be utilized to search itmes for companies in specific categories from all Jakamo Apps. Related to previous examples, for instance all the Orders made for Eastern Europe based companies supplying sheet metals and steel plates can be conducted by hitting the SELECT CATEGORIES icon from the bottom left corner in Advanced Filters on Orders App.
Searches can also be made in Network page by selecting the categories from the Filters -section.
7. Dashboard Links
Dashboard links can be used for instance providing links to guides, instructions or catalogs for company's Jakamo users. If your company has intranet or similar with specific URL addresses, links can be added with descriptions. Links will be visible only on User Dashboard, on the top left corner.

Several dashboard links can be added simultaneously. Text in "Title" field will be shown on User Dashboard. By hitting the title, new tab with the address written in the URL field will be opened for the user.
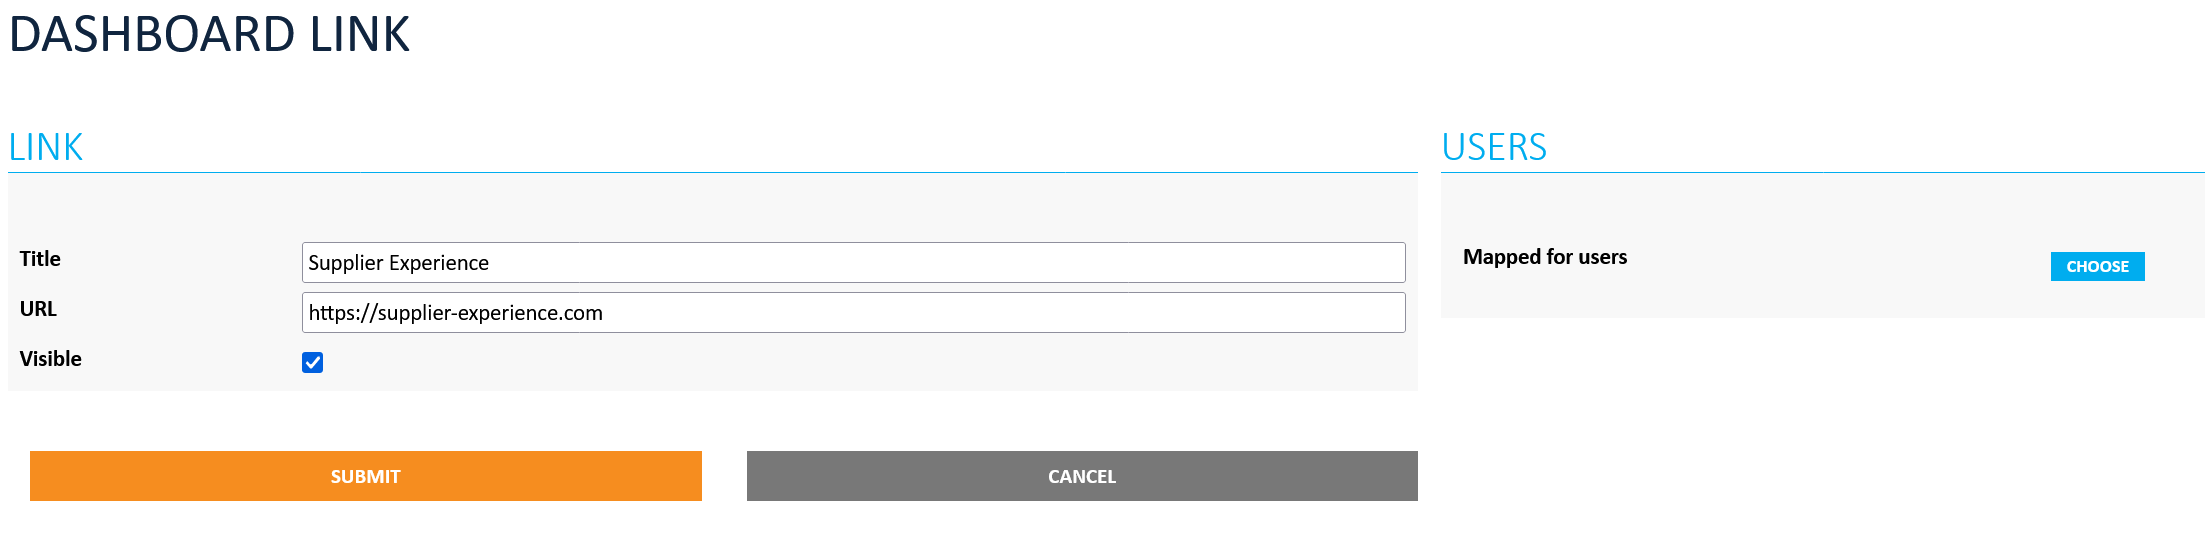
When adding or editing the Dashboard Link, users must be added. At least one user must be mapped to save the added link. Dashboard link will only be visible for the users mapped. Therefore, different links can be added for instance for purchasers, sellers, or supervisors.
8. Claims
These settings are related to Claims shared with supplier in Jakamo.
8.1 8D claim response
You can set the supplier's claim response form to follow the 8D process by default. Please note that this setting must be enabled at least once to activate access to the 8D form for all users in the Claims app.
When working with an 8D claim response, the expected resolution times and the required/optional settings of 8D steps are claim-specific. Your company’s claim settings define only the default values that are applied when a new claim is created when the Claims is created in the Jakamo's UI. (If the company claim settings are changed later, those changes do not affect existing claims.) When creating a new claim, you can review and modify the claim-specific 8D settings before saving the claim. The same settings can also be updated later by editing an existing claim. In the claim processing form, Jakamo shows which fields are required, making it easier to complete the response correctly. If the required setting of an 8D step is changed for a claim, Jakamo automatically adds a comment to the claim so that the change is visible in the claim history.
Compared to the Jakamo default response, the 8D response allows step-by-step processing of the claim for supplier, and step-by-step handling of responses for customer. Also, expected times for responses per discipline can be set by customer.
To set the 8D response as the default for new claims:
- Select
Create 8D claims by default (expect 8D processing from the supplier)instead ofCreate Jakamo claims by default. - Optionally, write informational text for each 8D discipline that will be visible to the supplier.
- Define the default expected response times for steps D3-D7.
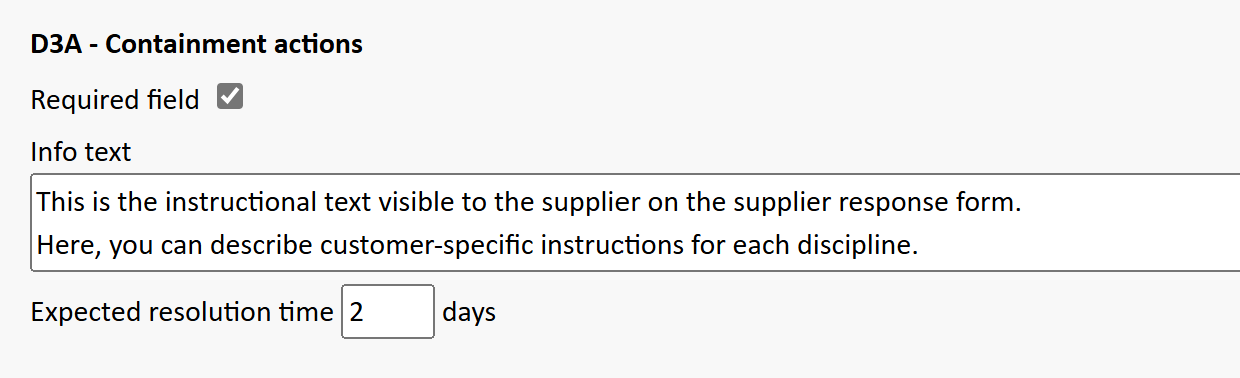
- Specify whether steps D3-D7 are mandatory for the supplier to respond to by selecting
Required fieldper discipline.- If
Require fieldis selected, supplier needs to set responsible user for that discipline in addition to provide an answer as a text.
- If
- Save changes by pressing
Save. After this, each new claim will require a response from the supplier according to the 8D process by default.
This is an example of the setting for discipline 3A containment actions:
Find instructions for 8D processing from Claims application instruction.
8.2 Status reminders
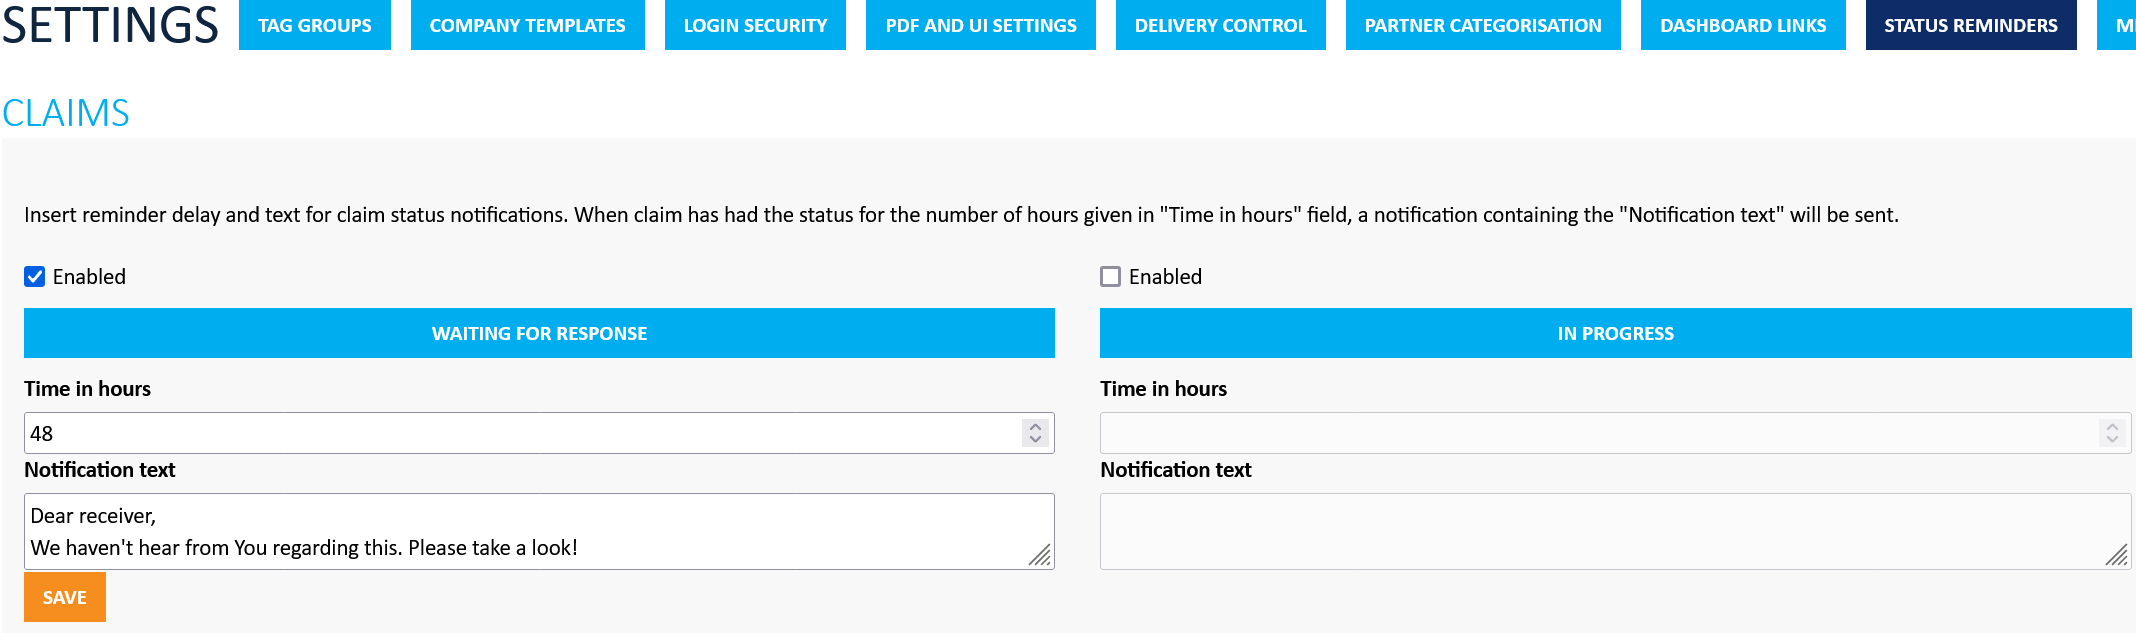
Status reminders allow automatic reminders for the responsible party (supplier) to proceed with open or unfinished claims. These reminders are sent to the company receiving the claim and the users assigned to it. Reminders are triggered when the defined time limits are exceeded and the claim reaches a certain status.
Status reminders can be added either for claims in status Waiting for response or In progress, or for both. Reminder is added by checking the Enabled tick box for the wanted status, giving the time limit in hours, and writing the notification text. After time in hours is reached with certain status, notification via email and Jakamo Dashboard Recent Activity feed is sent once. Both notifications include link to the claim in Jakamo.
This is an example of Jakamo sending a reminder for a claim that has been waiting for supplier response for 48 hours:
Please note that reminders for both statuses are sent only once. Recurring reminders cannot be set up.
9. Miscellaneous Settings
Miscellaneous Settings includes settings that can be turned on or off. Settings cover all of your company's Jakamo users. By checking the tick box beneath each setting, the setting is turned on, and by unchecking the setting is turned off.
Notification Settings - Auto follow relations
If this is checked:
- When new user is added, the user will have all existing relations followed automatically.
- When new relation is created between companies, the relation will automatically be added to followed relations for all users (in this company) in all apps.
You can learn more about the notifications from notification instructions.
Network Settings - Hide company users from your network
If this is checked, your company's users will not be visible for your partenrs in Jakamo if the visit in your company profile page.
Invoicing Settings
If this is checked, you do not need to input a reference number when creating an invoice. Instead, invoice number will be automatically used as the reference number.
ASN Settings
If this is checked, shipment numbers will be automatically generated for your suppliers. Therefore, suppliers do not need to fulfill any shipment no. by themselves.
10. Internal Guidance Settings
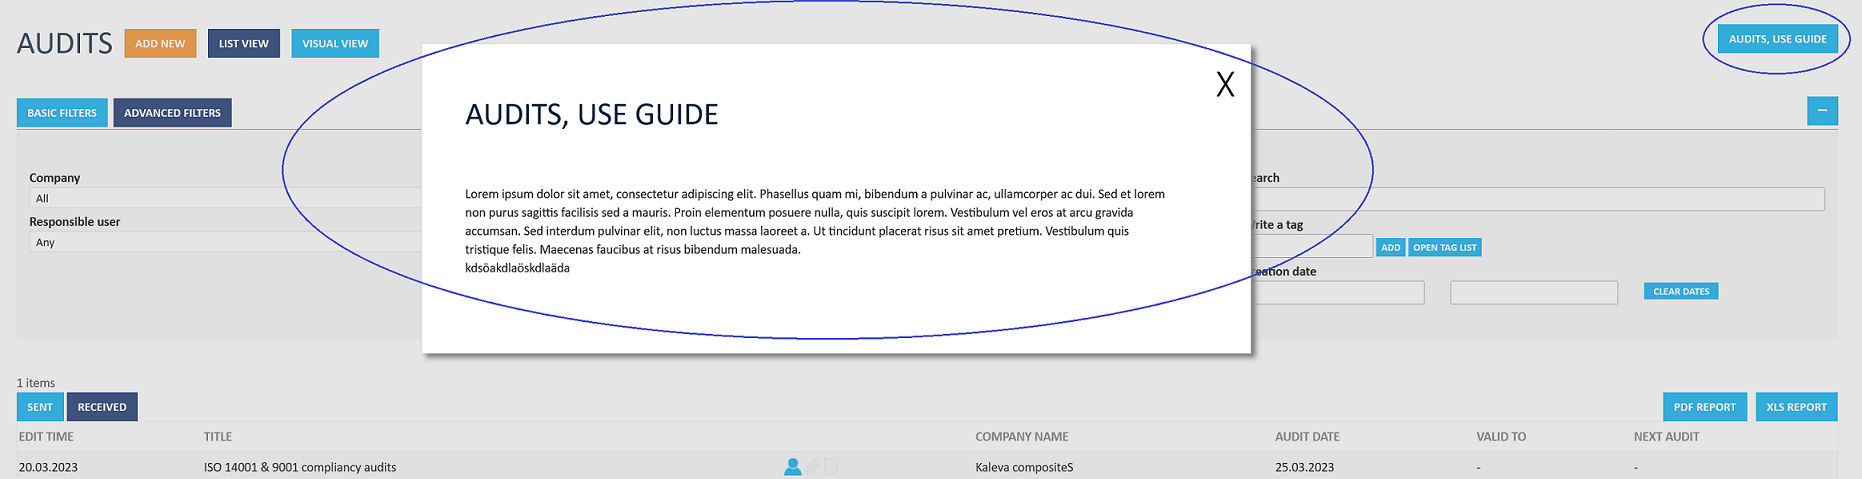
Internal Guidance can be added to each App used in Jakamo. Internal guidances are available to your company's Jakamo users to help them. Guidance is shown in the Jakamo user interface on the application's list view and in the specific items for each app where Guidance is added. Guidance is only visible for the Jakamo users in Your company, and not for instance to your supplier company's users.
Guides for each App can be added by writing the Title for the guide as well as the text. Text from the "Title" field will be added as an icon to the top right corner in the list and item view in the App user interface. Text needs to be added before the icon is added.

When Jakamo user from Your company hits the icon in the application list view in question, or in specific item i.e., for instance in specific Order, new window with the title and text given in Internal Guidance Settings will pop up.
11. Identifier Sequences
Here you can define automatic identifier generation for different applications. When these are set, identifiers will be generated automatically.
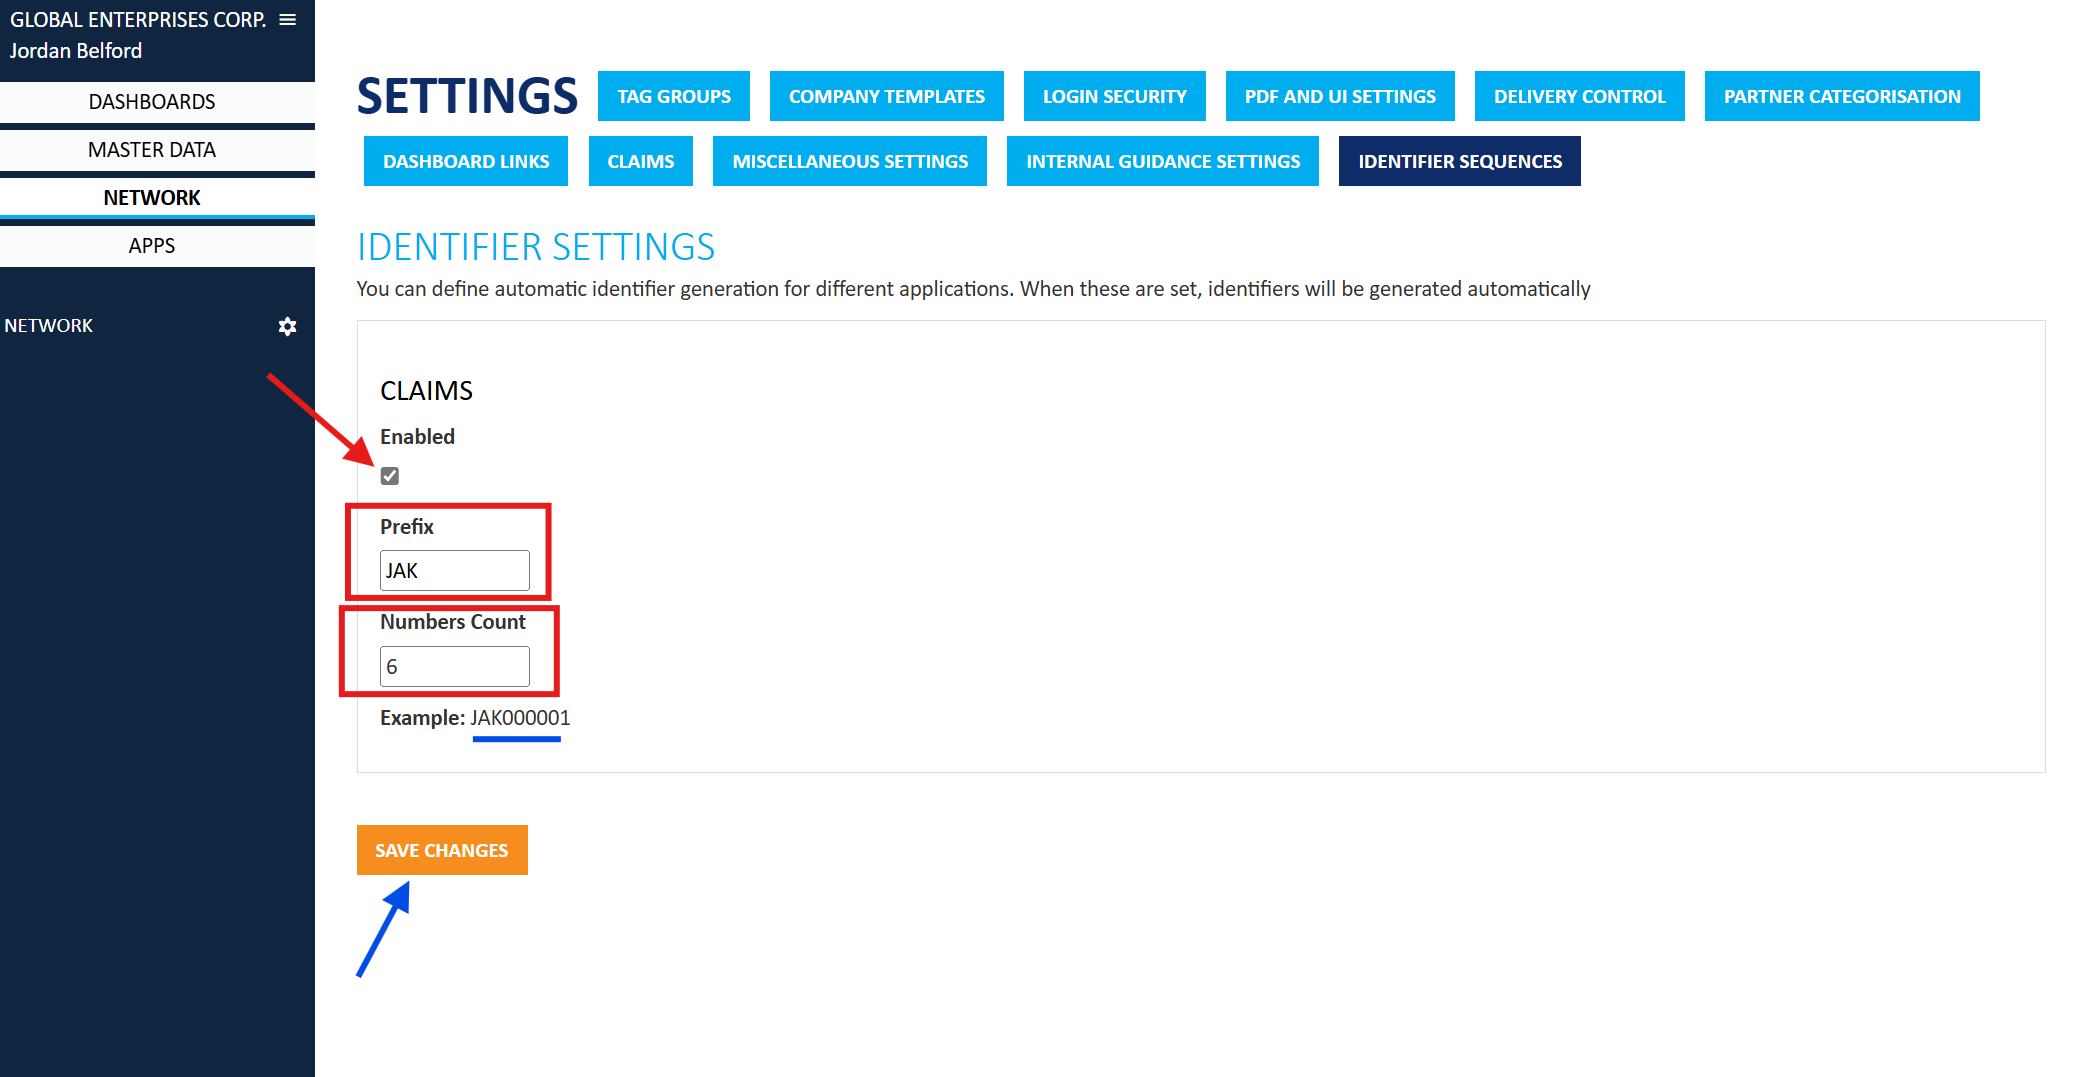
11.1 Claims
You can enable automatic generation of Claim IDs. When editing is enabled, you can define a prefix and specify the number of digits for the ID. After setting these values, an example of the automatically generated ID will be shown. Once you're done, click Save at the bottom of the page.
Didn't you find what you were looking for? Send email to Jakamo support (support@thejakamo.com) and we will help you.