My Company
My Company is for presenting, adding, and editing company info, such as Jakamo ID, addresses, and industry, as well as for adding, editing, or removing users.
All content shown on the My Company page is public in default and thus visible to Your partner companies, i.e. all companies with Your company have relations in Jakamo. You can find instructions for hiding users here.: Hide company users from your network
Since all data is visible to Your partner companies, make sure facts and details are up to date, your description of Your company is agreeable and clear, and all necessities are presented.
1. My Company
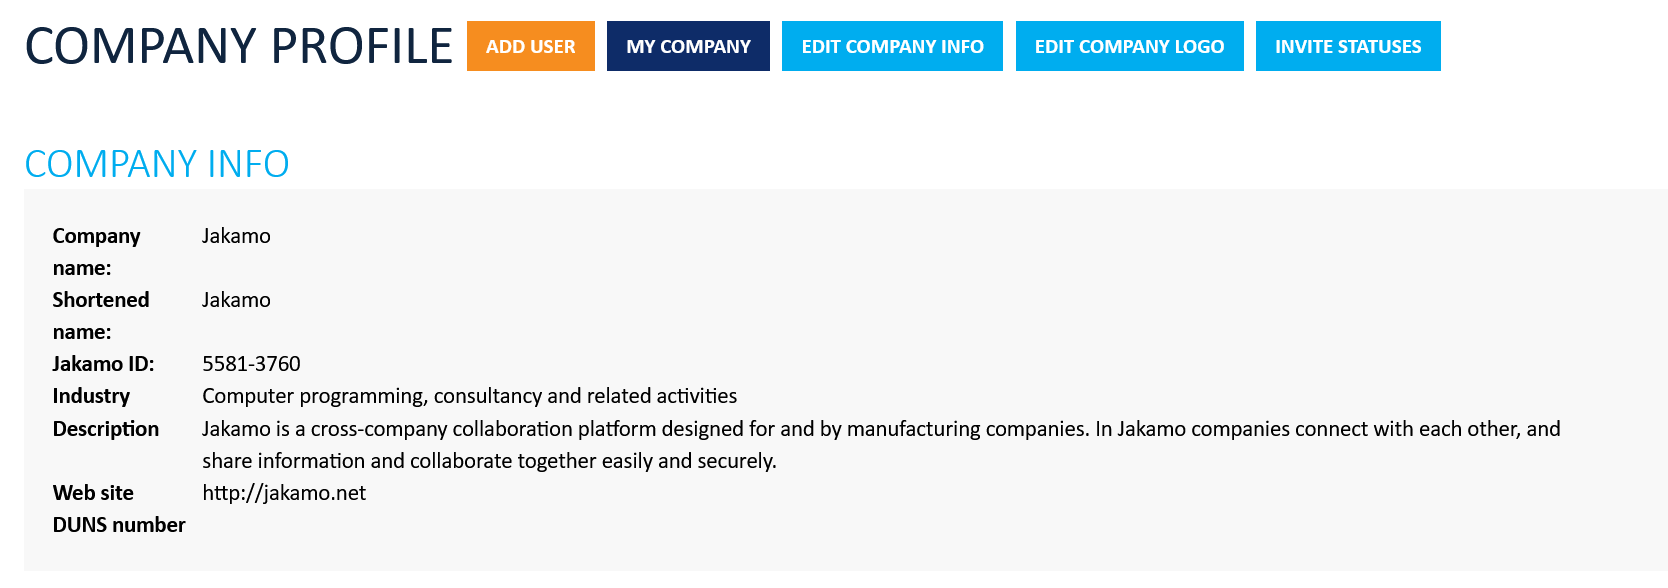
My Company landing page presents Company Info, Certificates, Awards, and Company Users, which are available on the top part of My Company page.
Guides for each functionality are presented later, shortcuts are on the right-hand side column.
1.1 Company Info
Company Info shows the basic and contact information for Your company. These can be edited via Edit Company Info
1.2 Certificates

Different certificates, such as ISO 14001, 9001, and 55001, Your company holds can be added to the certificates list. Each certificate can be edited and removed, as well as assigned to persons in responsibility. Validity periods and statuses can be indicated. Notes and also attachments, such as Confirmation of Compliance, can be added, edited, and removed.
1.3 Awards
Awards, medals, and trophies Your company has received and that you want to share with your partner companies can be added, edited, and removed. In addition to basic info, also attachments, such as certificates can be added.
1.4 Company users
Jakamo users in Your Company are listed at the bottom of the My Company page. The list includes active users as a default, but also inactive users can be included by hitting the icon on the bottom left corner of the list. EMAIL column shows the username each user uses when login into Jakamo.

User roles
Jakamo users can have two different roles:
- COMPANY ADMIN
- MEMBER
Both roles can view the same content in Jakamo and have access to all Jakamo applications. Both, company admin and member user, can interact with business partners in Jakamo without needing additional rights or permissions for successful daily use. The company admin can manage company account-related activities, such as Settings, and Integration settings. Both roles can manage their personal settings, including My Profile and Notifications.
Company admins can manage other user's roles within the company. Member role is suitable for most users. Company admin role does not have any limitations; all credentials in Jakamo are included.
It’s advisable to keep the number of company admin accounts limited but sufficient for company's needs.
Our recommendation is to have 2-5 users with company admin roles per company, site, division, or other unit in use. Since users with company admin roles are entitled to all actions in Jakamo, sometimes the great number of users with this role can cause more harm than good.
Company admins can (restricted from Members):
My Company:
- Update company information on the My Company page
- Add new users to the company account (if SSO is not in use)
- View your user invite statuses
- Manage company users (inactivate or activate them, change user roles)
Network:
- Create relations with other companies in Jakamo
- Send relation requests, accept or decline relationship requests, and disconnect relationships with other companies
- Send company invitation to invite new company to Jakamo network
Integrations:
- See the Integrations tab and manage your company's integration's settings
- See all active integrations your company has
- Create and remove user mapping and company mappings
- Manage integration authentication (OAuth2.0 or basic auth)
Company settings:
- Can manage your Jakamo company account related settings in the Settings
Master Data:
- Company admin can add new company to master data, manage master data template, and edit supplier's master data profile information.
2. Functionalities
The functionalities on the My Company page include managing user accounts and company information. Find instructions on how to:
- Add new users to company account
- Inactive users from company account
- Reactivate removed users
- Unlock locked users
- Manage your user invites on Invite statuses page
- Edit your company's information
- Edit your company's logo
These functionalities are available for modifications only for company admin users.
2.1 Add user
More information can be found here: Federated Identities. If you are interested in establishing SSO, please contact Jakamo Support (support@thejakamo.com).
The method for inviting new users to Jakamo differs based on the login method used (SSO vs. Basic login)
- If you are using SSO, follow the instructions in section 2.1.1 How to Add Users When SSO is Used
- If you are not using SSO, follow the instructions described in section 2.1.2 How to Add Users in the Jakamo User Interface
2.1.1 How to Add Users When SSO is Used
Access to Jakamo is controlled through your organization's Active Directory (AD). Permissions can be granted or restricted by managing the AD groups and their members. In other words, new users cannot be invited to Jakamo directly through the user interface — access is managed entirely via your organization's AD settings. More information about SSO login and user management can be found here: Key concepts in Federal Identities.
2.1.2 How to Add Users in the Jakamo User Interface
The Add User feature allows you to invite new users to Jakamo within your company. This ensures that each new user receives and accepts the privacy policy and terms & conditions.
Only add your colleagues to your Jakamo account! Do not add your suppliers, customers, or any other external individuals to your company account. Everyone who has access to your company account can see everything that has been shared with you on the Jakamo platform.
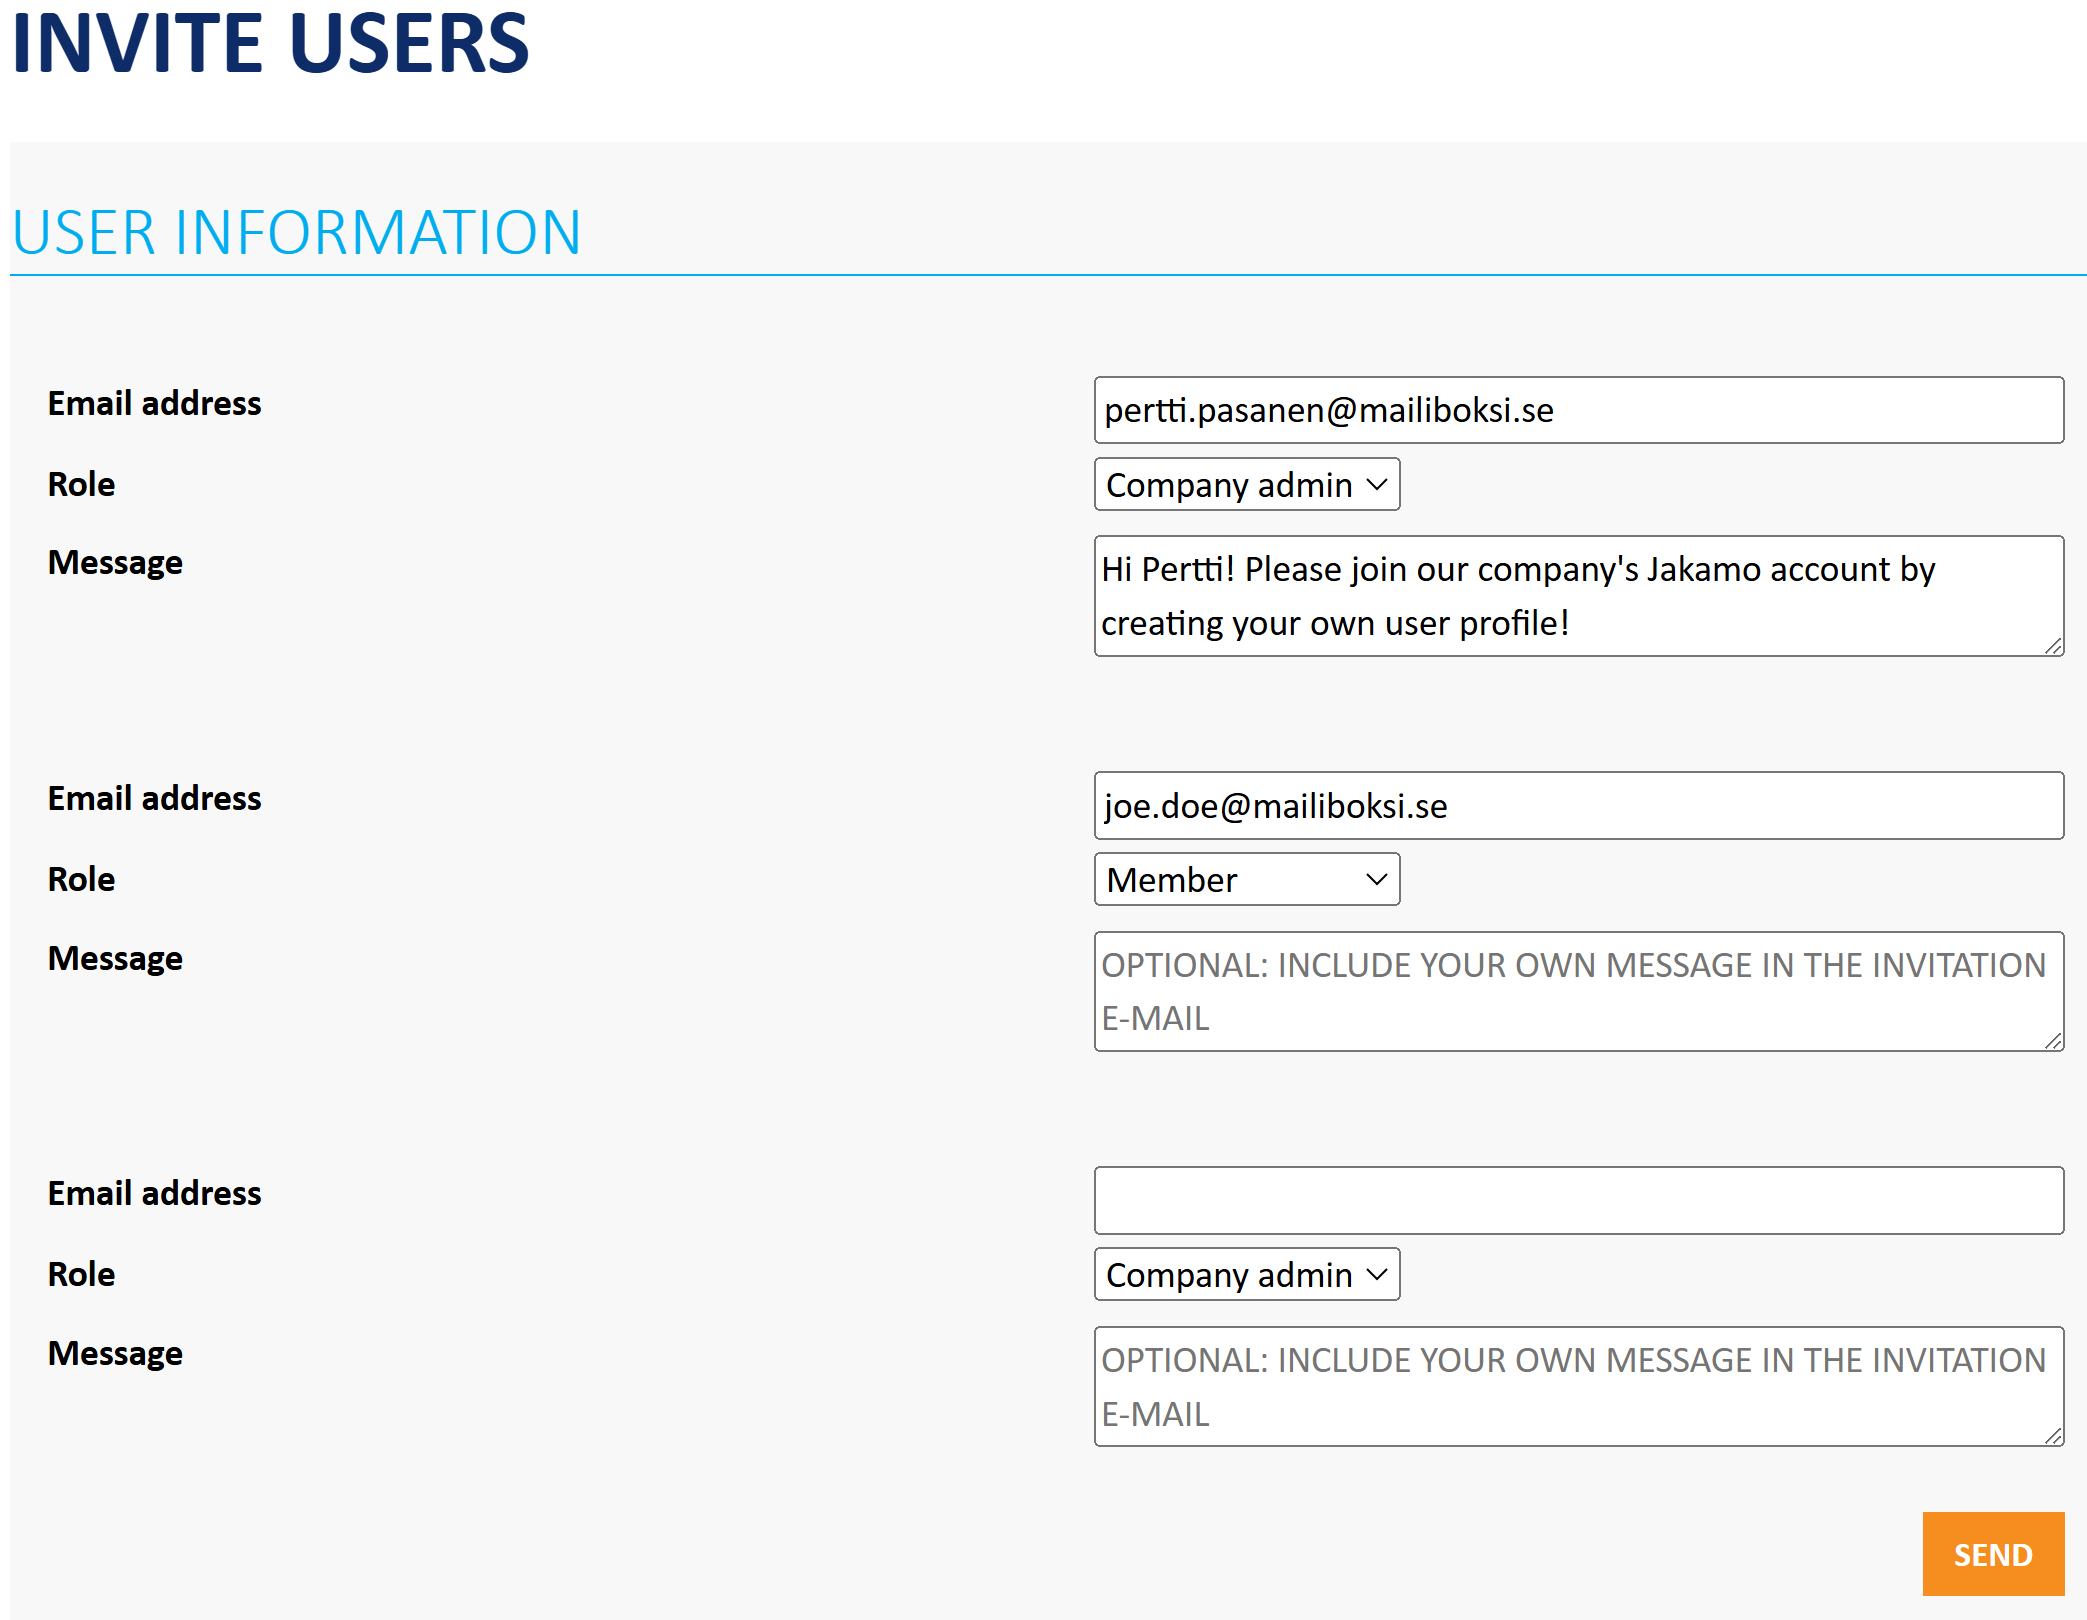
Steps to invite a new user:
- Navigate to Add user page directly from the settings menu or via My Company page.
- Email Address: Enter the email address of the person you want to invite.
- Select Role: Choose the appropriate role for the new user.
- Optional Message: You can include a personal message in the invitation email.
You can invite 1 to 3 new users at a time. If you need to add more users, simply click the Add User icon again and repeat the process.
Invited colleague will receive intivation email from Jakamo to create their own user profile. Without an optional message, new Jakamo user receives the invitation email like this:
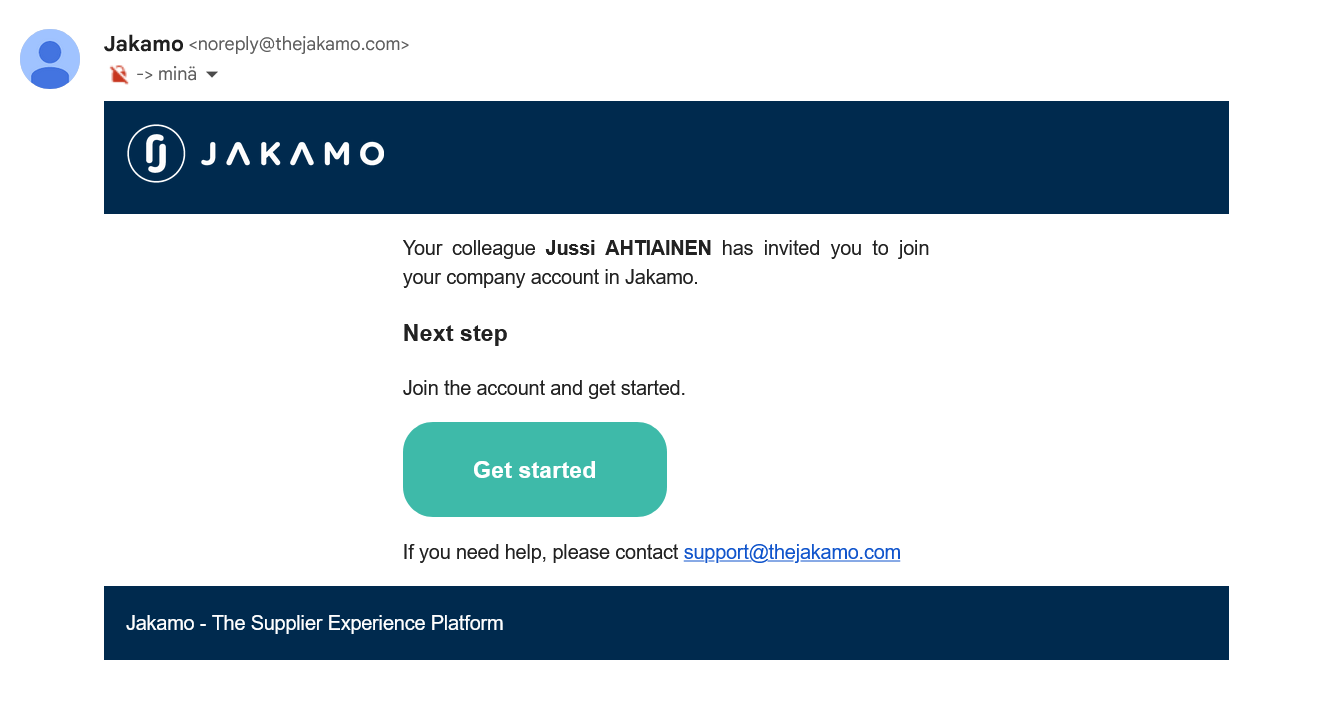
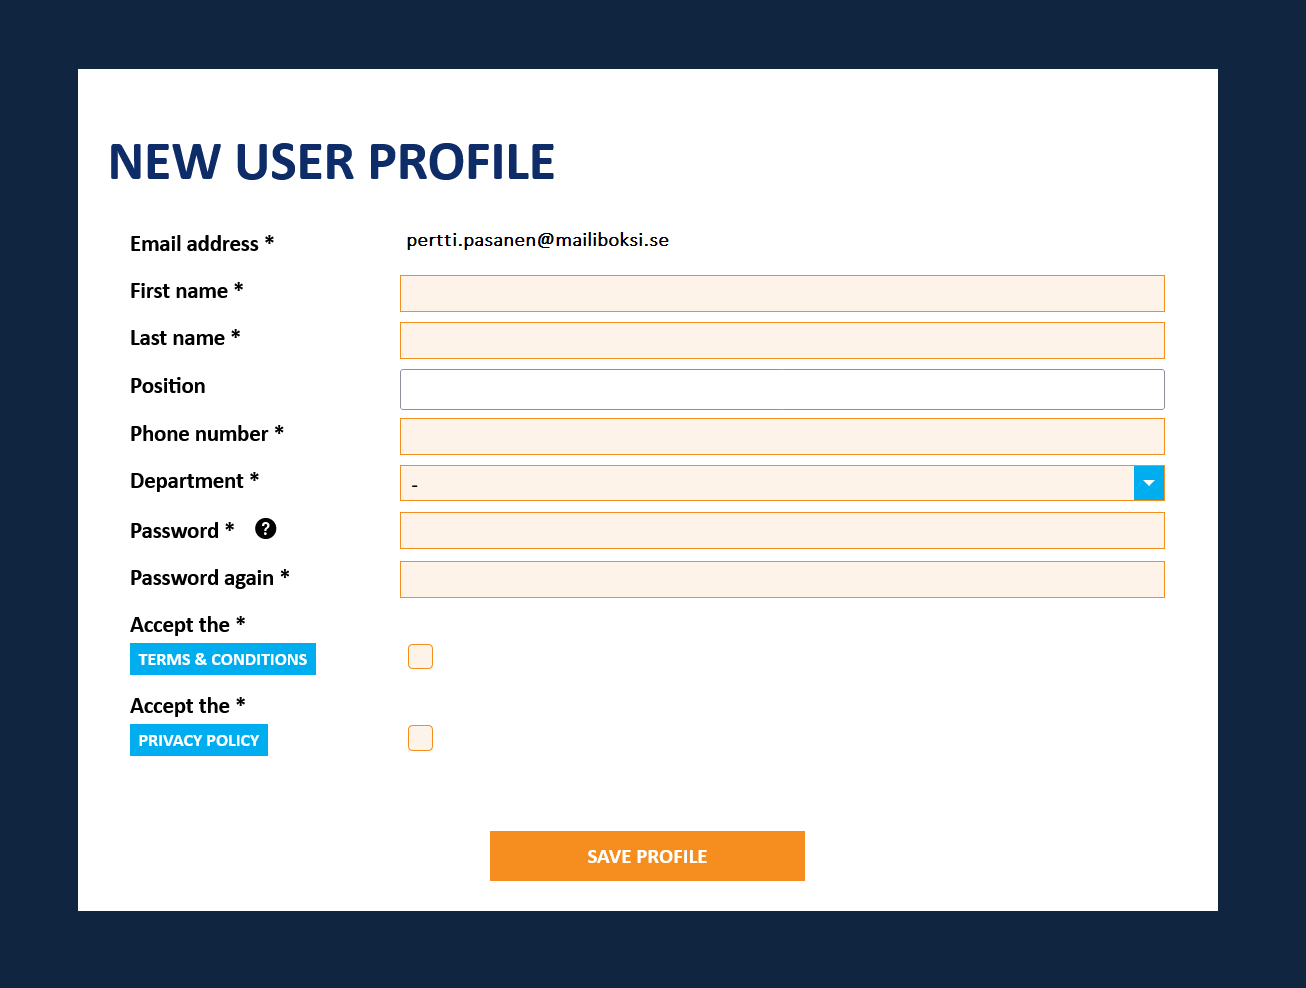
When clicking the GET STARTED button in the invitation email, a new window will open. Here, new Jakamo users can enter their basic information, including:
- Name
- Phone number
- Department
- Personal password
After reviewing and accepting the privacy policy and terms & conditions, save all the details by clicking the SAVE PROFILE button.
Once registration is complete, new users can log in to Jakamo using their email address (as username) and personal password.
Learn how to add a user with the help of a short tutorial video:
2.2 Inactivate (remove) user
If you're a company admin in Jakamo, you have the ability to inactivate user accounts from your company's account. This is useful when an employee leaves the company for any reason.
To inactivate a user:
- Navigate to the
COMPANY USERSin the My Company page. - Look for the active user you want to inactivate. You'll see a
REMOVEicon next to their name. - Click on the
REMOVEicon and Confirm user removal window will appear. - Confirm the user removal in the pop-up window.
The user's account will then be inactivated, and they will no longer be able to log in to Jakamo by using their email address as an username.

When a user is removed from Jakamo, an email notification is automatically sent to their registered email address. The email will have the following details:
- Subject: "Account removed in Jakamo"
- Message: "Your account has been removed from Jakamo by [Remover's First Name], [Remover's Last Name]."
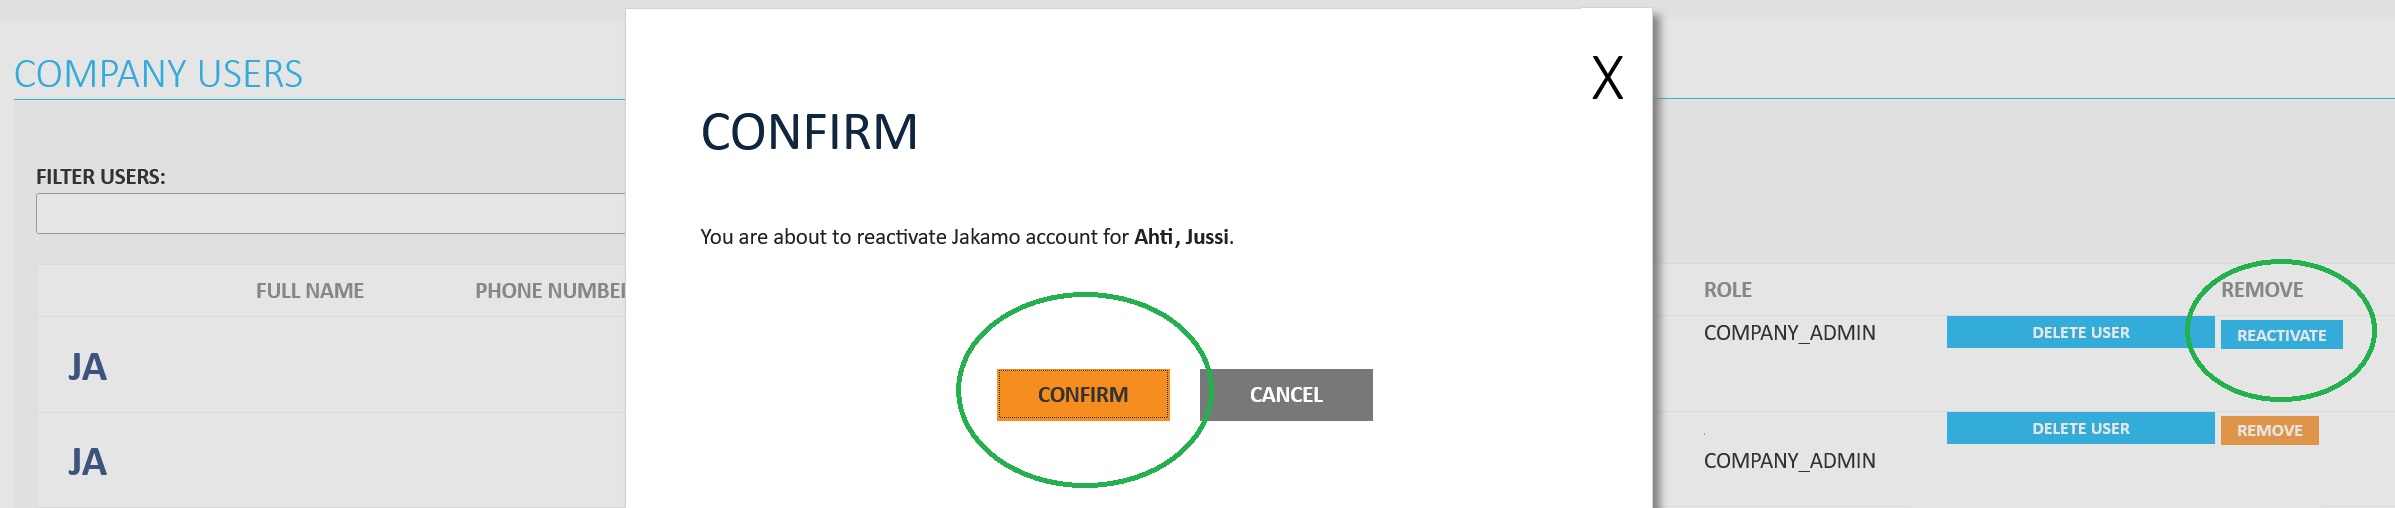
2.3 Reactivate the removed user
If a Jakamo user account has been inactivated (same as removed), you can easily reactivate it from the user list. By default, inactivated accounts are hidden.
To view inactivated users and to reactivate them:
- Click the
SHOW ALSO INACTIVATED USERSicon at the bottom of the user list. This will display all inactivated users. - Find the user you want to reactivate and click the
REACTIVATEicon. - Confirm the reactivation. The user account will then be active and are able to log in to Jakamo.
If the user has forgotten their password, they can find a quick guide on how to reset password from the Jakamo FAQ.
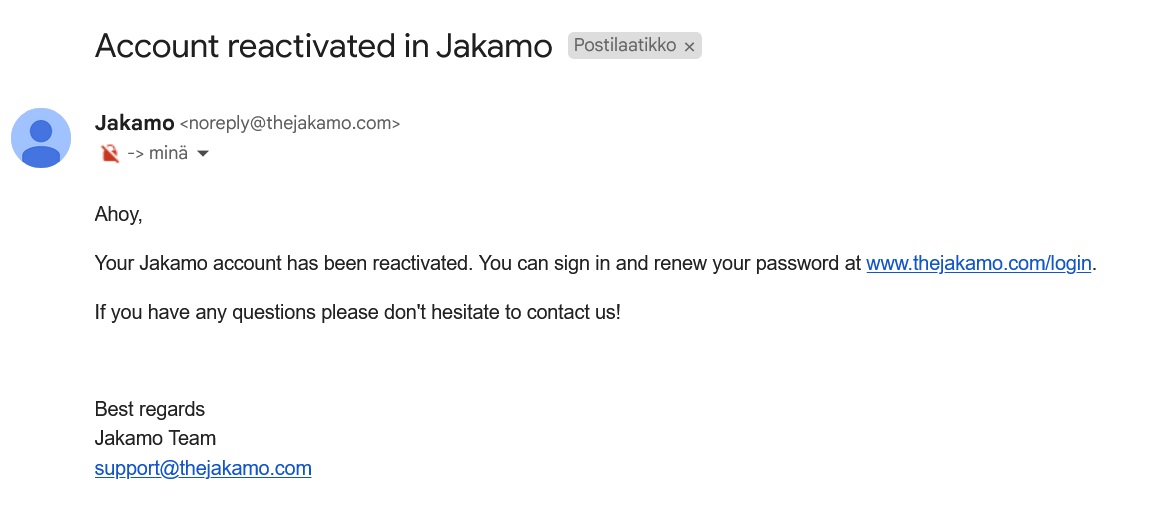
When a user account is reactivated, the user will receive information about that via email notification at their registered email address:
2.4 Unlock locked user account
If password management is activated, user accounts can be locked after several failed login attempts. Users with a company admin role can unlock these accounts from the COMPANY USERS list at the bottom of the My Company page.
If an user account is locked, orange UNLOCK icon is visible on the right-hand side of the line for the user in question. User account will be unlocked simply by just hitting the UNLOCK icon and confirming the action in the pop-up window opened.
Steps to unlock a user account:
- Look for the orange
UNLOCKicon on the right-hand side of the line for the locked user. - Click the
UNLOCKicon. - Confirm the action in the pop-up window.
Once the user account is unlocked, it may be a good idea to reset the password. Follow the reset password instructions to do this.

Since the user has either misspelled or forgotten their password, suggesting a change might be relevant. The easiest way for the user to change their password is to click the Forgot your password? link on Jakamo's login page.
2.5 Edit Company Info
Your Company's basic contact info is managed in EDIT COMPANY INFO.
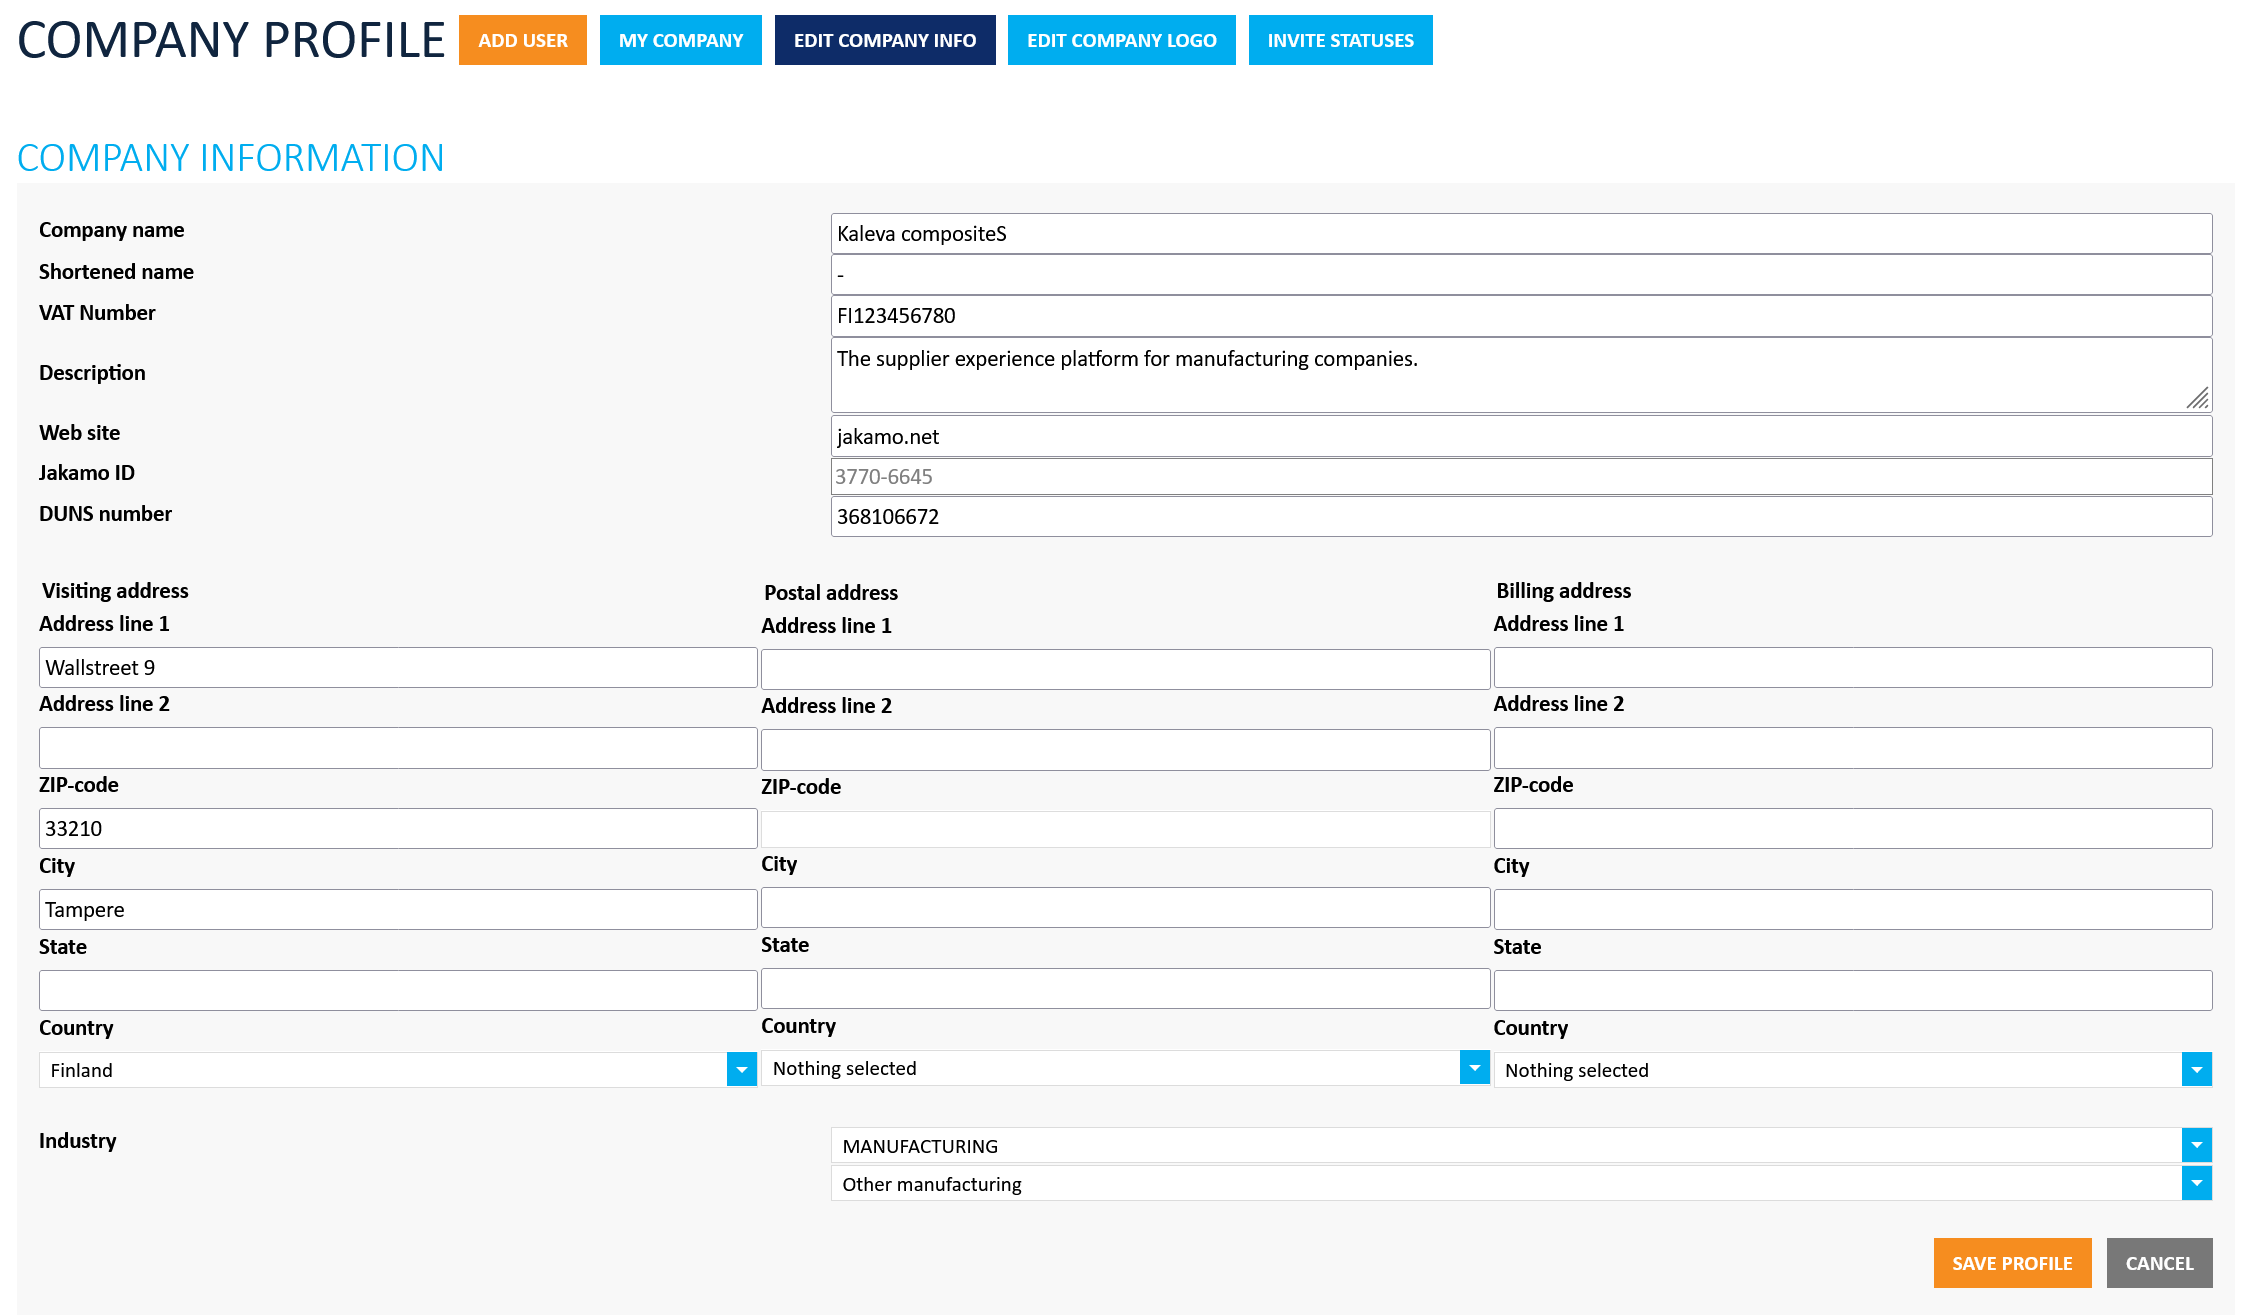
Your company's name, city, and country from the "Visiting address" column will be visible to other Jakamo users in the "Find companies" and "Create Relation" functions in the Network module. Make sure this information is correct so your partners can easily find your company on Jakamo!
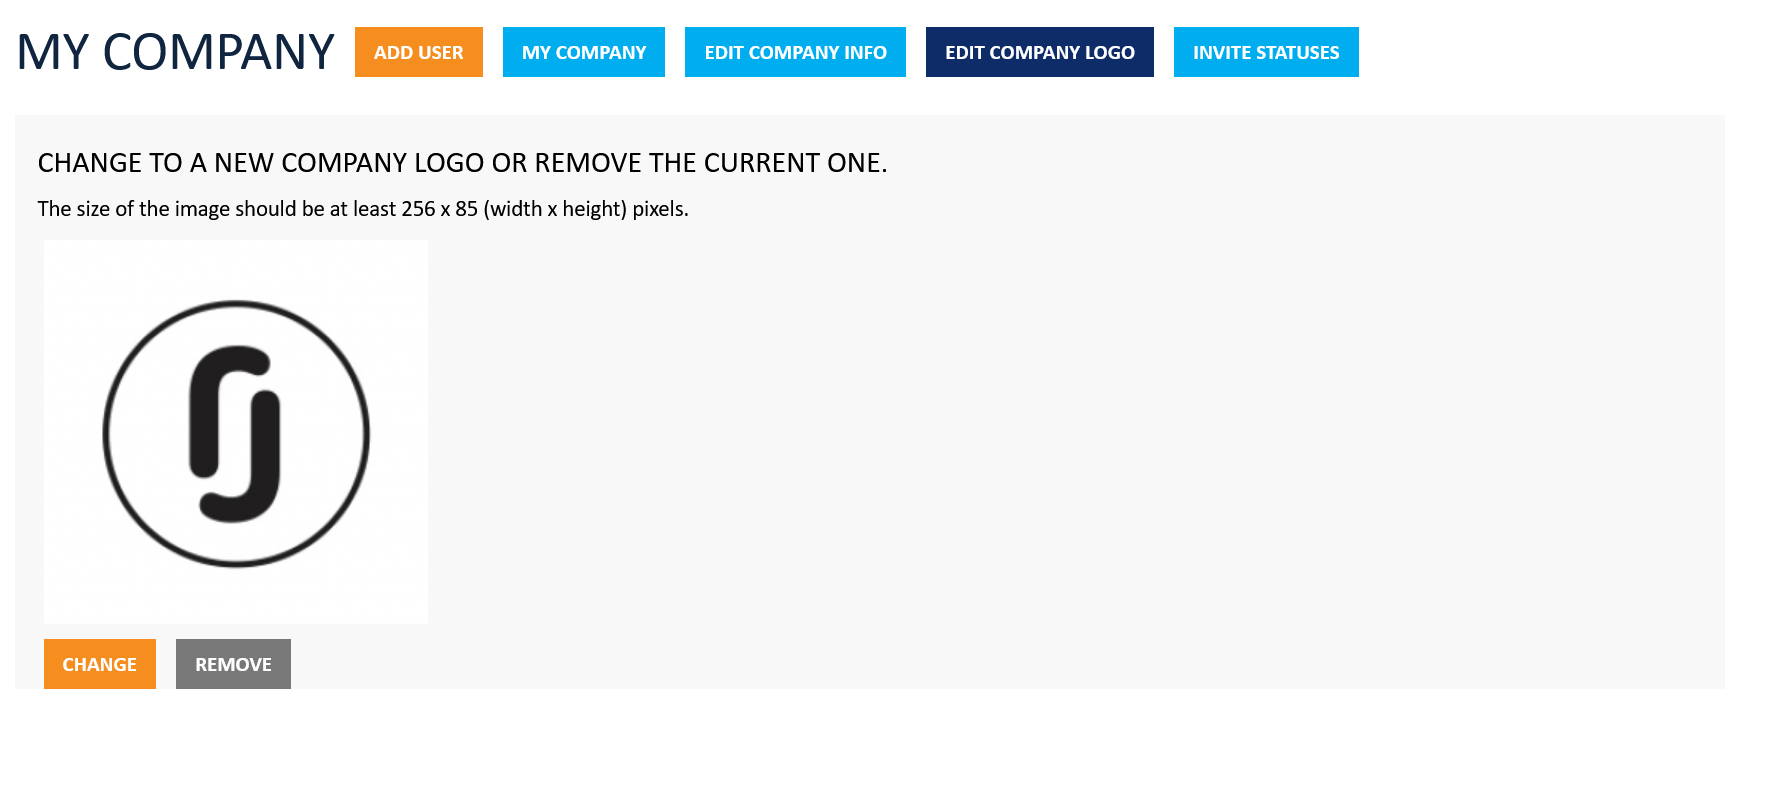
2.6 Edit Company Logo
Company logo is visible on different .pdf reports exported from Jakamo as well as in the company profile for other Jakamo users to see. The logo needs to be at least 256 x 85 (width x height) pixels and of typical logo formats such as .jpg, .jpeg, or .png.
2.7 Invite statuses
Invite statuses show all sent user invites. Status can be either Pending, Accepted, Canceled, or Expired:
- Pending: Invite has been sent, but the user has not registered to Jakamo
- Accepted: The user has registered to Jakamo and is thus visible in the user list
- Cancelled: Pending invite has been canceled by company admin
- Expired: After a few weeks, the pending invite expires
Pending invites can be canceled by any user with a company admin role. If an invite has been sent for instance to the wrong email address, and the user has registered to Jakamo, the user account needs to be removed from the COMPANY USERS list.
3. Miscellaneous
Useful things without obvious header for Company Admin users are gathered here.
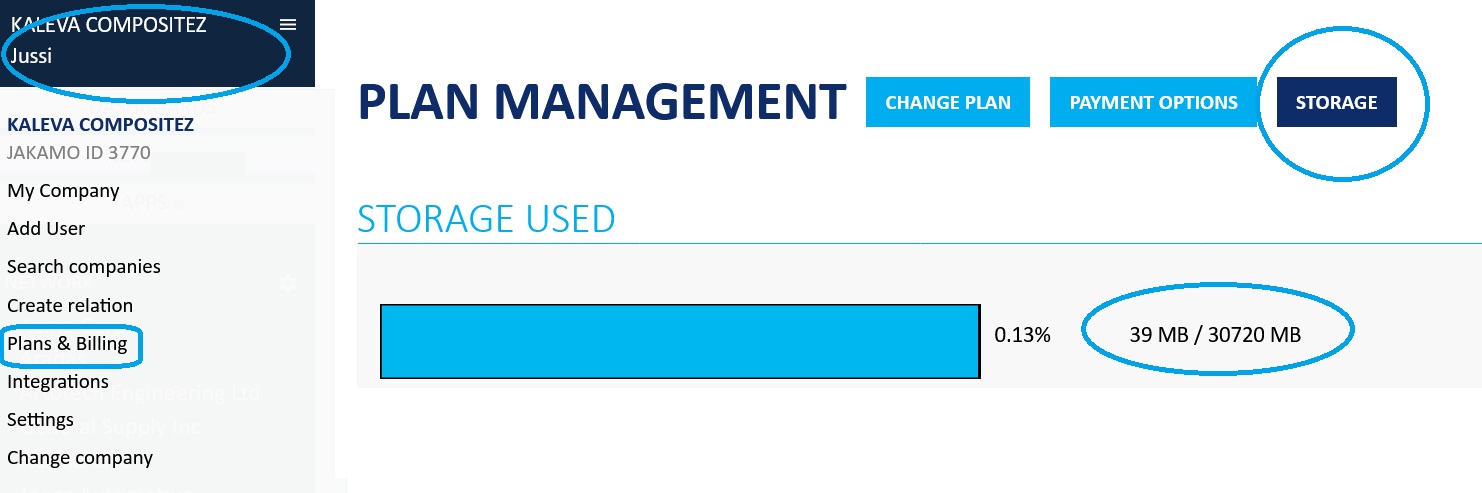
3.1 File storage use
Depending on the Jakamo plan your company has, file storage maximum size can differ. It starts from 2 GB in Jakamo Basic plan, and increases to 50-80 GBs in Jakamo Enterprise plan.
Storage used can be easily checked from the Storage tab. Navigate to hamburger menu (click your own name from the top left corner on Jakamo web user interface), hit "Plans & Billing" and find blue STORAGE icon from the top of the page.
Storage view shows the usage of storage space in percent and in MB. Note that 1 GB = 1024 MB.