Operative Sustainability
1. Short introduction to Products
Products is designed for collecting item-specific information. The purpose is to facilitate and clarify the collection of item-specific information for sustainability reporting, but the functionality is suitable for all item-specific data collection.
As the customer orders items in purchase orders from their suppliers, the item information is generated into Jakamo's database. This means, in other words, that neither the customer nor the supplier needs to separately import their items into Jakamo / Products, ensuring that all product information is always up-to-date, significantly simplifying the process.
The customer can fully define what item-specific information they want to collect. Whether the need is based on CSRD, CSDDD, EUDR, CBAM, RoHS, REACH, DPP, or something else, this is possible with Products. The collected data can also be exported to an external system via an API interface.
Jakamo also recognizes the importance of this matter, so we continuously strive to develop the functionality to better meet the needs of our customers and their suppliers.
Here are the quick access links:
- Gathering item-level information from your supplier (customer perspective)
- Providing item-level information (supplier perspective)
- Application basics (for both customers and suppliers)
- Practical recommendations (for both customers and suppliers)
See a short tutorial video of how to collect scope 3 data from purchased items using Jakamo Products:
2. How to find Products
Products is linked to the Orders application to enable transparent information sharing about ordered items.
You can access Products:
- either from the left-hand navigation

- or by navigating to APPS -> Orders -> Products

On the Products page, select Help in the top-right corner to open this user guide in a new browser tab.
3. Basics of Products
Section 3 introduces the Products functionalities in the numerical order shown in the image below.
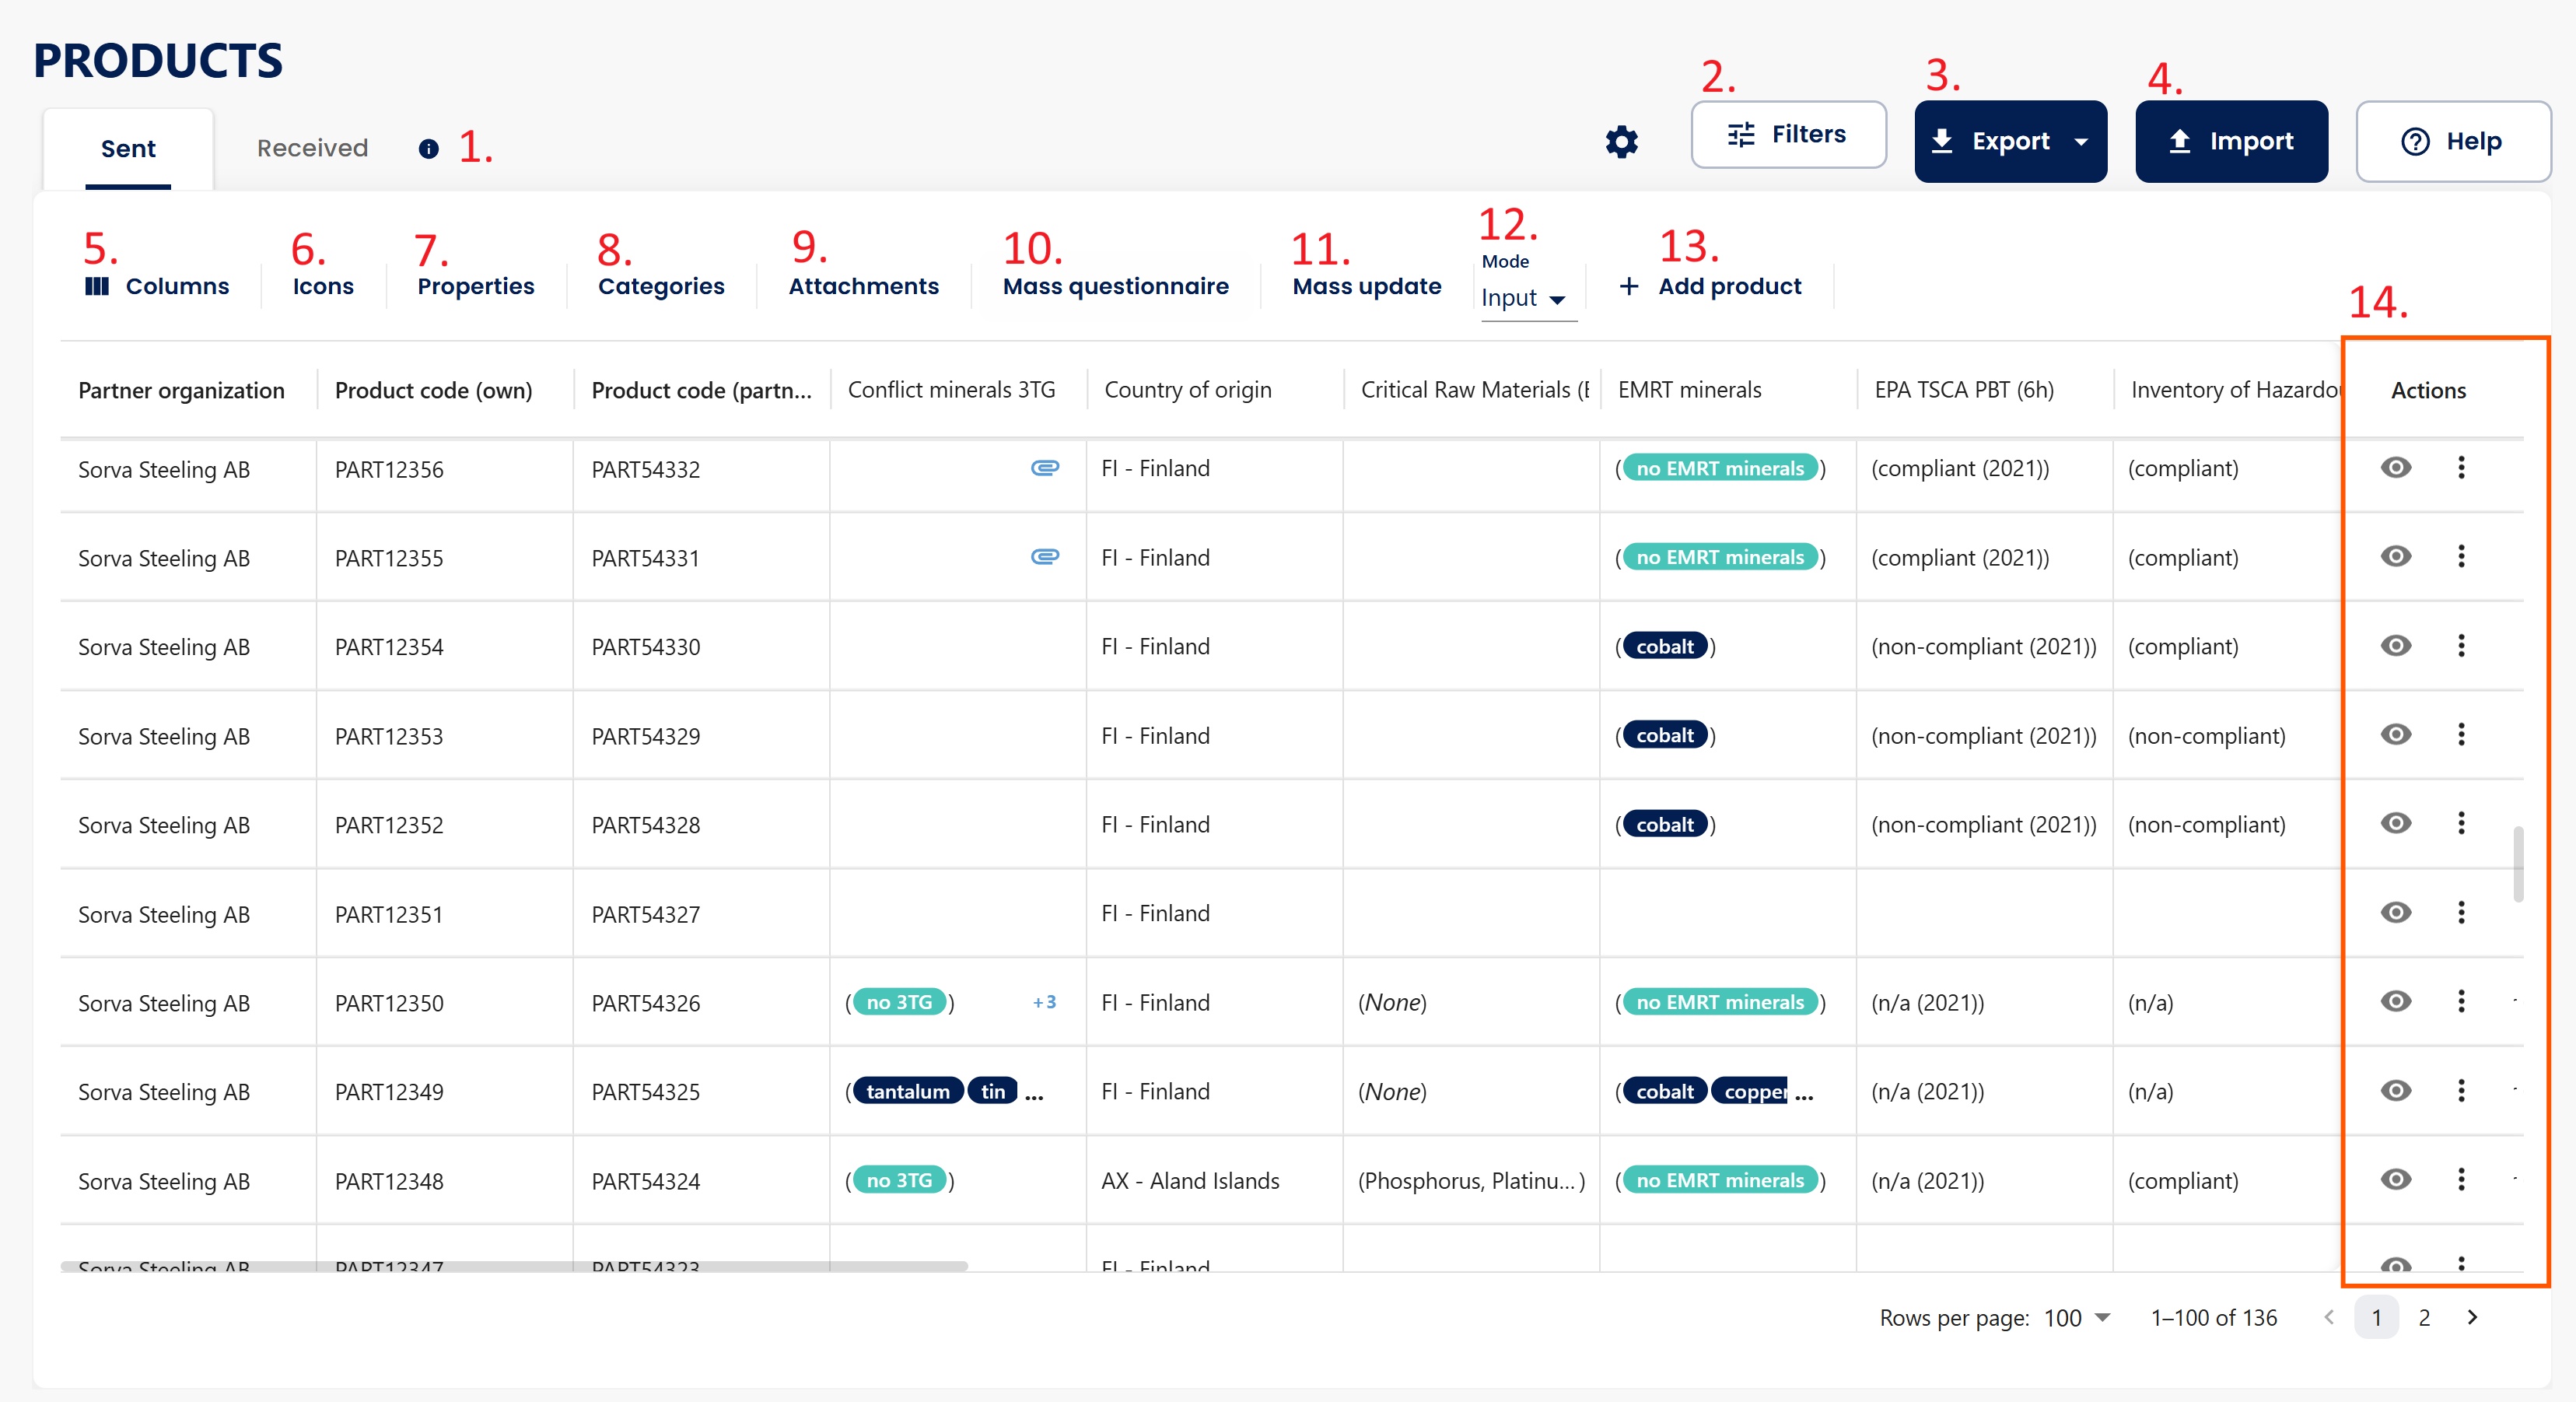
3.1 Sent / Received
- Sent: Displays product details for items added by your party and items for which your party has provided information, along with corresponding data provided by the other party.
- Received: Displays product details for items added by the other party, along with corresponding data provided by your party.
The questionnaire status shown for an item — for example a pending response icon, or the Questionnaire status filter described in Filters — always reflects both the sent and the received questionnaire for that item, no matter whether you're viewing Sent or Received. You don't need to switch tabs to see the full picture.
3.2 Filters
Open Filters in the top-right corner to narrow the product list. Filters apply to both Sent and Received views and are also respected by Excel export.

General filters
- Search: Enter one or more product codes (your own or your partner's) and press Enter or select the + icon to add each term. You can search multiple codes at once. Product codes come from purchase orders.

- Category: Limit the list to items in selected categories. See Categories.
- Business Unit: If business units are enabled, select one or more of your own business units. Items are assigned to business units based on sent and received purchase orders.
- Partner organization: Select one or more partner relationships. When business units are in use, partners are grouped under their business unit name so you can filter a specific buyer–supplier relationship (for example, the same supplier on different plants).

- Questionnaire status: Show items where a response is pending from you or from your partner.
Property filters
Use Property filters to filter by property values such as RoHS, REACH, 3TG, EMRT minerals, or custom properties. You can combine several property filters and choose whether to match your own values or your partner's values.

Property filters use the same criteria as the list view (text, options, numbers, yes/no). For example, you can list all items where Tantalum is marked under 3TG, or where cobalt is marked under EMRT minerals. See EMRT minerals. 
3.3 Excel export
All the completed data can be downloaded as an Excel file, and likewise, it is possible to upload data to Jakamo via Excel import.
Select EXPORT when you want to download the data. The exported Excel file respects the column structure defined in Products, so make sure to arrange the columns in the desired order before exporting.
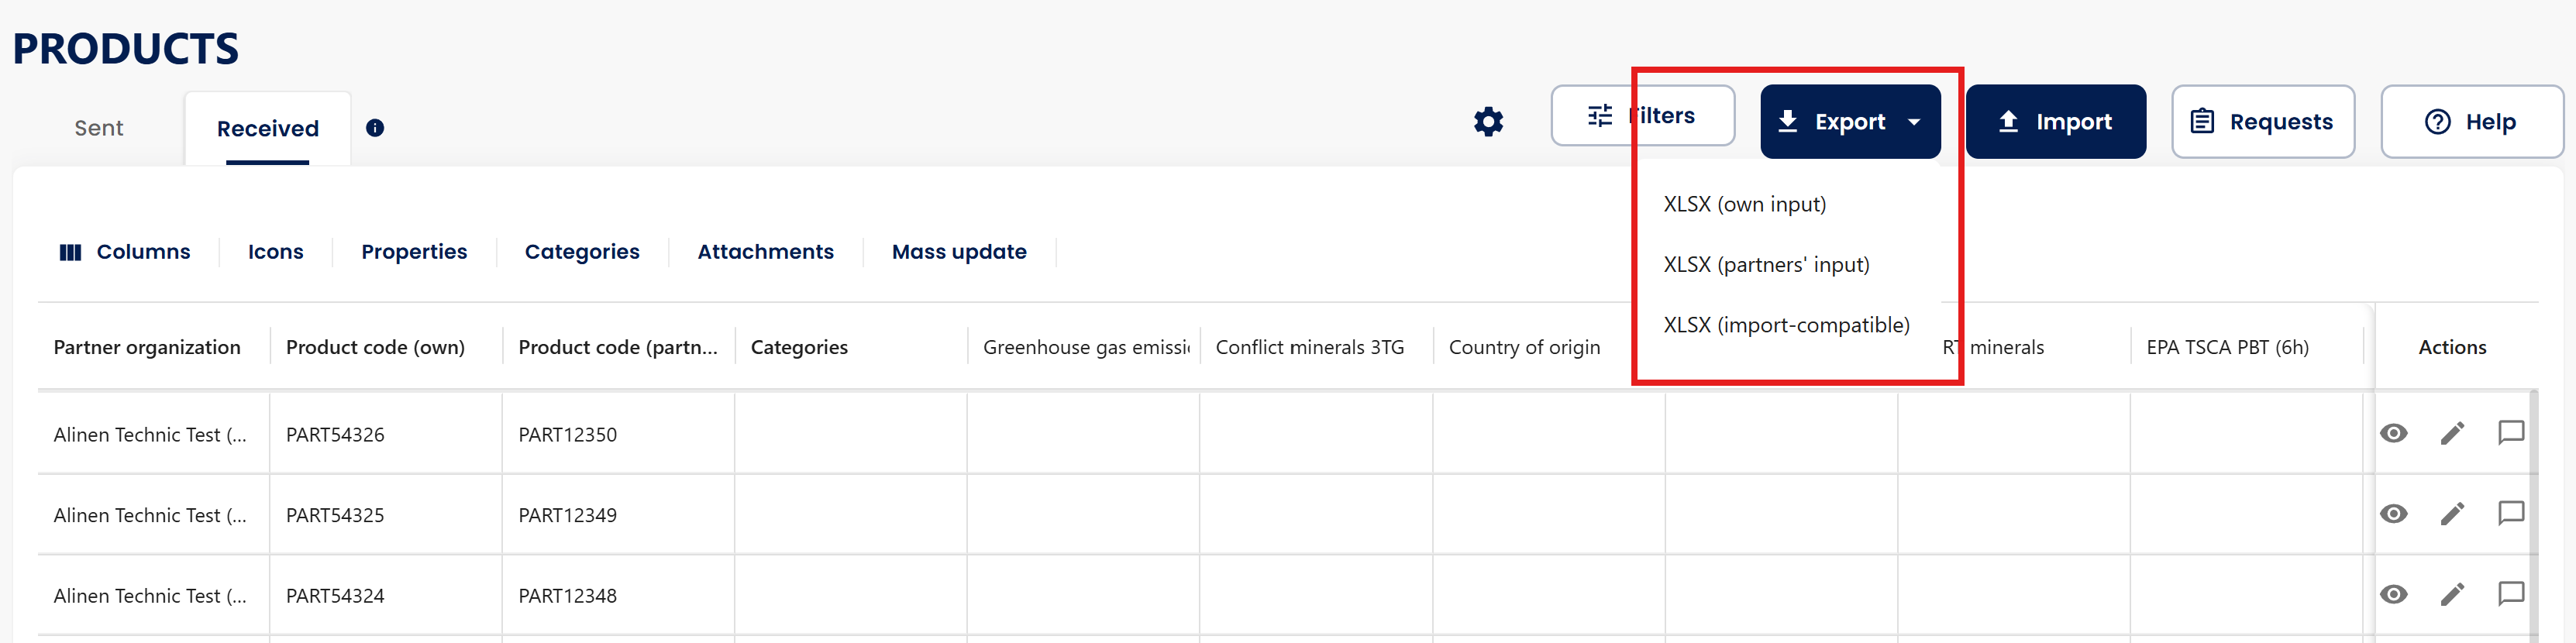
The Export menu provides three options depending on what data you need and what you want to do with the exported file.
Export products
- Navigate to Products.
- Open the Received or Sent tab.
- Use Filters to narrow down the products, if needed.
- Select Export.
- Choose one of the following export options:
-
XLSX (own input)
Exports product data with the values provided by your own company. -
XLSX (partners' input)
Exports product data with the values provided by your partners. -
XLSX (import-compatible)
Creates an Excel file designed for updating product information in Excel and importing it back to Jakamo.
The Excel file is then generated for download.
💡 Tip: Choose XLSX (import-compatible) if you want to edit product information in Excel and import the updated file back to Jakamo.
XLSX (import-compatible)
The XLSX (import-compatible) option helps you identify missing information and complete product data directly in Excel.
The exported file includes:
- 🟡 Yellow cells for missing answers.
- 🟠 Orange cells when a required attachment is missing.
- Additional information in column headers to help you complete the fields correctly.
- An Instructions sheet with guidance for completing the Excel file.
Some information is presented differently in the import-compatible file:
- Conflict Minerals (3TG) and EMRT minerals use a single comma-separated column.
- Products with price volume tiers may appear on multiple rows to represent the different price levels.
After completing or updating the information, save the Excel file and use the import function in Jakamo to upload the changes.
Export pending data requests
You can also create an import-compatible Excel file directly from Requests page.
- Navigate to Products > Received > Requests.
- Select Export.
- Open the downloaded Excel file.
- Complete the requested information. Missing answers are highlighted to help you identify the fields that require attention.
- Save the completed Excel file.
- Return to Jakamo and use Import to upload the updated file.
Tip: Exporting from the Requests view is useful when you want to complete multiple pending product data requests in Excel.
3.4 Excel import
All the completed data can be downloaded as an Excel file, and likewise, it is possible to upload data to Jakamo via Excel import.
Excel import
Use Excel import to add or update data for multiple products at once. Your Excel file can contain any relevant columns, such as Country of origin, REACH, or Categories. During the import, you can map the Excel columns to the corresponding fields in Jakamo.
Important: To update existing products, the Excel file must include the item code (item number in Jakamo).
Jakamo matches each row in your Excel file to an existing item by its item code alone — there should only be one item per item code. This means that if you don't map the Partner organization column, Jakamo will still find and update the existing item (including its properties) as long as an item with the same code already exists, and any relationship the item has with a partner is kept as it was. Mapping the partner organization is only required when you are adding brand new items that don't exist in Jakamo yet.
Select Import when you want to import your data to Jakamo. This will open a new window where you need to select an Excel file to be uploaded to Jakamo.
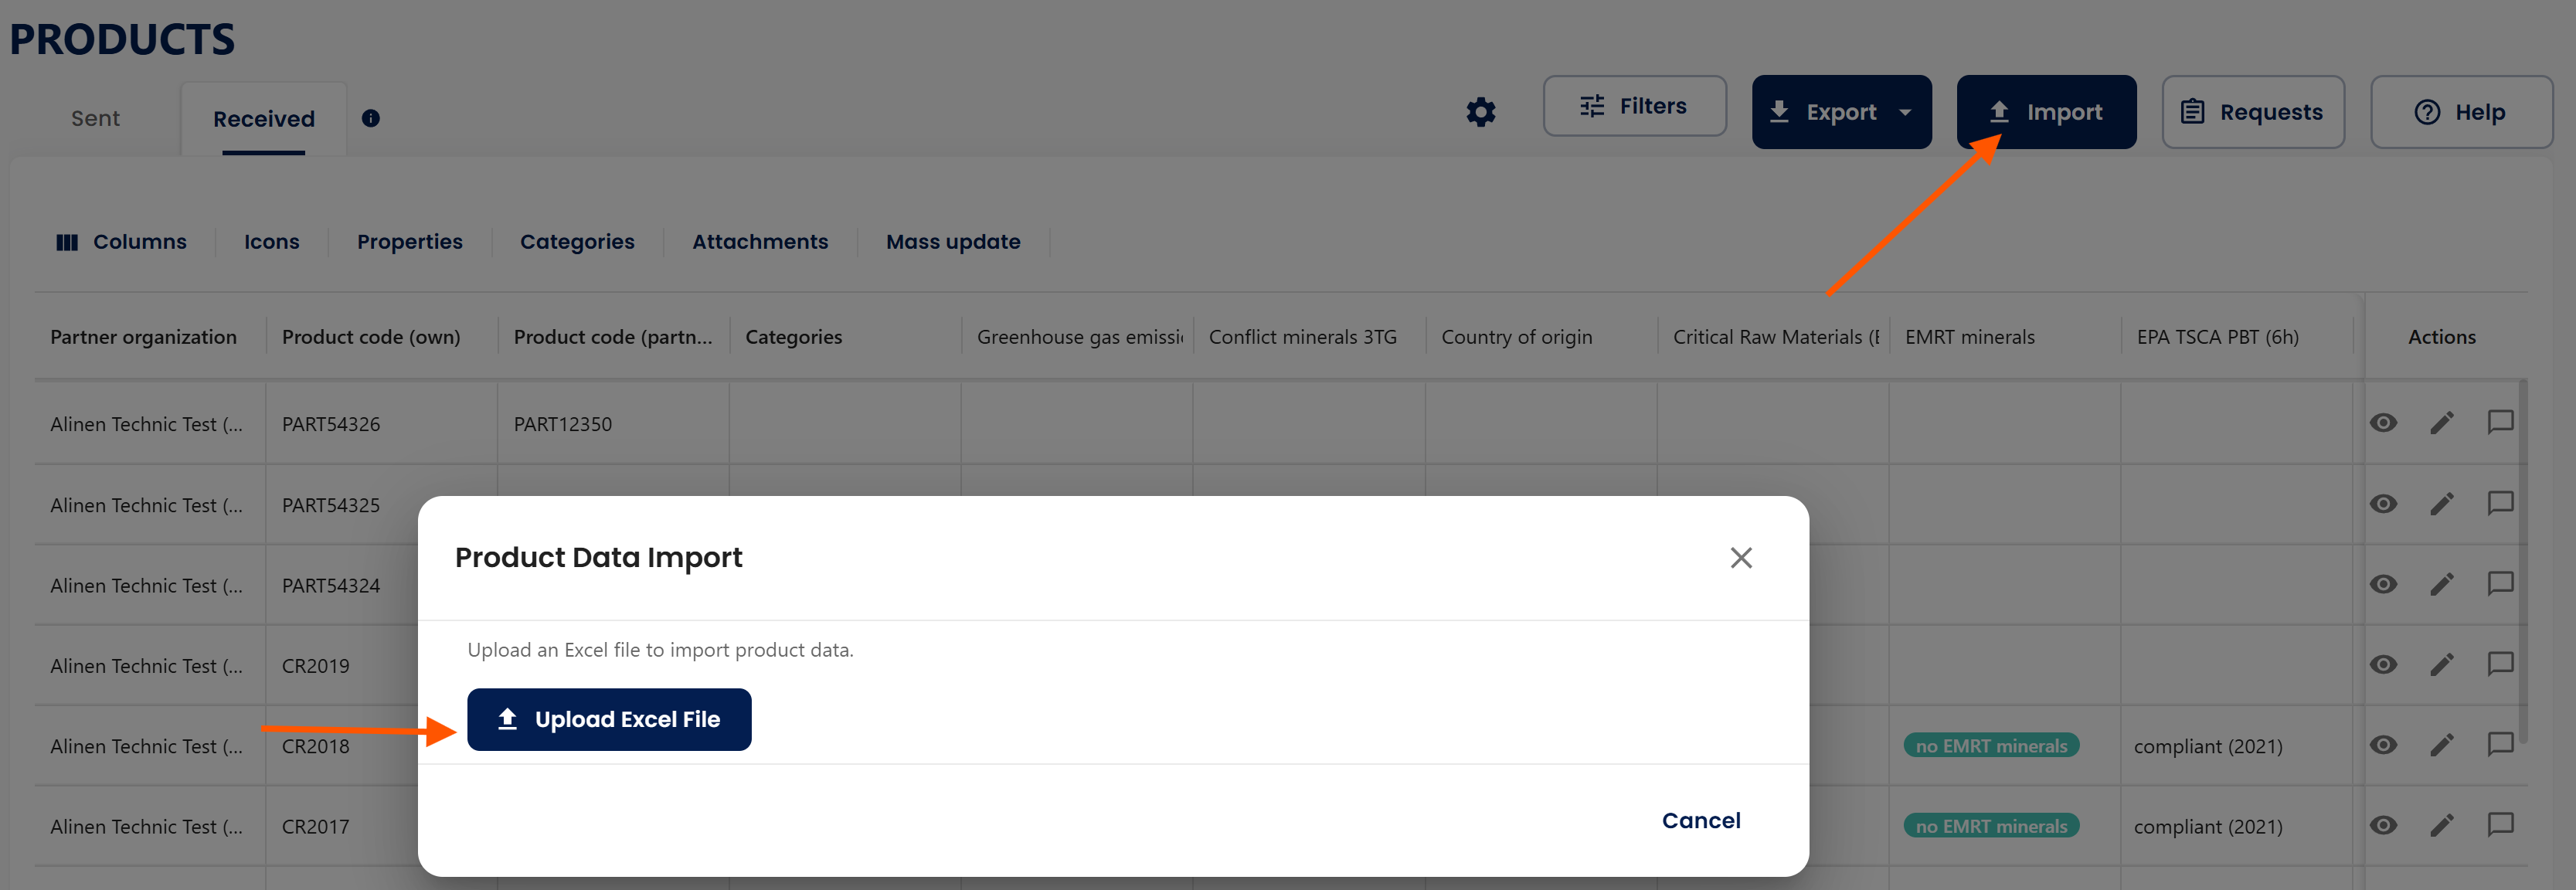
Upload the file and map the columns from Excel to Jakamo. Once a column has been mapped (selected from the row's list), it will turn light green to indicate that the mapping has been completed for the column. You can leave some columns unmapped, and they will not be imported into Jakamo (product property is not mapped).
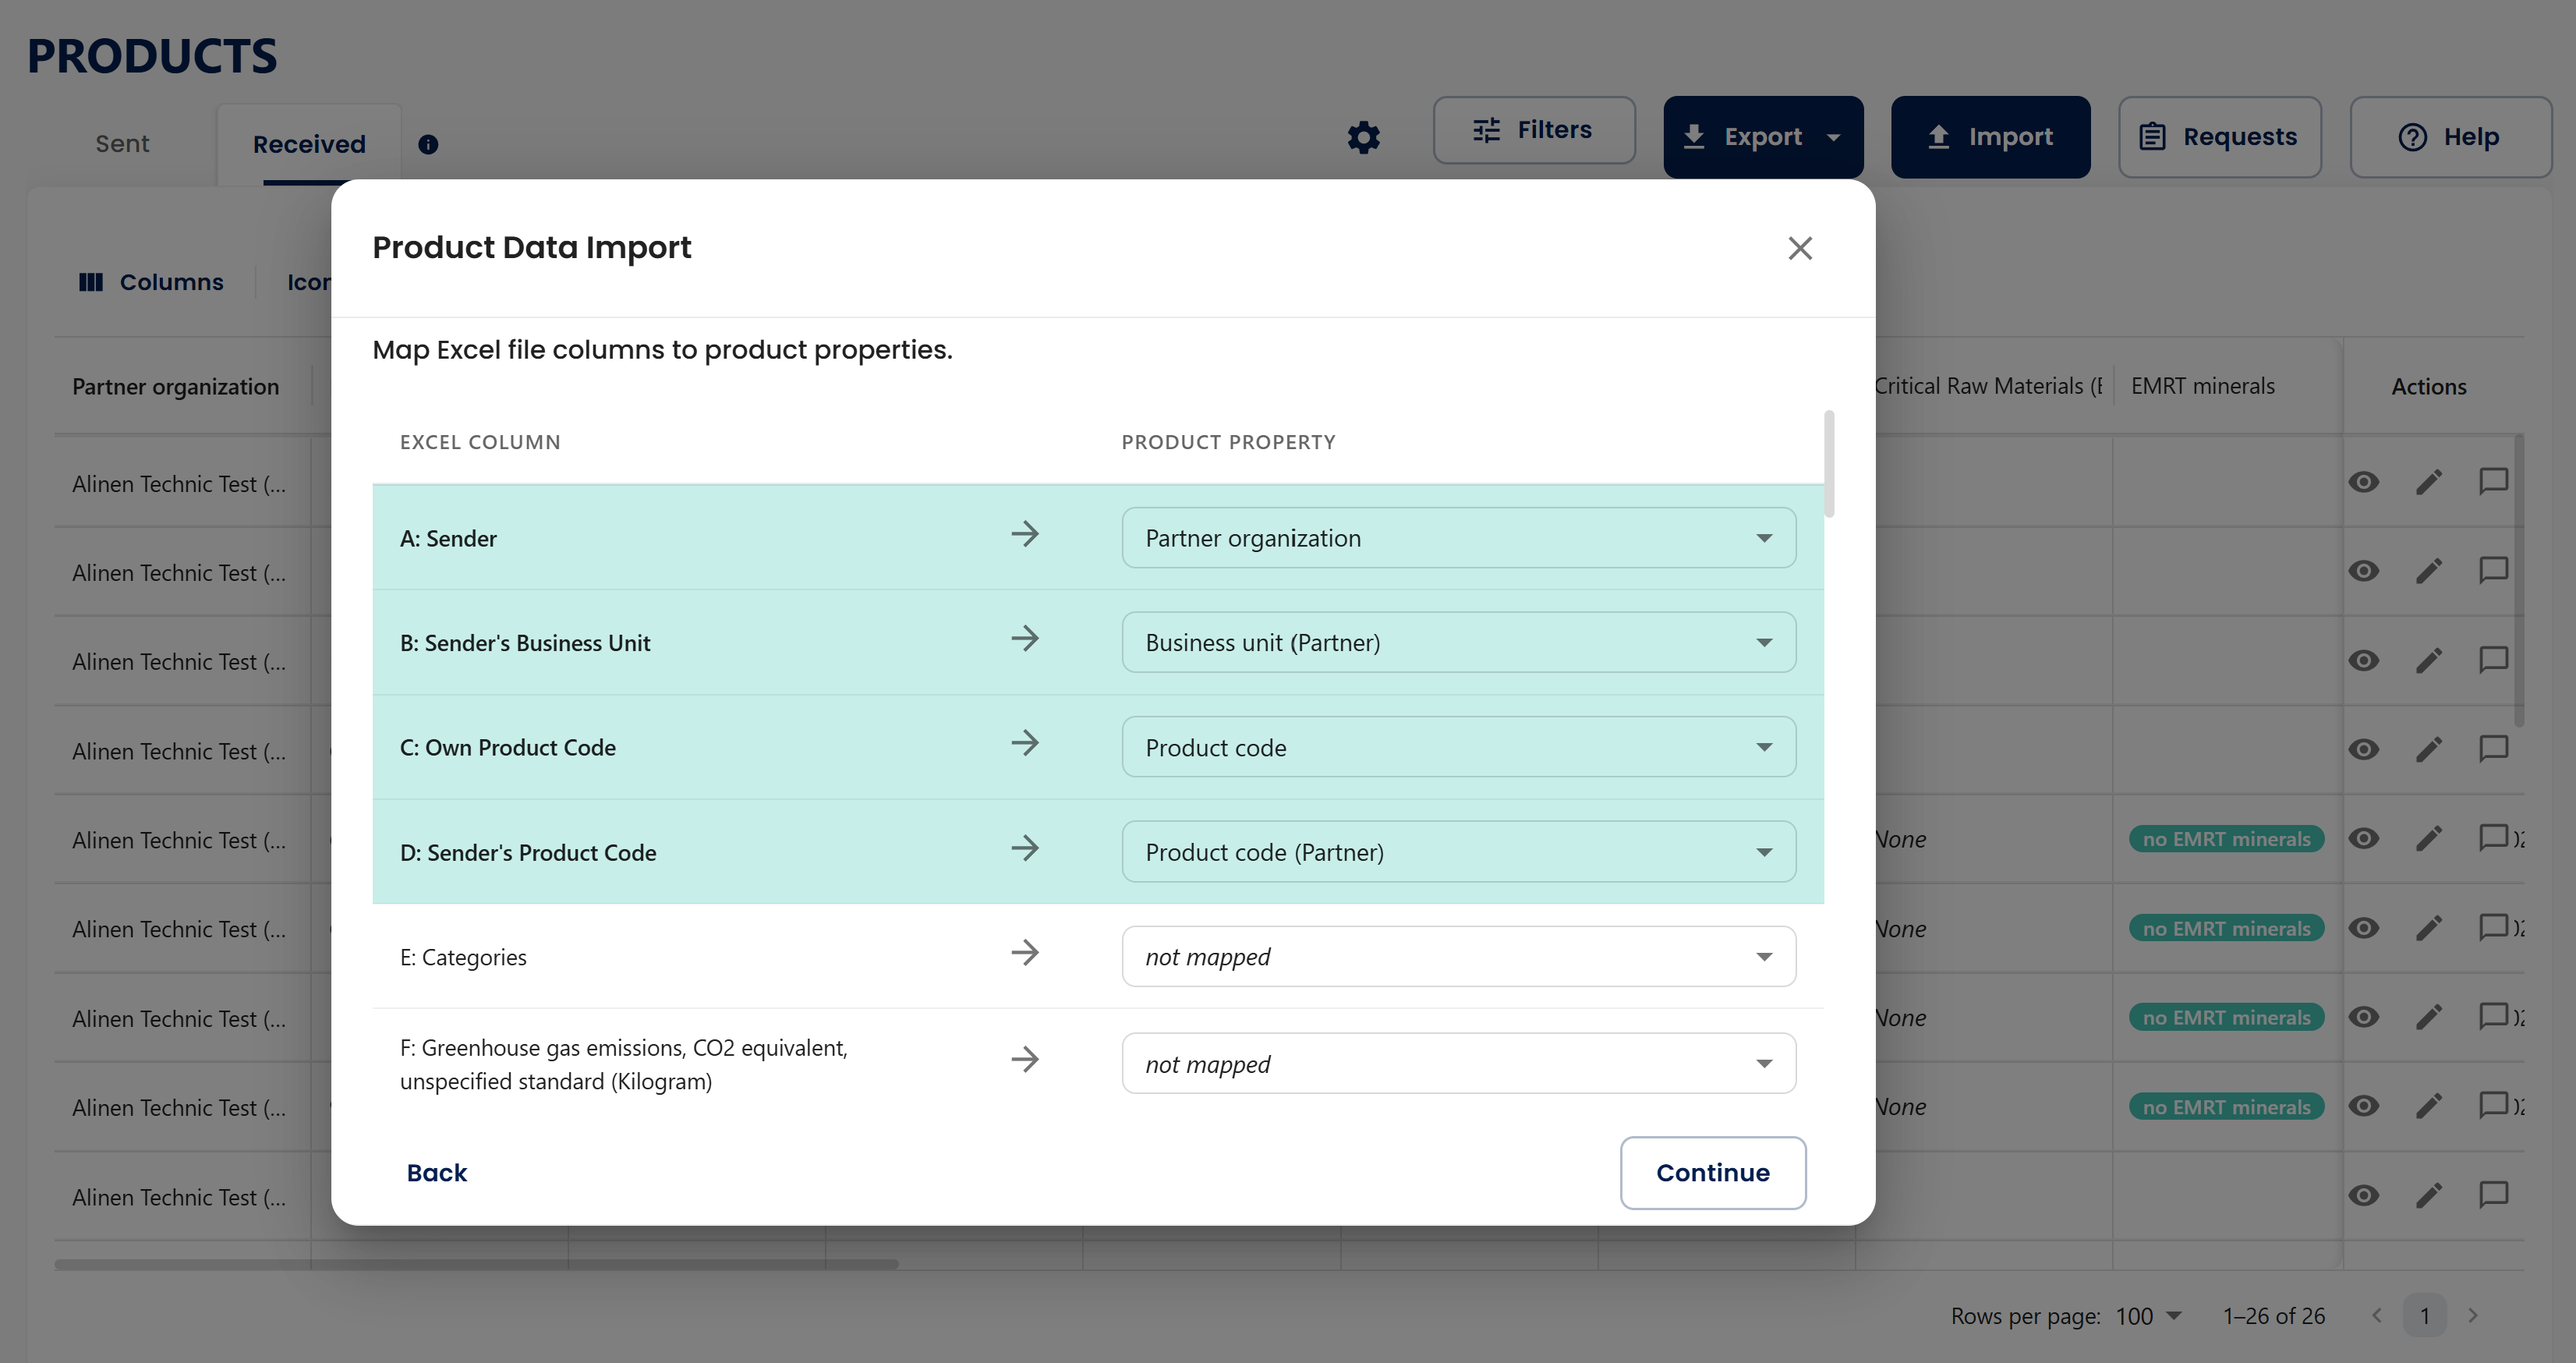
After the mapping has been completed, select Continue.
Here you can see how many items and their data will be:
- imported
- updated
- in error and not transferred (see more about handling these situations from here: Handling errors)

If your company has business units in Jakamo, select one of them.
In order to complete the import, select IMPORT.
Handling errors
Please check these if you receive an error message from excel import:
- Are there any dublicates in the excel?
- Verify the format of the properties.
- Is the item code column mapped? Jakamo needs it to check whether a row matches an existing item, so an unmapped item code column blocks the import with "Product code column not mapped. Cannot check for duplicates."
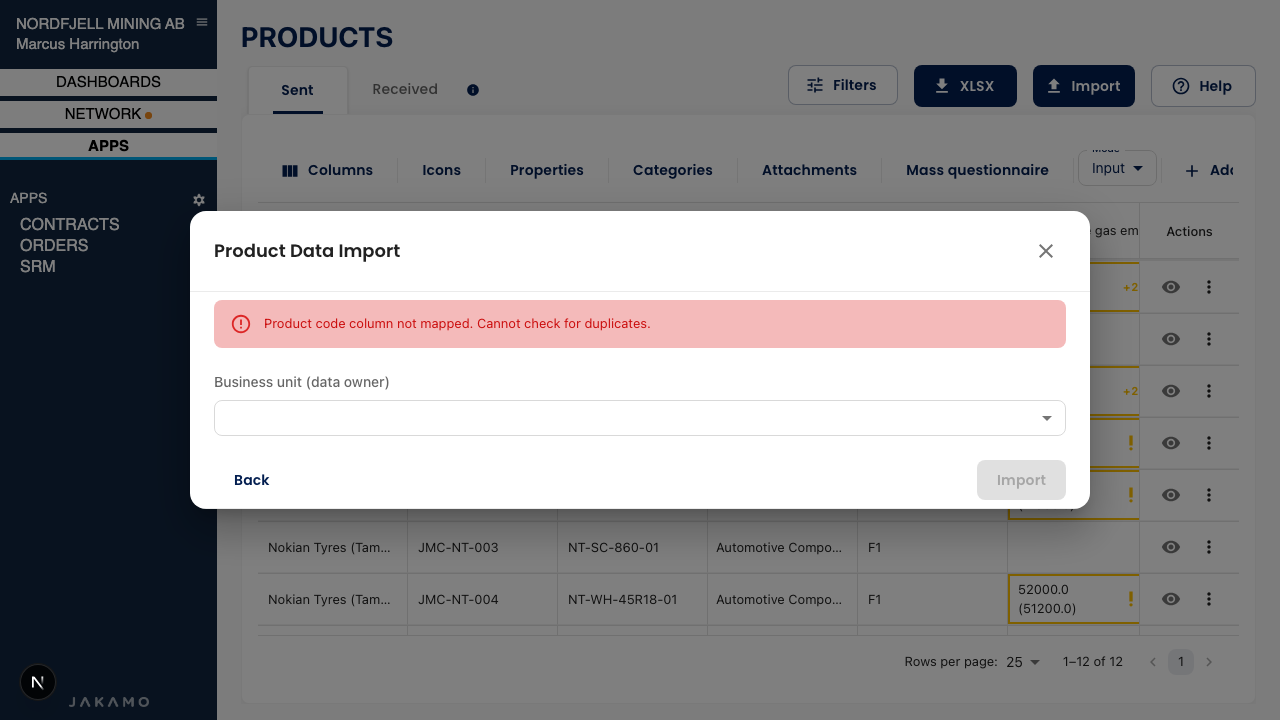
If Jakamo finds more than one existing item with the same item code, that row is skipped with an error ("Product code '...' exists multiple times in Jakamo. Skipped.") so that data isn't written to the wrong item. Clean up the duplicate items in Jakamo before importing that row again.
3.5 Columns and list view layout
Use Columns to choose which fields are visible in the list. You can also change column order and pin columns so important fields stay visible while scrolling.
Show or hide columns
Select Columns to open the column panel. Check or uncheck fields to show or hide them. Use the search box to find a column quickly, Show/Hide All to toggle everything, or Reset to restore the default layout.

Reorder, pin, and hide columns from the grid
You can also customize the layout directly from the grid header:
- Reorder columns — drag a column header left or right to change its position.
- Pin columns — open the column menu (three dots on the header) and select Pin to left or Pin to right to keep key columns visible when scrolling horizontally.
- Hide a column — use Hide column in the same menu, or manage visibility from the Columns panel.

The column order and visibility you set are remembered for your user account. Excel export uses the same visible columns in the same order as your current list view.

The list of existing Columns created by Jakamo
| Column | Description | Data type |
|---|---|---|
| Business unit | If business units have been actived, you can see the business unit to which the data belongs. Please note, all the business units can still see the data. | Text |
| Partner organization | Name of the supplier in Jakamo. If this is empty, the item is not assignet to any supplier / parter organization. | Text |
| Product code (own) | Code of the item that matches your systems' information. (Please note, usually this is provided via purchase order integration.) | Text |
| Produc code (partner) | Code of the item that matches partner's systems' information. (Please note, usually this is provided via purchase order integration.) | Text |
| Categories | Categories are designed to organize items and facilitate data collection from suppliers. See more from here: Categories | Text |
| Conflic minerals 3TG | Indicate whether the product contains any 3TG minerals (Tin, Tantalum, Tungsten, Gold) | MultiSelect |
| Country of origin | The country where the product was manufactured or produced. Required for customs declarations and trade compliance. | SingleSelect |
| Greenhouse gas emissions, CO2 equivalent, unspecified standard (Kilogram) | Total greenhouse gas emissions expressed as CO2 equivalent. Includes all greenhouse gases (CO2, CH4, N2O, etc.) converted to the equivalent amount of CO2. | Numeric |
| EMRT minerals | Indicate whether the product contains any Extended Minerals Reporting Template (EMRT) minerals or metals: cobalt, copper, graphite, lithium, mica, or nickel. Works like 3TG. See EMRT minerals. | MultiSelect |
| EPA TSCA PBT (6h) | EPA Toxic Substances Control Act Persistent, Bioaccumulative and Toxic chemicals status. Indicates presence of any of the 6H PBT chemicals requiring special reporting under US regulations. | SingleSelect |
| Inventory of Hazardouns Materials (IHM) Marine Offshore | Compliance status with the Hong Kong International Convention for ship recycling. IHM tracks hazardous materials in marine vessels and offshore structures | SingleSelect |
| Manufacturer | The company or organization that manufactured the product. Important for traceability and quality assurance. | String |
| PFAS | Information about PFAS (forever chemicals) present in the product. PFAS are increasingly regulated due to environmental persistence and health concerns. | Custom |
| Persistent Organic Pollutants | Indicates presence of chemicals listed under the Stockholm Convention on Persistent Organic Pollutants. POPs are toxic chemicals that persist in the environment and bioaccumulate. | SingleSelect |
| Product name | The commercial name or designation of the product used for identification and communication. | String |
| Product description | Detailed textual description of the product, including features, specifications, and intended use. | String |
| Product weight (Kilogram) | The total weight of the product including packaging. Used for shipping calculations and environmental impact assessments. | Numeric |
| REACH | Registration, Evaluation, Authorisation and Restriction of Chemicals regulation compliance. REACH addresses the production and use of chemical substances and their potential impacts on human health and the environment. EU Regulation (EC) No 1907/2006. Select N/A when REACH does not apply to the item; substance and SCIP fields are then hidden. | Custom |
| Recycled content (Percent) | Percentage of recycled materials used in the product. Important for circular economy and sustainability reporting. | Numeric |
| RoHS | Restriction of Hazardous Substances Directive compliance status. RoHS restricts the use of specific hazardous materials in electrical and electronic products. EU Directive 2011/65/EU. Select N/A when RoHS does not apply to the item; exemption fields are then hidden. | Custom |
| Taric commodity code | The integrated Tariff of the European Union classification code for customs and trade statistics. Used for determining customs duties and trade measures. | Custom |
| Water consumption (Liter) | Amount of water consumed (liters) during the production of this product. Part of environmental sustainability metrics. | Numeric |
| Critical Raw Materials (EU) | Indicates which EU-designated critical raw materials (CRMs) are present in the product. CRMs are economically important materials with high supply risk | MultiSelect |
| California Proposition 65 | California Proposition 65 warning information. Lists chemicals known to the State of California to cause cancer, birth defects, or reproductive harm present in the product. | Custom |
| Actions | Actions is always the last column but stays in the view, which allows you to view information behind item, edit the data related to item, add attachements to item, delete the item and have a discussion with your business partner in the context of the product. | Custom |
In other words, these are already available for all users by default to use faster and easier, but you can also add your own columns, referred to as properties in Jakamo, to the questionnaires. See more from here.
You can scroll the list view both horizontally and vertically. Additionally, when there are large numbers of items, you can navigate between pages

EMRT minerals
EMRT means Extended Minerals Reporting Template. The EMRT minerals column works like Conflict minerals 3TG. The minerals in the list are different.
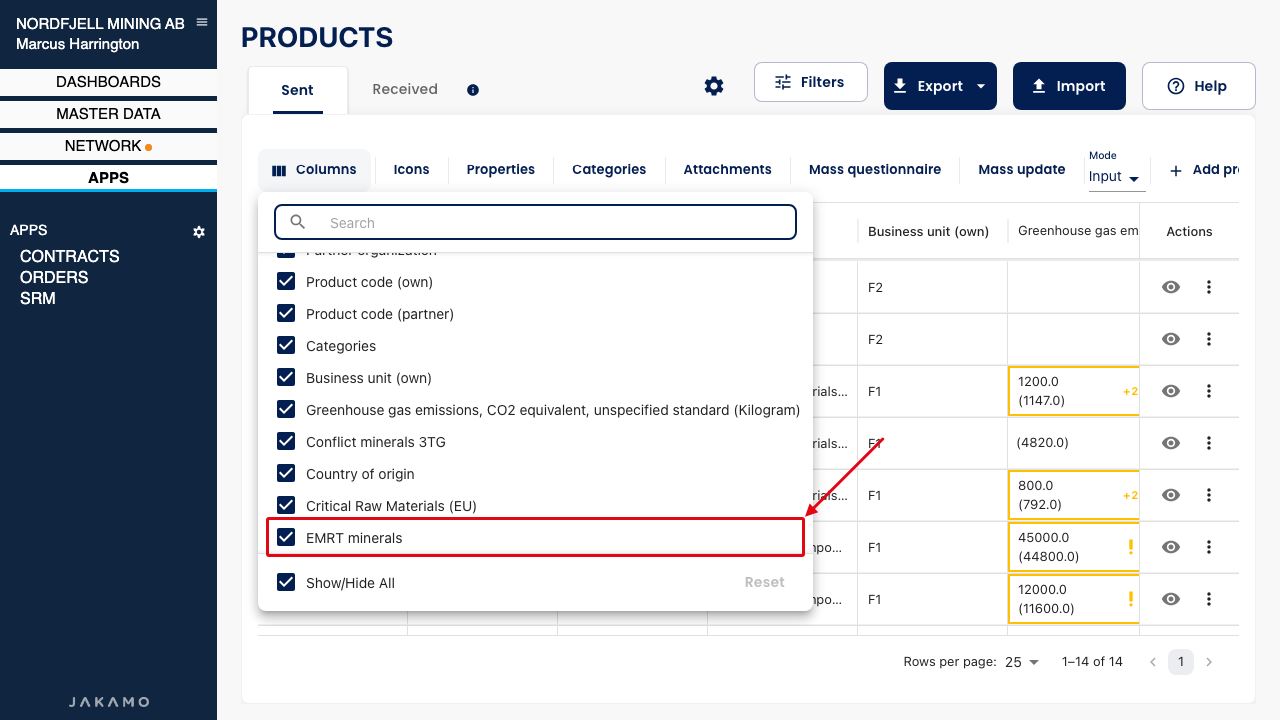
Use it to record whether an item contains cobalt, copper, graphite, lithium, mica, or nickel. Jakamo provides this property. You do not create it yourself. Hover the column name in the list to read the short description.
-
Open Products.
-
If you do not see EMRT minerals, open Columns and turn the column on. See Show or hide columns.
-
Open the actions menu (three dots) on the item row and select Edit.
-
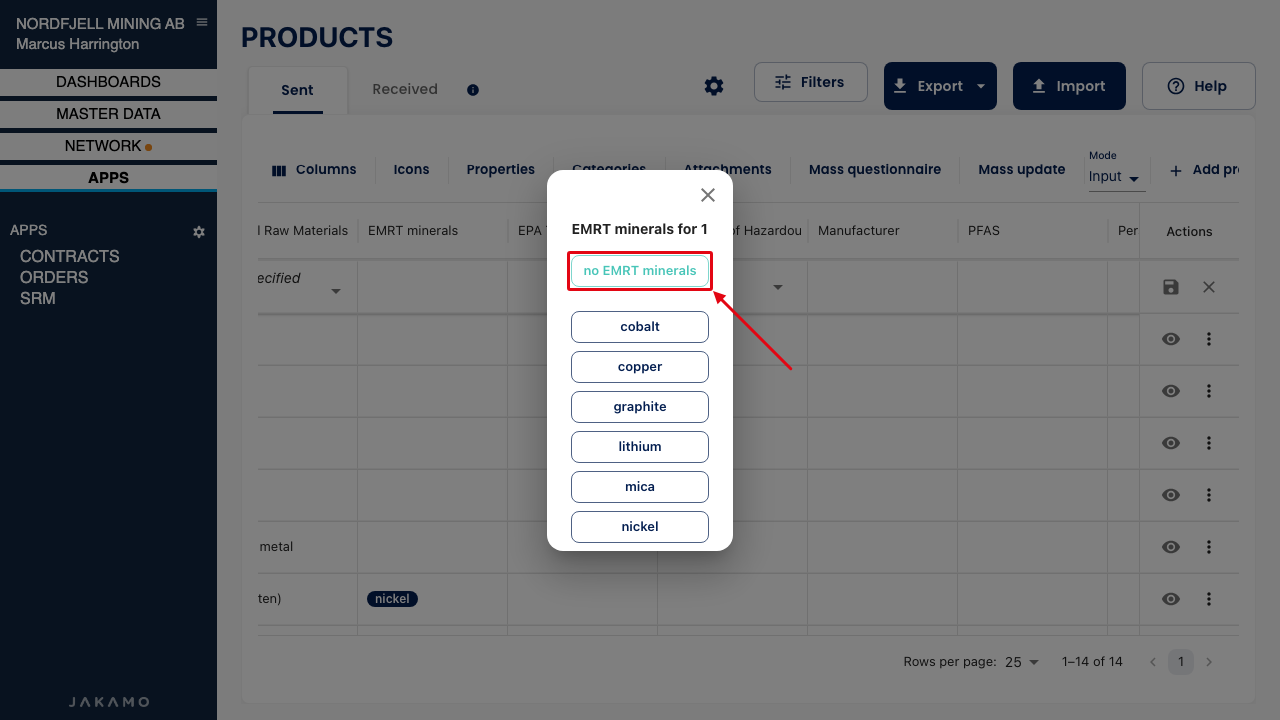
Click the EMRT minerals cell. The dialog title is EMRT minerals for, followed by your product code.
-
Select the answer:
- no EMRT minerals when the item does not contain any of those minerals. This choice stands alone. Select it again to clear the answer.
- One or more of cobalt, copper, graphite, lithium, mica, and nickel. You can select several. Selecting a mineral removes no EMRT minerals. Select a mineral again to remove it.
-
Close the dialog with the X in the corner. That keeps the selection.
-
Select Save in the same actions menu.
no EMRT minerals is shown in green. Each mineral is shown in blue.
The same dialog opens if you select View in the actions menu and fill EMRT minerals there.
The selection is kept when you close the dialog with the X. Clicking outside the dialog, or pressing Escape, clears what you selected.
To find items by this answer, open Filters, then Property filters, and choose EMRT minerals. The filter lists No EMRT minerals, Cobalt, Copper, Graphite, Lithium, Mica, and Nickel. You can match your own values or your partner's values. See Property filters.
Ask a supplier for this value the same way as for 3TG. Include EMRT minerals in a category, an auto-question, a mass questionnaire, or an individual questionnaire. See How to collect item-specific information as a customer.
If a document must always be attached with the answer, turn on Require Attachment for EMRT minerals under Properties. See Require attachement. If the supplier cannot answer yet, they can set an estimated date the same way as for any other property. See Set estimated date.
3.6 Icons
Icons are designed to make it easier to notice key information, such as whether an attachment has been added to a product property. All icons are visible by default, but you can customize their visibility from the Icons settings. The Icons section also provides descriptions of all available icons.
 Please note that by hovering over an icon in the list view, you can review its meaning (e.g. Waiting for partner's response) and see additional details, such as information that has been added to the item (e.g. the attachment name).
3.7 Properties
Properties are the topics that you can personally create and include in questionnaires for your suppliers. They are also listed in Columns and can be filtered if needed. Please note that you can see all the properties by scrolling the page to the right.

See more about creating new properties and editing existing properties from here.
3.8 Categories
Categories are designed to organize items and facilitate data collection from suppliers. A category consists of selected properties, and you can fully define which properties belong to each category. These categories further simplify item-specific data collection, as the properties within a category are automatically requested from the supplier when an item is classified under that category. You can find more information about creating and editing categories from here.
3.9 Attachements
3.9.1 Require attachement
Attachments, such as certifications, can be set as required if needed. This requirement is property-specific and can be configured in Properties. For example, if an attachment is always required for 3TG minerals, enable the Require Attachment checkbox for the 3TG property. The same checkbox is available for EMRT minerals:

3.9.2 Add attachement
You can attach documents to items by adding attachments individually to each item. If the same document needs to be attached to multiple items, you can first upload it to Jakamo using Attachments and then reuse it across items. Alternatively, you can attach the document directly to the item.
If you want to reuse document across items, upload the document to Jakamo from Attachments, and then by selecting + Add new attachement:
 (Select the + icon on the left-hand side to view the items to which the document is linked, if that has been done for the document.)
Regardless of whether the document has already been uploaded to Jakamo, you can add it to an item by selecting the three dots on the right-hand side of the item row in the list view. Then, select the eye icon to open the item details:

Locate the appropriate property to which you want to attach the document.
 (You can find more properties by scrolling down the list.)
Select + Add new attachment from the appropriate property, and then choose whether you want to use an already uploaded document or add a new one.

Select Save and now the paperclip icon in the property column indicates that an attachment has been uploaded to the product.

3.10 Mass Questionnaire
Mass questionnaires allow you to send questionnaires for all products at once. This is very useful when you want to for example make a one-time request for REACH information for a specific item group. See more from here: 4.5 Using Mass Questionnarie
3.11 Mass update
Update a Relationship
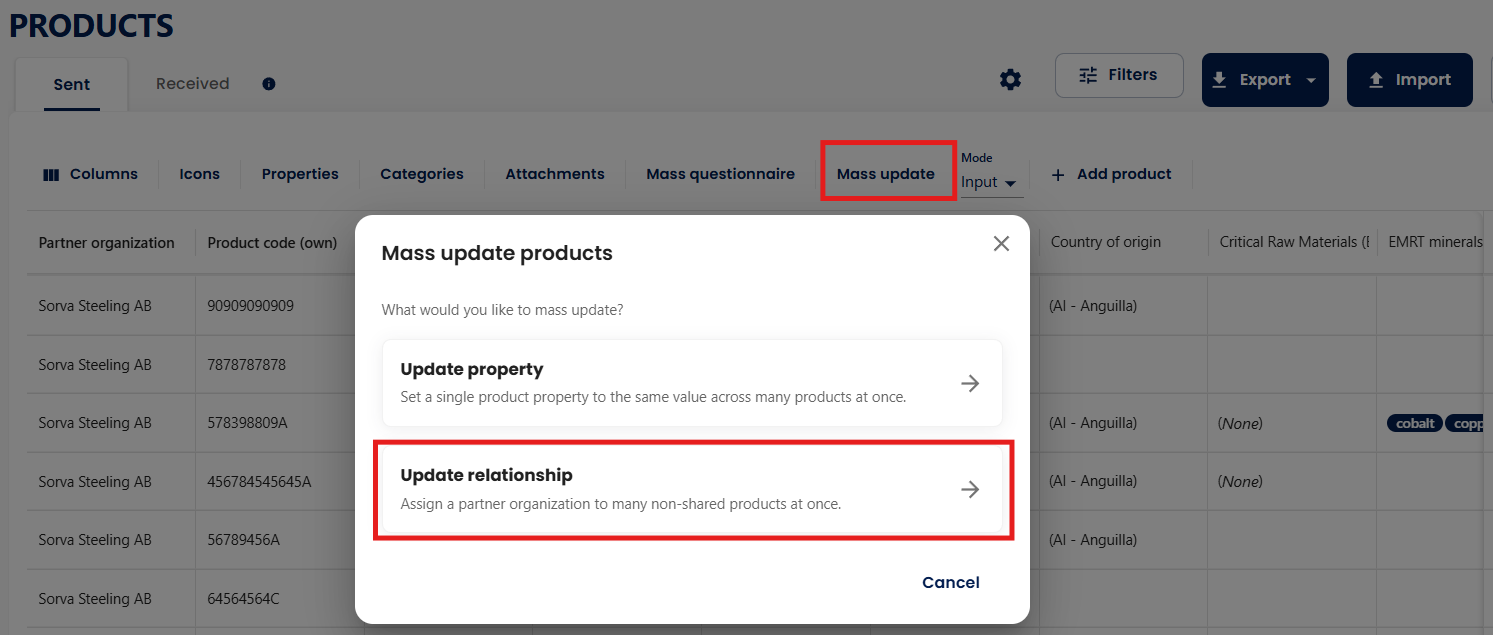
Use Update a relationship when you need to assign a partner relationship to multiple non-shared products. This option is only available when using Mass Update on the Sent tab.
This can be useful, for example, when products already exist in your Products application as non-shared products and you later need to associate them with a partner organization.
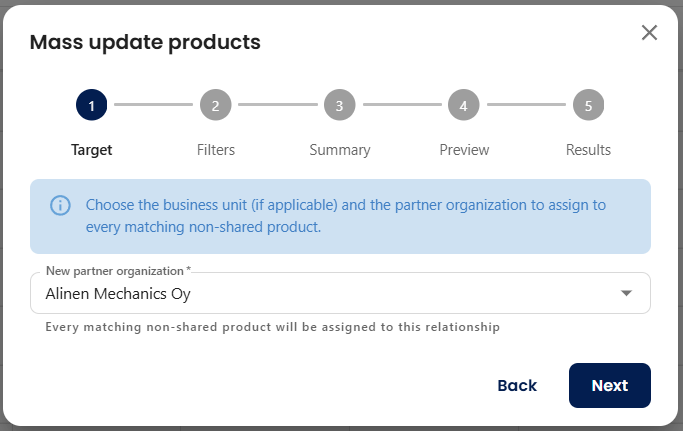
Select Mass Update from the Products toolbar > Select Update a relationship:
- Target: Select the partner relationship you want to assign.
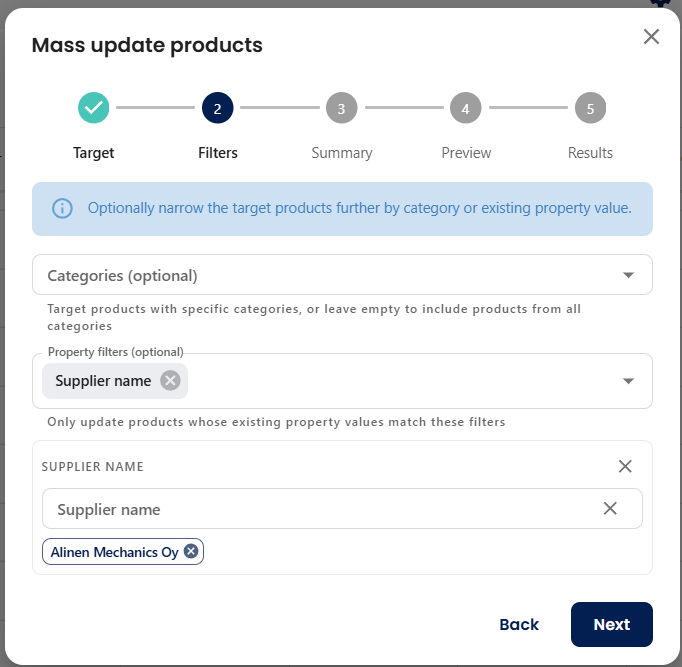
- Filters: Optionally, narrow down the target products by category or existing property value. For non-shared products, you may have a custom property containing the supplier name. Select the relevant custom property and supplier name to target the products you want to update.
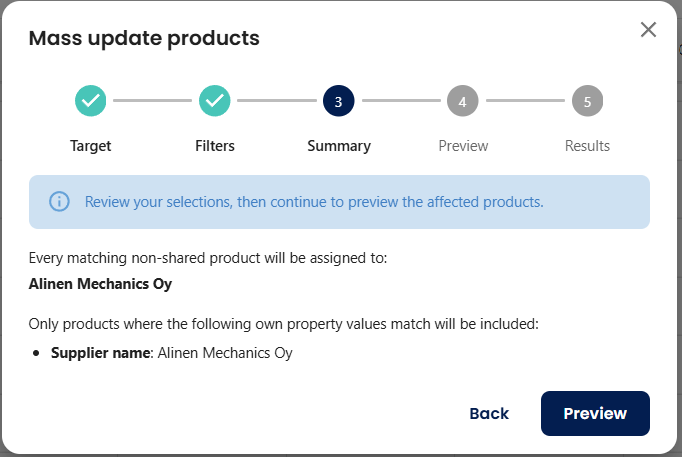
- Summary and Preview: review the summary and view a preview to verify which products will be affected.
- Results: Continue and confirm the Mass Update by selecting
Update relationship.
Note: Products that cannot be updated due to validation issues, such as product code conflicts, are skipped and reported separately without preventing other valid products from being updated.
3.12 Mode
Mode describes whether you want to use Categories, Auto-Questions or Mass Questionnaires for data collection OR select individual properties for the questionnaire. Thus, the two options for Mode are Input and Questionnaire (see more about requesting values from here: 4. How to collect item-specific information as a customer).
- Input: Only categories will be used for data collection.
- Questionnaire: You can select individual properties to collect data in addition to categories.
3.13 Add Product
When an item is ordered via Jakamo, it will be stored in the company's database in Jakamo, which will also automatically generate it in Products. If there is an item that has never been ordered via Jakamo, you can add the item to this functionality manually by selecting + Add product.
3.14 Actions
Discussion
The Discussion feature allows you to communicate with your business partner directly in the context of a product. Discussions provide a convenient place to exchange comments and keep product-related communication connected to the relevant item.
Open a product discussion
You can access the discussion in two ways:
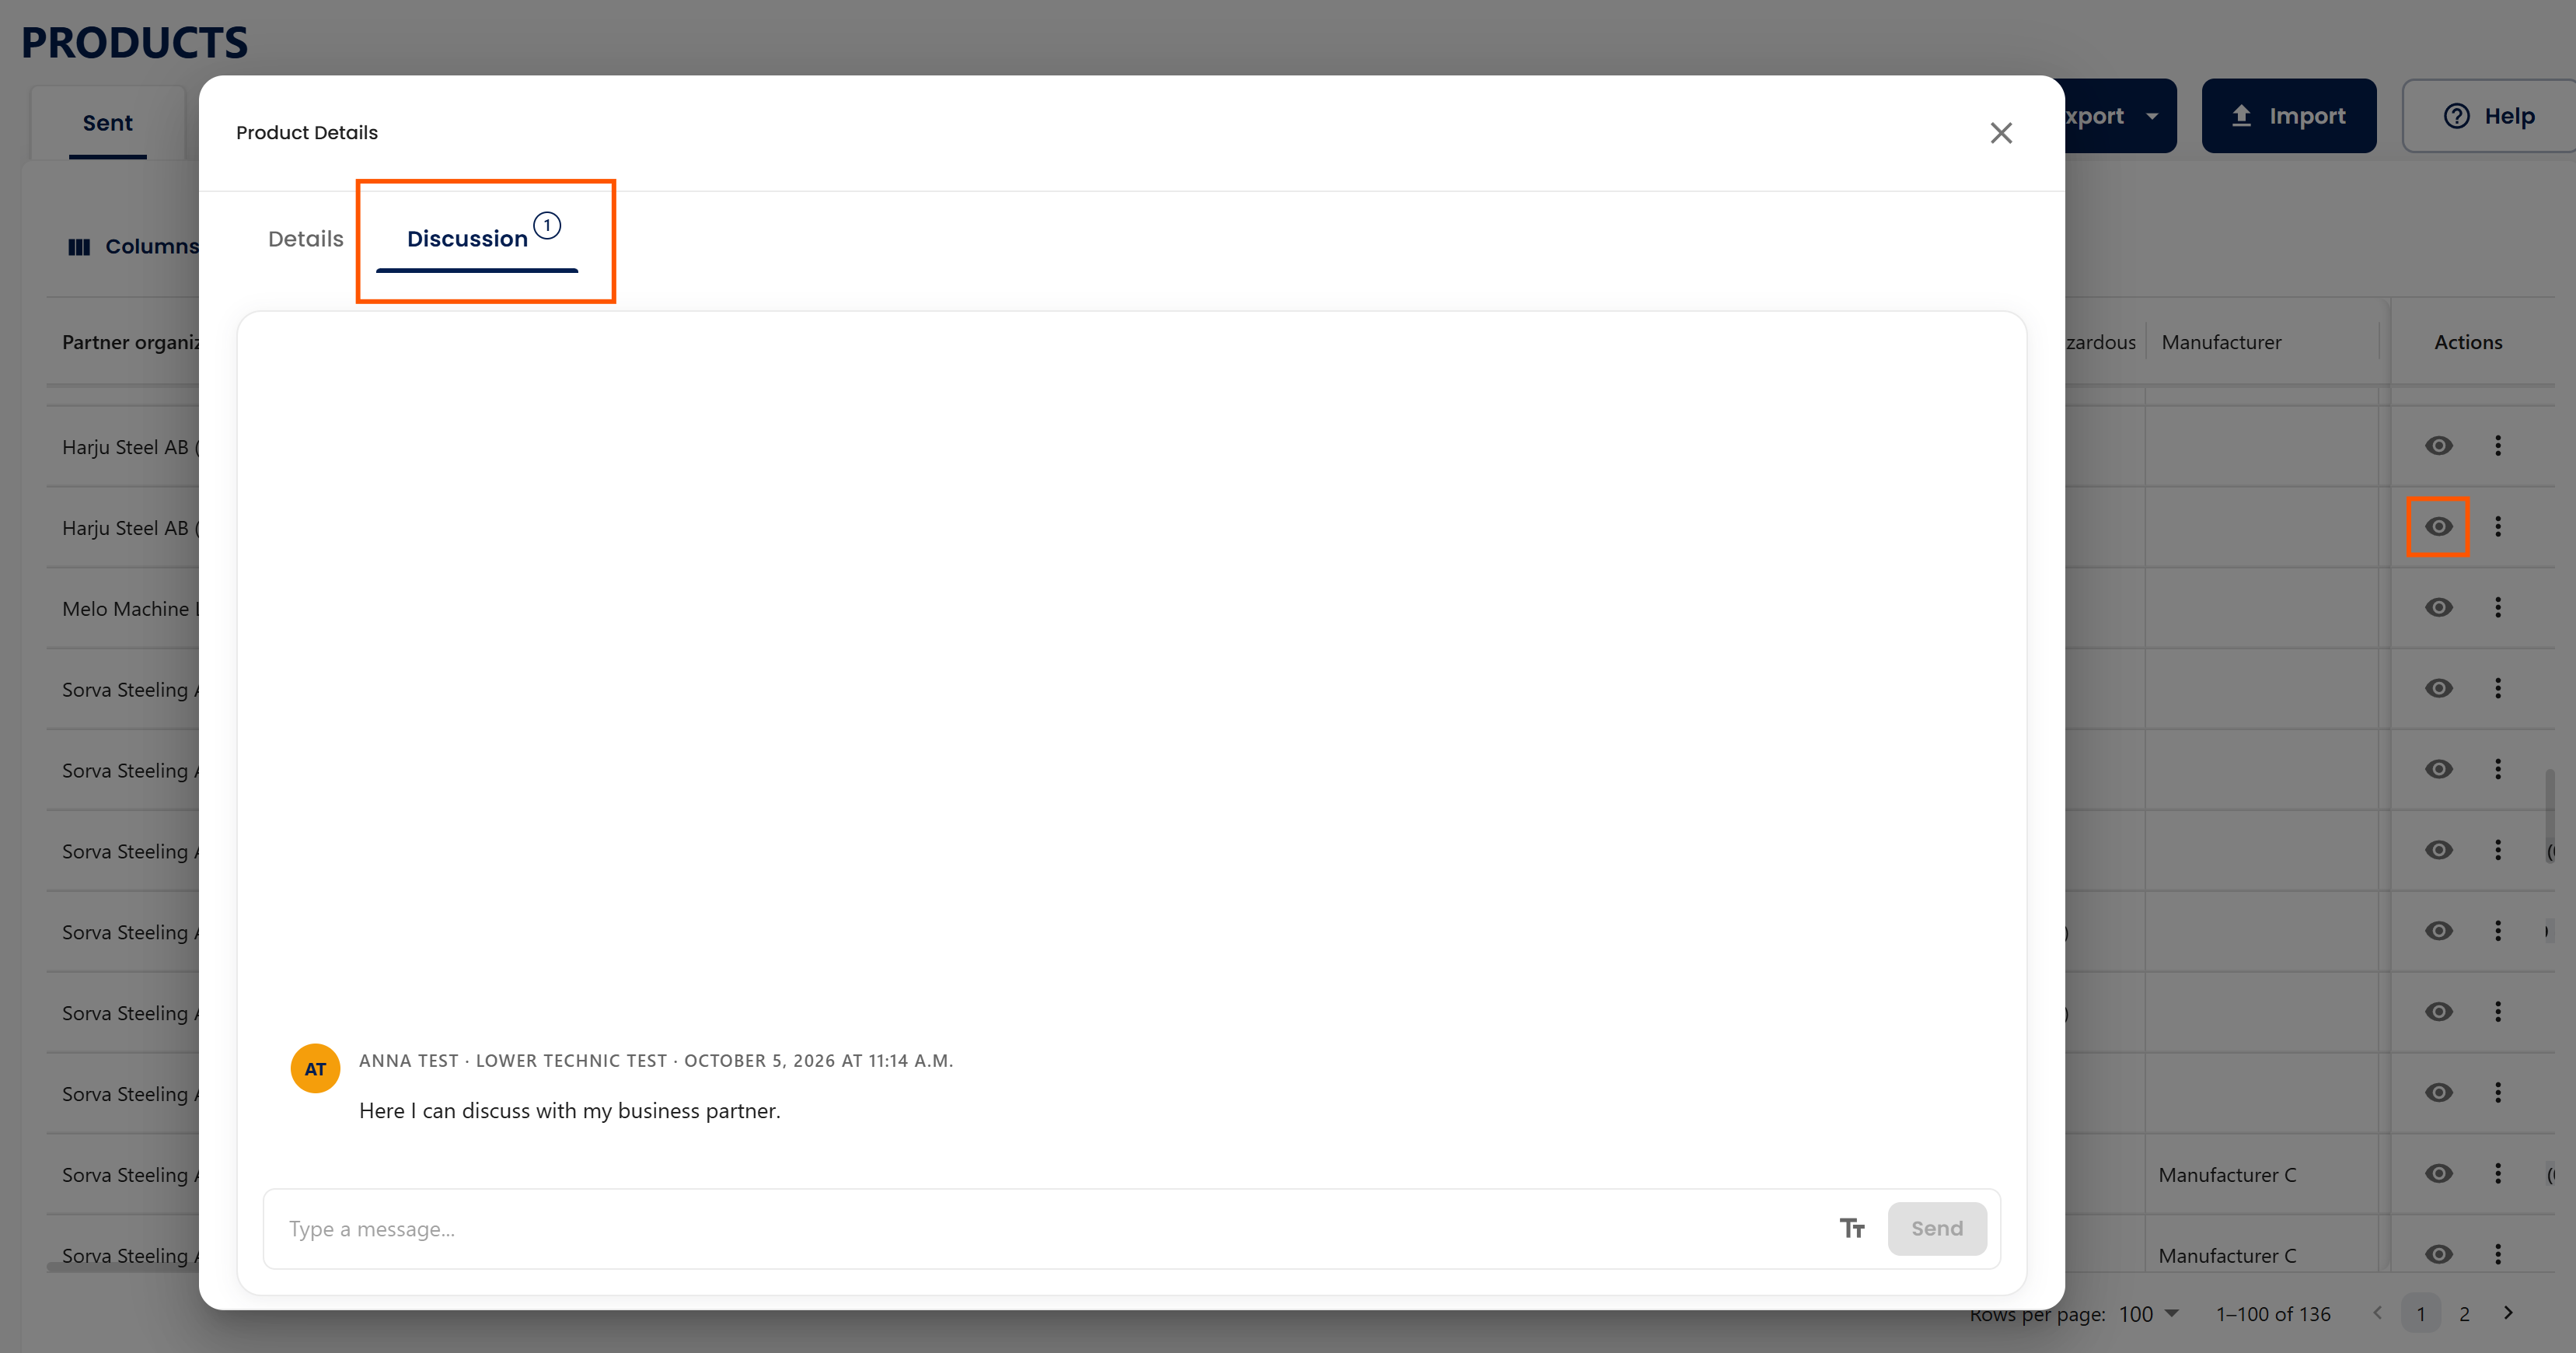
- Navigate to Products and open the desired product from the eye icon.
- Select the Discussion tab.
- Write your comment and add it to the discussion.
Alternatively, you can open the discussion directly from the Products list:
- Navigate to Received tab.
- Find the desired product.
- Click the Discussion icon in the Actions column.
- The product opens directly to the Discussion tab.
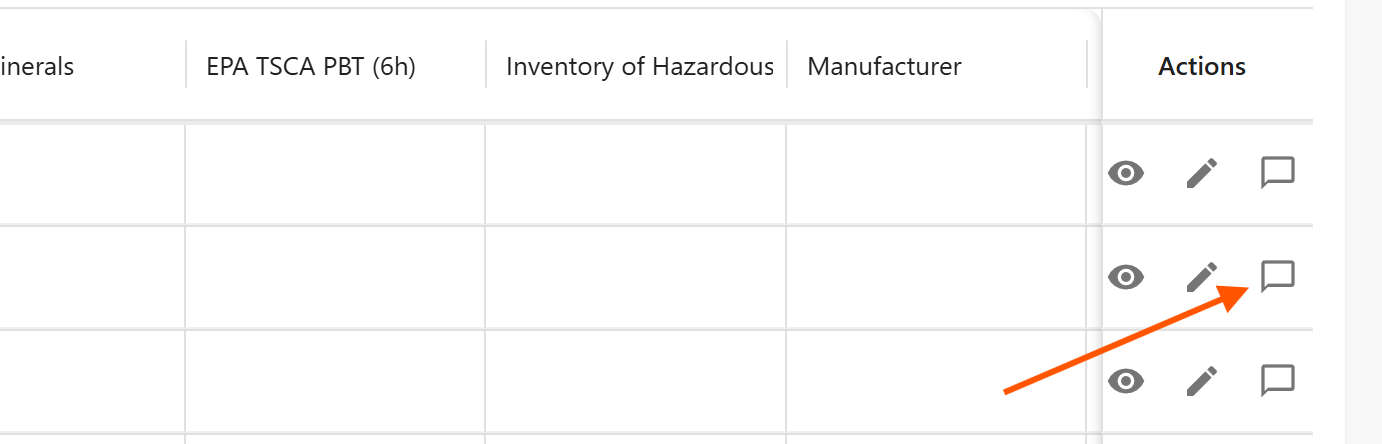
The number shown next to the Discussion icon indicates the total number of comments related to the product.
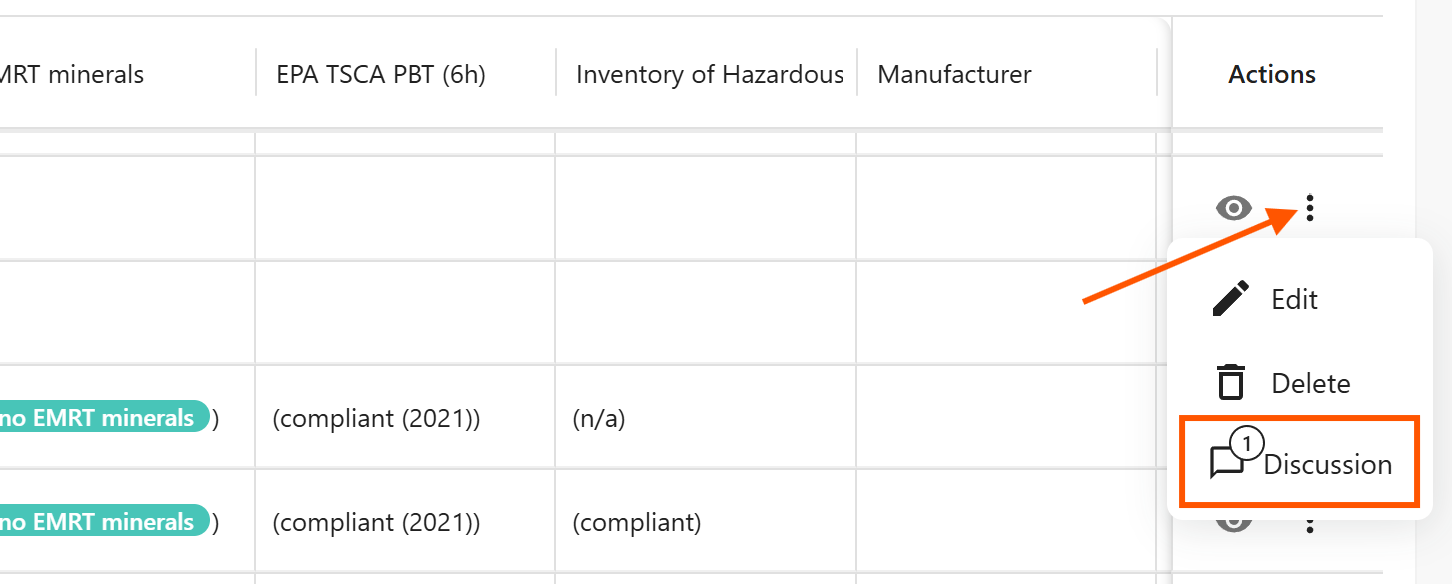
Discuss shared products
For products shared between companies, the discussion is visible to both parties. Comments related to the corresponding product on either company's side are shown in the same discussion thread.
This allows both companies to discuss the product while working with their own product information in Jakamo.
Edit or delete a comment
You can edit or delete comments that you have added yourself. Comments created by other users cannot be edited or deleted by you.
4. How to collect item-specific information as a customer
Products is designed for collecting item-specific information. The purpose is to facilitate and clarify the collection of item-specific information for sustainability reporting, but the functionality is suitable for all item-specific data collection.
You can send questionnaires to suppliers in several ways:
- By category: Assign items to a specific category to automatically send a questionnaire to the supplier covering all products in that category.
- Auto-Questionnaires: Automatically send questionnaires based on predefined rules and configurations.
- Mass Questionnaires: Send questionnaires in bulk to specific supplier(s) or item(s).
- Individual questionnaires: Send questionnaires manually for individual items or suppliers.
In order to collect item-specific information, follow these steps:
-
Define Properties and:
- Create automatic questionnaires so called Auto-Questions for automatizying the workflow AND / OR
- Create Categories for collecting item-specific information. (This is suitable when there are large amount of items to questionnaire) AND / OR
- Create Indivitual Questionnaires for collecting item-specific information. (This is suitable when there are just few items to questionnaire.) AND / OR
- Use Mass Questionnaires to send questionnaires in bulk to specific supplier(s) and/or item(s). This option is useful when questionnaires need to be targeted to particular suppliers or specific items.
-
Please note that you can also:
- add estimated answer date for property value.
- cancel a questionnaire if needed.
- require attachement for provided item details.
4.1 Properties
Before collecting any data from suppliers, you must define the properties that will be included in the questionnaire. If the desired property is not already in the property list by default, it can be created from Properties. You can see the meaning of each property either by hovering over the name in the list view or from Properties. The description can also be edited, which is described below.
Here you can see all the created properties, and they can also be managed by editing if your user account has Admin credentials:

- New properties can be created from
+ ADD PROPERTY. - Properties can be edited using the Pencil icon. (Note that all properties can be set to be questioned automatically for both existing items and new items from next to the pencil icon.)

Thus, you can fully define the properties that you want to include in the questionnaire. There are many columns already available that you can see in more detail from here: Columns. We at Jakamo manage the database susch as RoHS, REACH, 3TG, EMRT & Country of Origin, which will help suppliers keep the information up-to-date in the fast-changing regulation environment.
Best practices for data collection:
- The easiest way to collect item-specific data from suppliers is by Auto-Questions This is described in more detail in here: Auto-Questions.
- If there is a need to collect specific information from majority of suppliers, spesific properties or ask for an updated information, it may be best to use Mass Questionnaires
- If there is a need to collect specific information from an individual item, it may be better to use categories or create a questionnaire for that.
4.2. Auto‑Questions: Automating the Questionnaire Workflow
Instead of sending questionnaires manually or gathering data through fragmented processes, the workflow automatically asks relevant questions as part of the process itself. This reduces manual effort, improves data consistency and quality, and ensures tasks move forward smoothly and on time allowing teams to focus on decisions and value‑creating work rather than administrative work.
Auto-Question can be set up from the Properties:
To enable Auto‑Questions, edit (Pencil Icon) the desired property and activate the Auto‑Question toggle - then select Save:

If you want to send the questionnaire to all existing items in Products, select Yes. If not, select No, and the questionnaire will be sent only to items created through new orders.

4.3 Using Input (Categories) for Data Collection
When there are many items and properties, it is worth categorizing them to simplify and speed up data collection. After defining all the properties, categories can be defined from Categories and assigned to all items. This will send questionnaires to the selected items and thus to the suppliers.
Create categories

New categories can be created from + Add Category, and existing categories can be edited by selecting the pencil icon:

Assign items into categories
In order to assign items to categories, select Edit (pencil icon) from the item row in the list view. Then select the category from the item row that you want to assign to a category.

When the item is assigned, the data collection questionnaire will be automatically sent to the supplier. This can be identified by the yellow borders around the cells.

4.4 Using Questionnaire for Data Collection
Separate questionnaires are useful when there are only a few things to collect data on and when items cannot be categorized. Change the mode from Input to Questionnaire:

Select the individual cells you want to send the questionnaire about and then select CELLS SELECTED. (In the example, I have selected three cells marked light blue.)

When the questionnaire has been sent, this can be identified by the yellow borders around the cells:

4.5 Using Mass Questionnarie
Mass questionnaires allow you to send questionnaires for many products at once. They are useful, for example, when you want to make a one-time request for REACH information from a specific partner organization or for a specific product category.
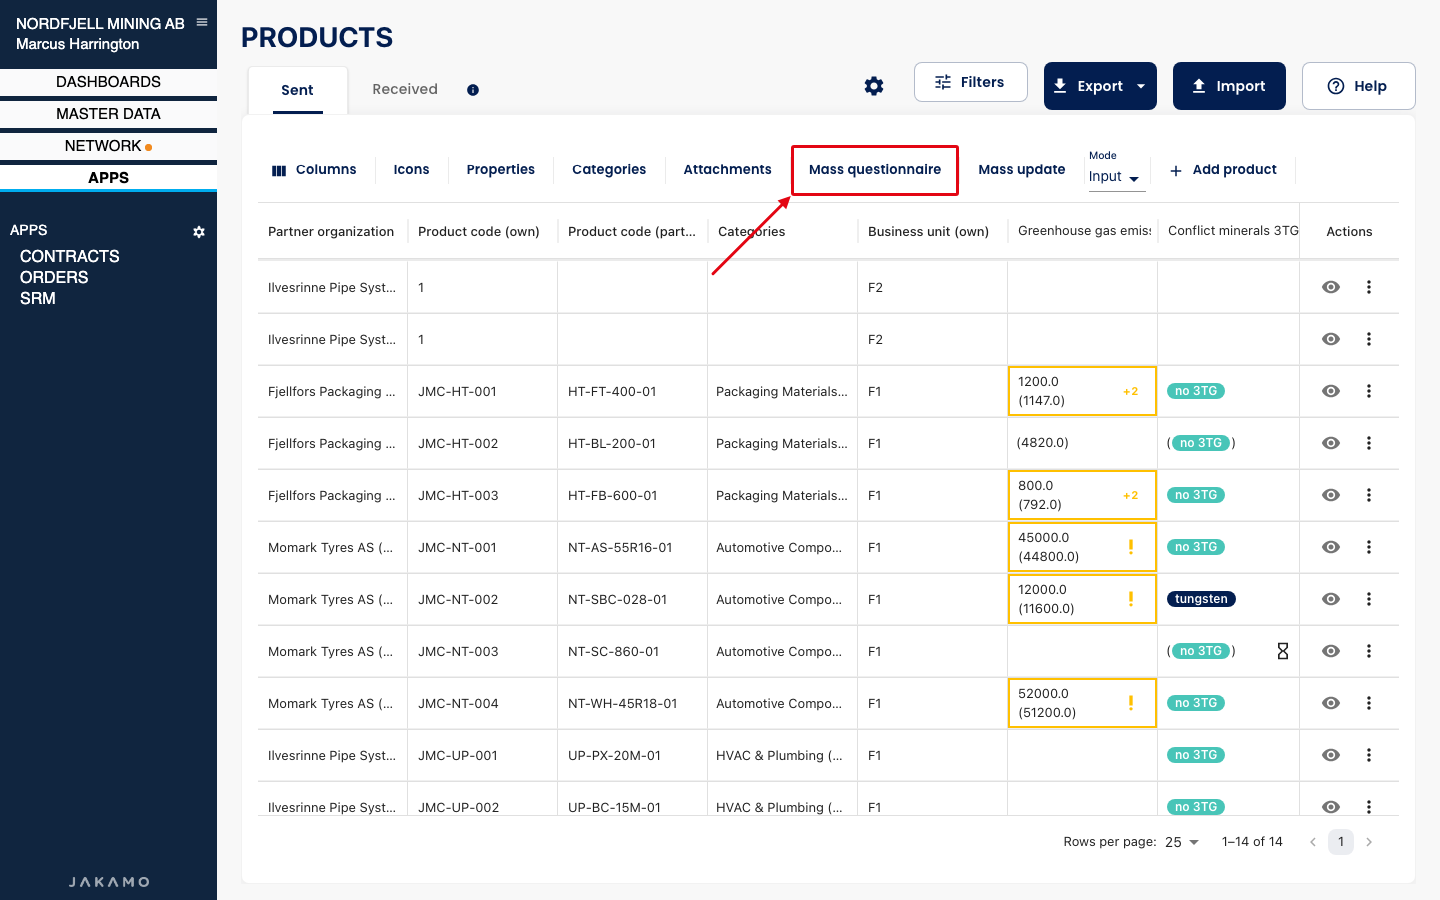
- Open Products and select Mass questionnaire in the toolbar above the product grid.
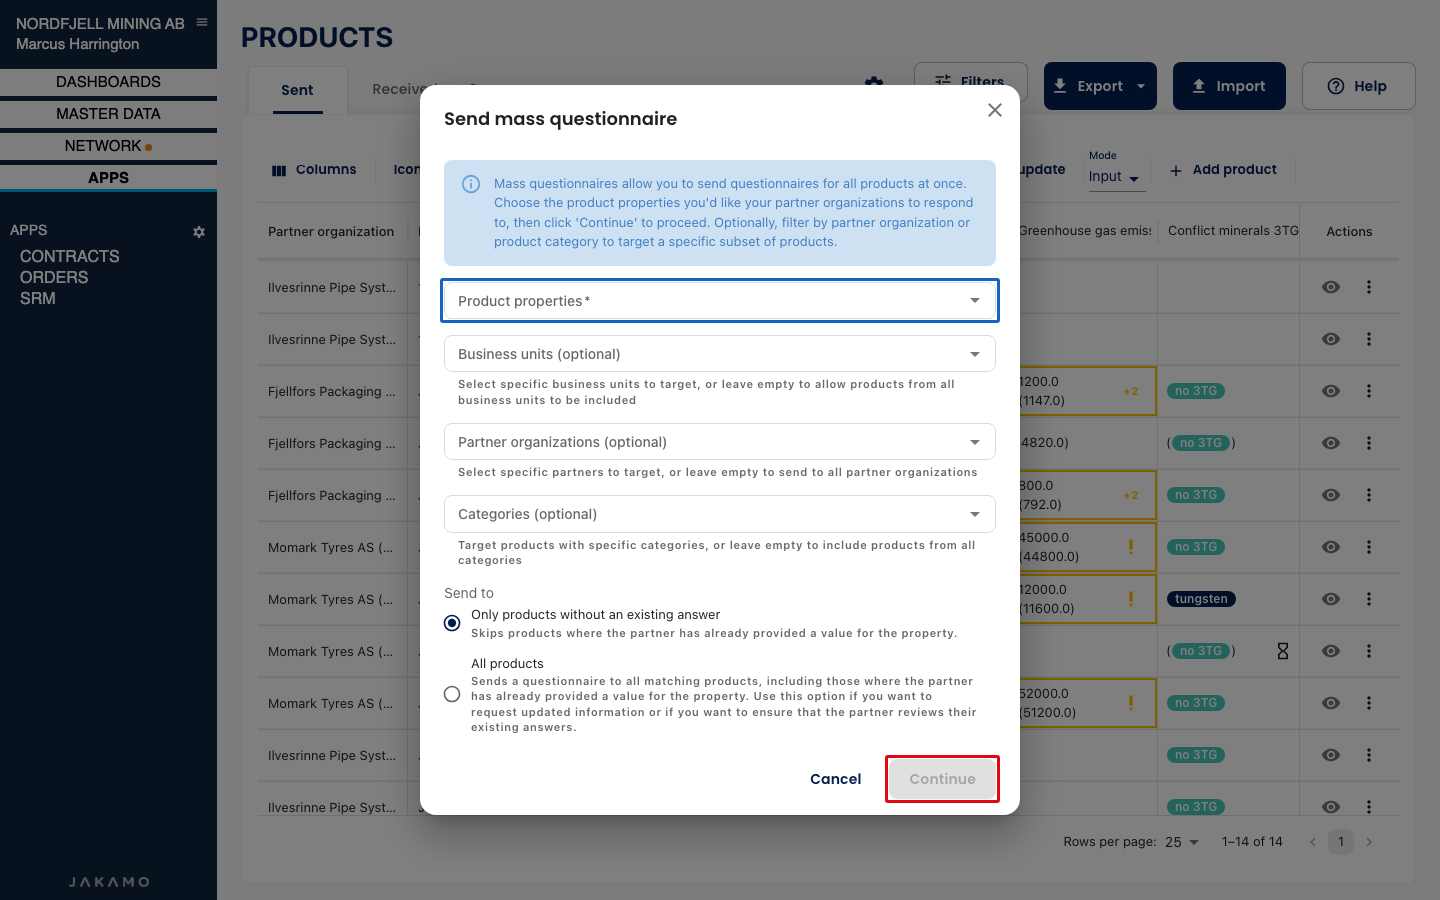
- In the Send mass questionnaire dialog, choose the Product properties you want your partner organizations to respond to. This field is required.
- Optionally narrow down which products receive the questionnaire:
- Business units (optional): Only shown if your company uses business units. Choosing business units also limits the partner list to relationships of those business units.
- Partner organizations (optional): Select specific partners, or leave empty to send to all partner organizations.
- Categories (optional): Target products in specific categories, or leave empty to include all categories.
- Under Send to, choose whether to skip products where the partner has already provided a value (Only products without an existing answer) or to send to All products. Use the latter if you want to request updated information or ensure that the partner reviews their existing answers.
- Select Continue. (The button becomes available after you have selected at least one product property.)
- Review the summary of the properties, partners, business units and categories that the questionnaire will be sent to. Select Back to change something, or Send questionnaire to send it.
The dialog does not close by clicking outside it, so you will not lose your selections by accident.
4.6 Set estimated date for property value to be added
If the supplier is not able to provide the value for an item immediately, an estimated date can be set for when the property value will be added. This helps keep the data collection process on track. To set estimated date:
- Find the item in the list view
- Select the three dots (Edit) and eye Icon (View) on the right-hand side of the item row to open the order.

- Set the date.

4.7 Cancel questionnaire
To cancel an individual questionnaire:
- Find the item in the list view.
- Select the three dots (Edit) and eye Icon (View) on the right-hand side of the item row to open the order.

- Use the Cancel button available for the requested values.

5. How to fullfill asked item-specific information as a supplier
Your partner may define which properties they are sending you questionnaires to fulfillment.
You can provide the requested product information in several ways:
-
Individual item update
Provide the requested data to the item directly in the Products grid or item's Product Details view. -
Order-specific update
Provide the requested data for items included in a specific order when completing the order confirmation. -
Pending requests
View and complete all pending product data requests from the Requests page. -
Mass update
Update a single requested data property for multiple existing items shared with your company at once. -
Excel import
Provide or update product data in bulk by importing an Excel file.
5.1 Individual item update
You can provide or update information for an individual item either directly in the Products grid or by opening the Product view.
Option 1: Update the item in the Products grid
- Open Products in Jakamo.
- Find the item you want to update.
- Check which information has been requested. Fields requiring input are highlighted with a yellow border and yellow question mark.
- Enter or update the requested information directly in the item row by double-clicking the cell.
- Remember to save the data by selecting Save icon.

Tip: If you cannot see all the available fields, scroll horizontally at the bottom of the Products grid.
Option 2: Update the item in the Product Details view
- Open Products in Jakamo.
- Find the item you want to update.
- Select the eye icon on the right side of the item row to open the Product Details view.
- Review the requested information marked with the yellow background in the Product Details view.
- Enter or update the requested information by selecting
Requested by partner. - Fulfill the information, updates are saved automatically.

5.2 Order-specific update
You don't have to proactively investigate if there is something to be filled, because after order confirmation, a pop-up window Unaswered questionnaires will appear if there are any pending questionnaires related to the confirmed items:

We recommend always selecting Yes - answer now if you are able to provide that information immediately. Once the task is finished, the pop-up window will not appear again for that item after order confirmations in the future.
When selecting Yes - answer now, you will be directed to the Products section filtered with items only in that spesific order.
Start providing information by selecting the pencil icon from the right side of the item row:
 (If you want to see all items ordered from you, unselect
Order Id from the filters.)
Select the correct option for you from the existing database options. There can also be text fields where you can write down your answer.
Remember to Save after providing all the answers (marked red). Please note that there may be additional properties pending your response on the right-hand side. You can scroll the view using the horizontal slider (marked in blue):

Please note, if you need to attach documents (for example, REACH certifications), please see the instructions here: Add Attachements.
5.3 View all pending requests
The Requests page provides a focused view for completing product information requested by your partners. Find Requests from Product Received tab.
- Open Products and go to the Received tab.
- Select the button
Requestsfor viewing all pending data requests. - The Requests page opens and shows the requested product propertie filtered with only properties your company has pending data requests.
- On the Pending tab, you can see products with information that still needs to be provided.
- Enter the requested information directly into the applicable cells, or use excel import.
- Once all requested information for a product has been provided, the product is shown on the Completed tab.
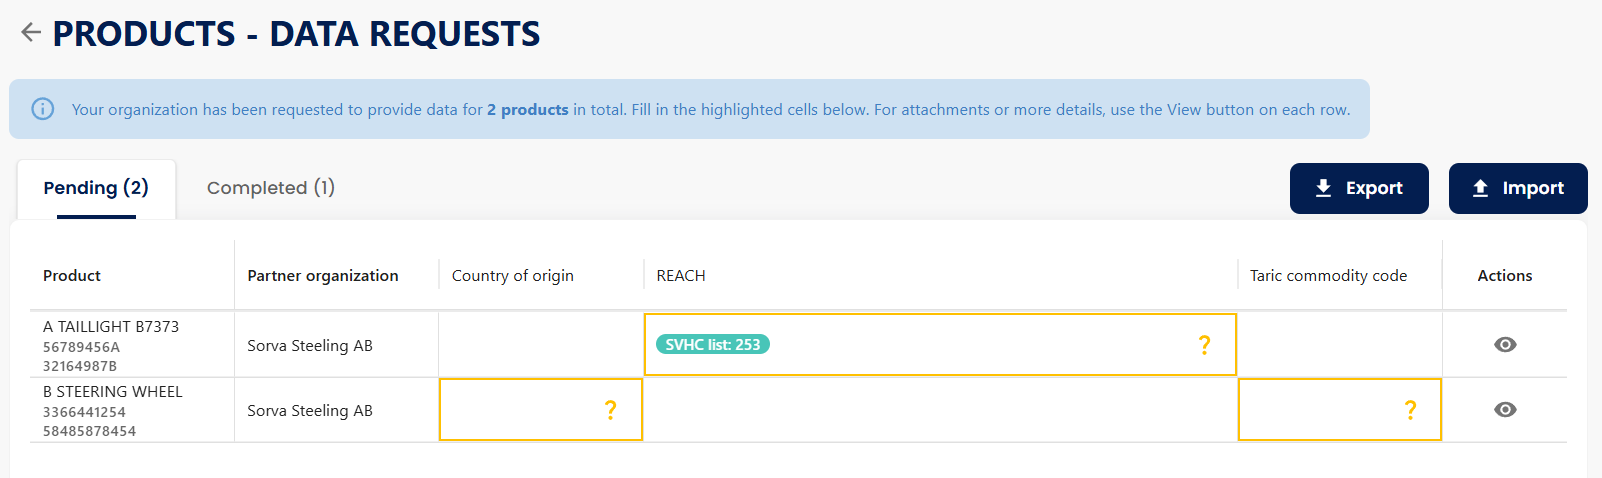
Tip! If you have received an email reminder from Jakamo about pending data requests, you can access the Requests page directly from the link in the email.
If you have filtered Products by partner organization before opening the Requests page, the same partner selection is automatically applied to the Requests view.
5.4 Mass update
Update Multiple Items with Mass Update
Use Mass Update when you need to update the same information for multiple products at once.
To start, open Products and select Mass Update from the toolbar.
Use Update property when you want to update the same property for multiple products:
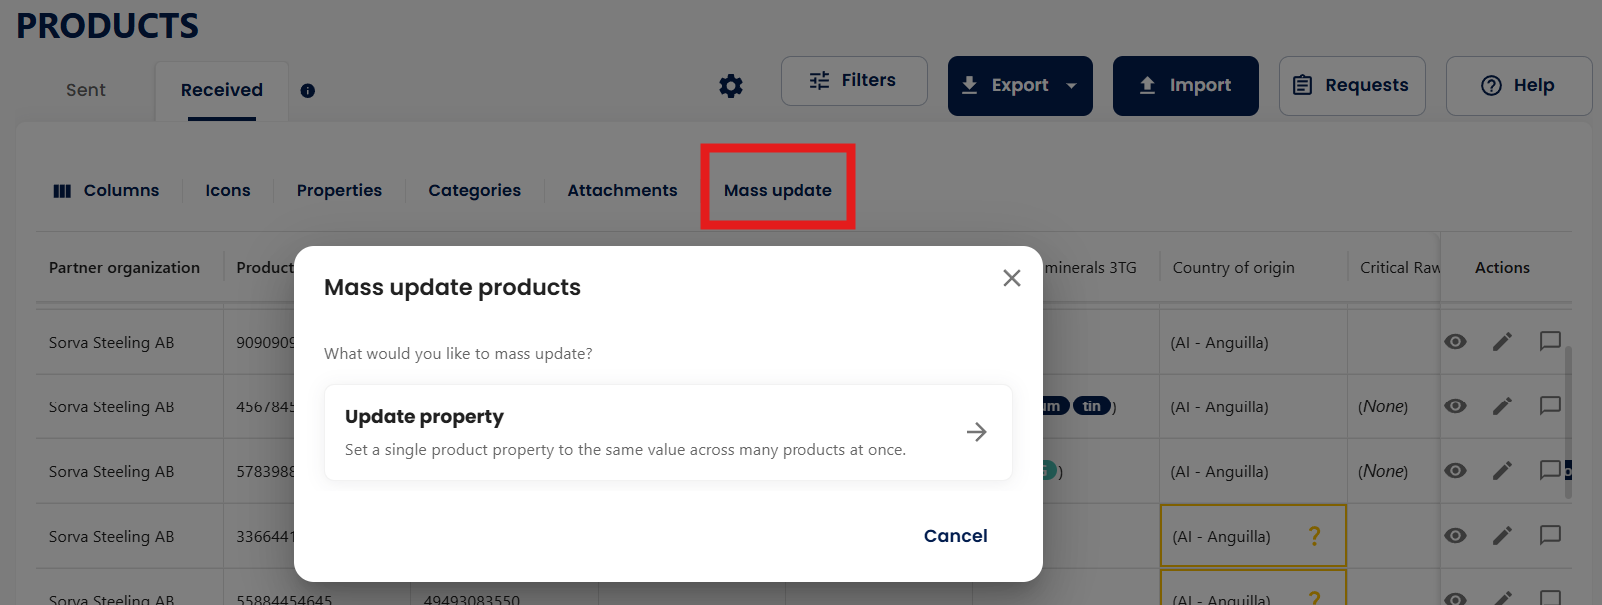
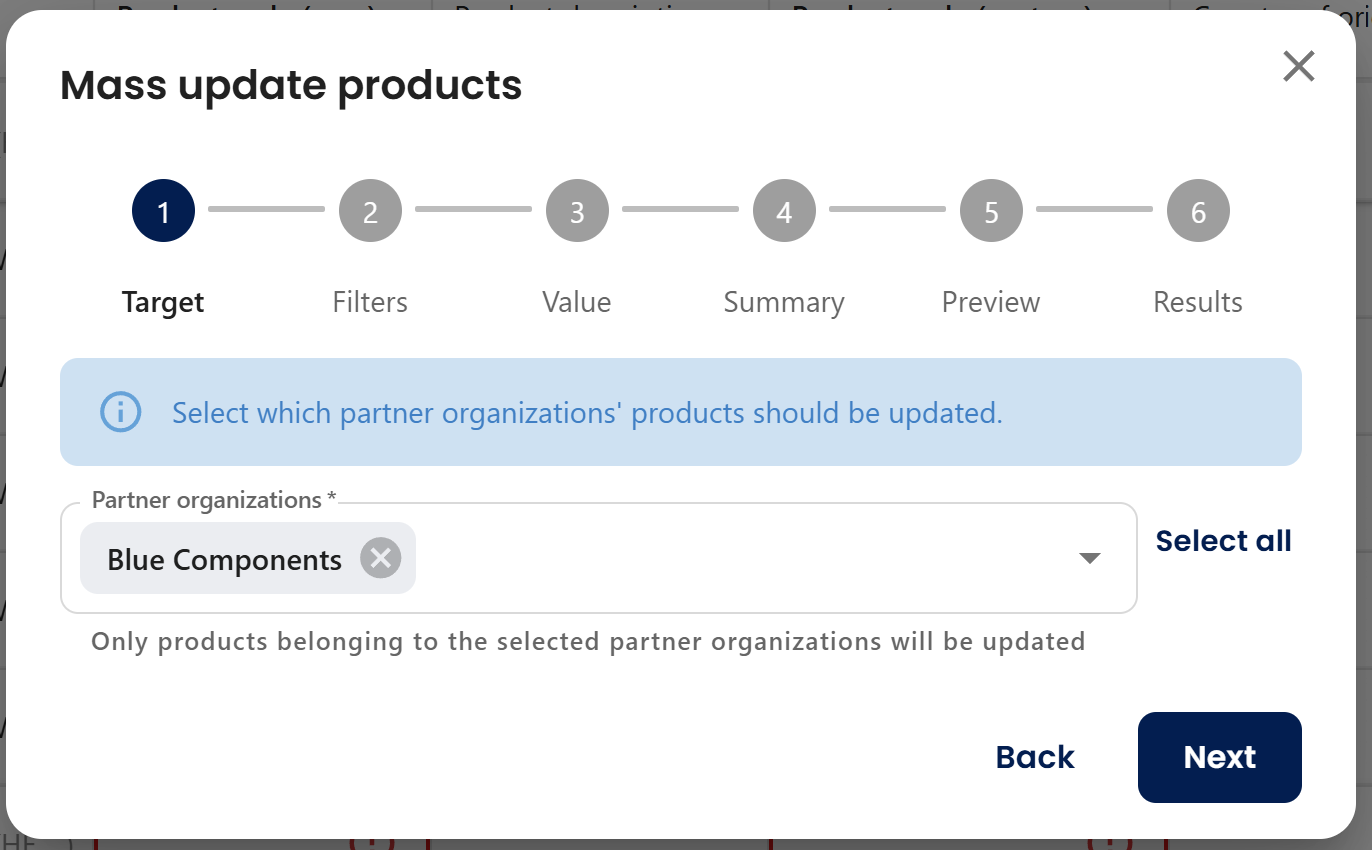
- Target: Select the partner organization(s) whose products you want to update.
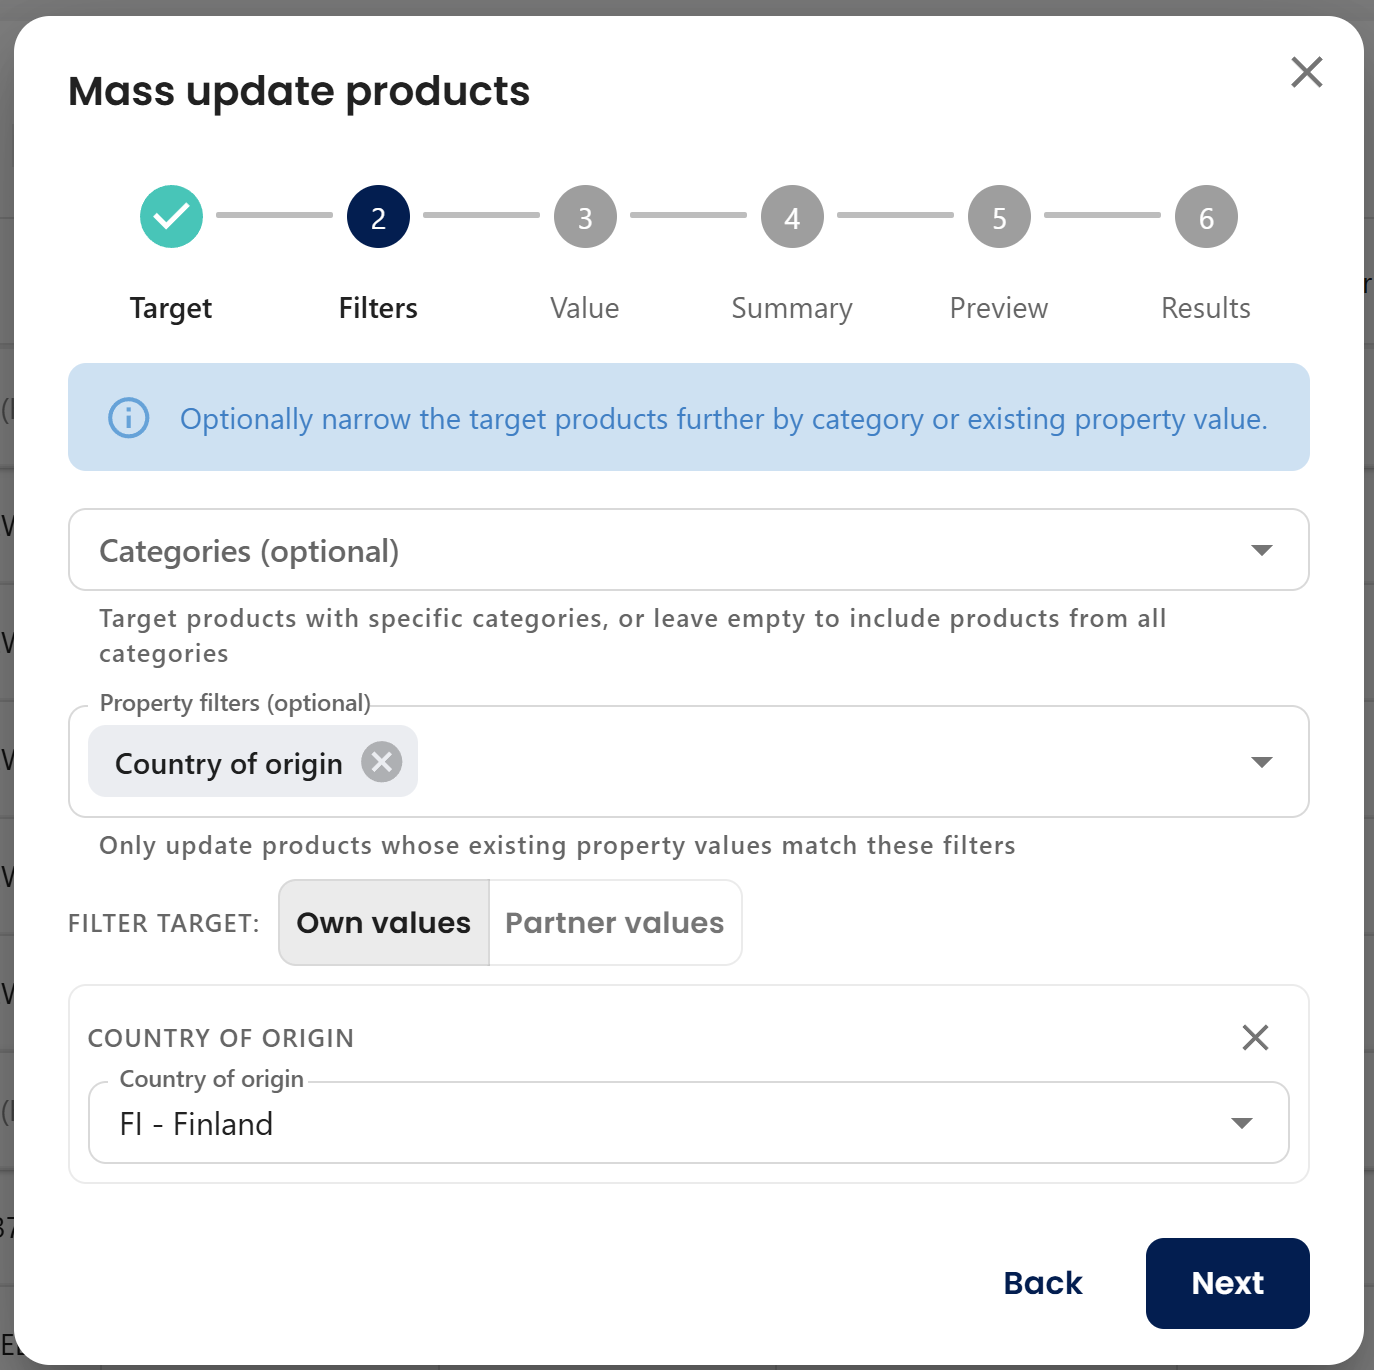
- Filters: If needed, narrow down the products by:
- Category: Target products with specific categories, or leave empty to include products from all categories
- Existing property value, either your company's value or the partner's value: only update products whose existing property values match these filters
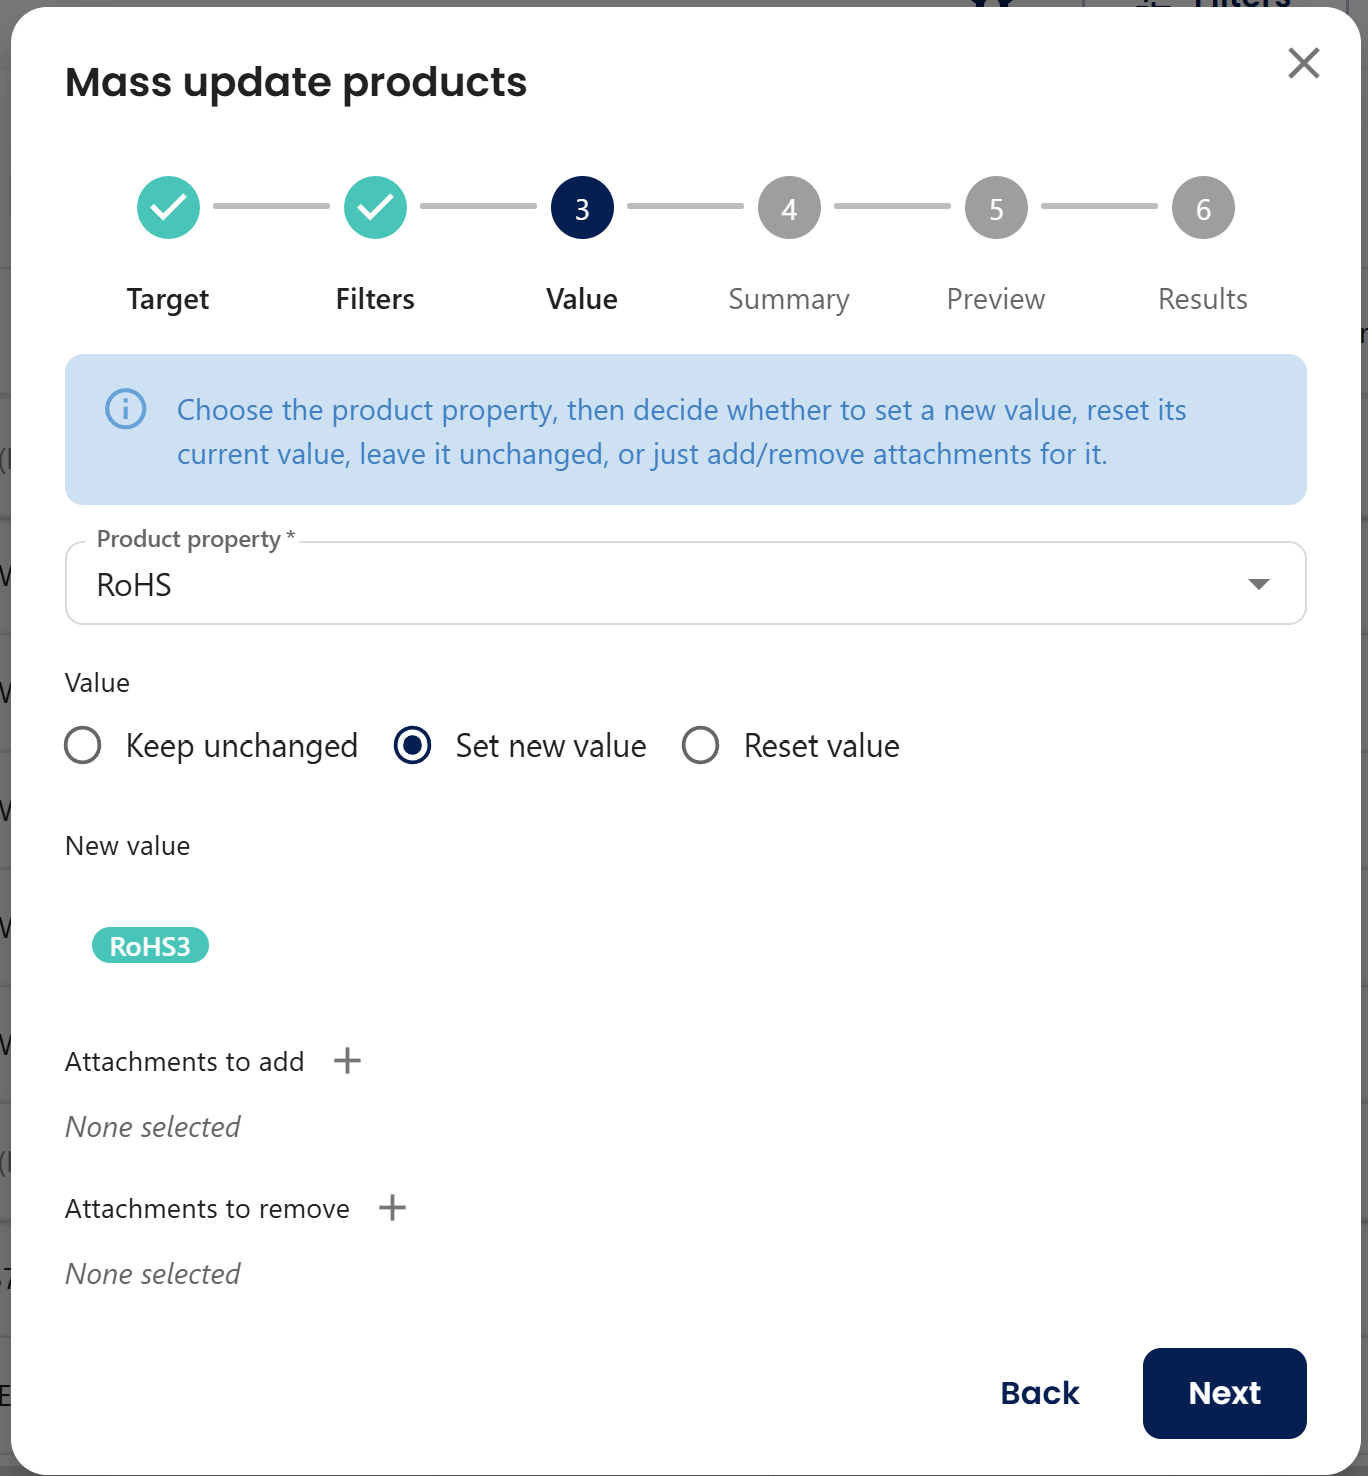
- Value: Select the property you want to update. Define the new value. Depending on the property, you can:
- Set a new value
- Reset the value to blank
- Add or remove an attachment
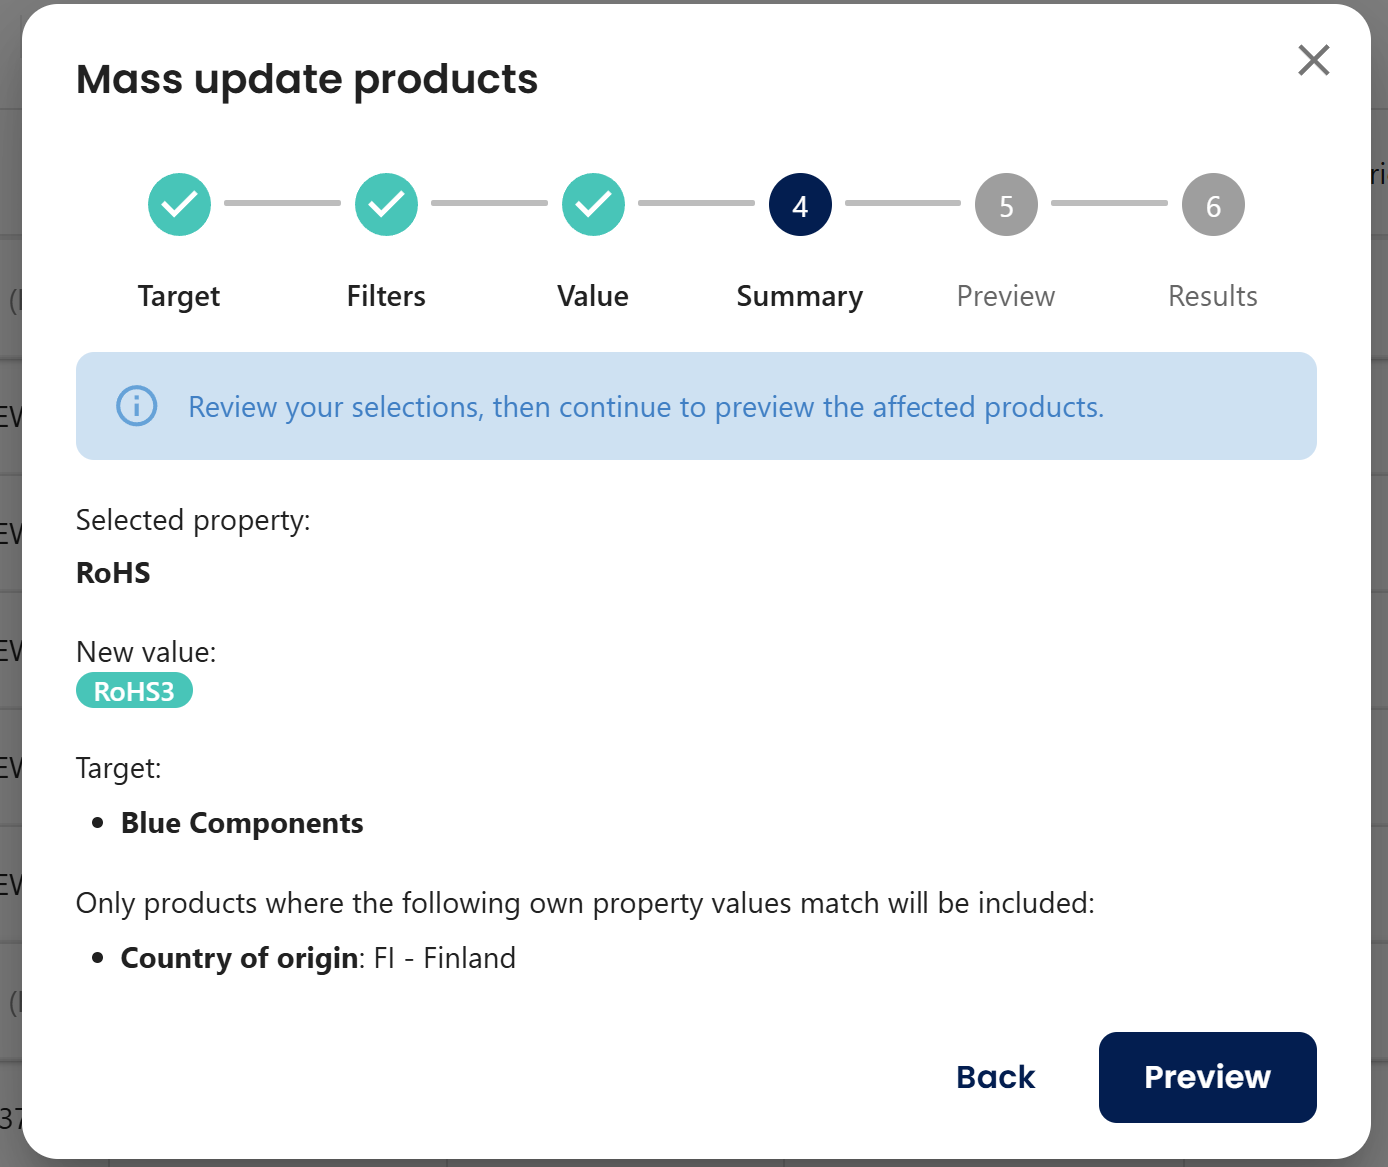
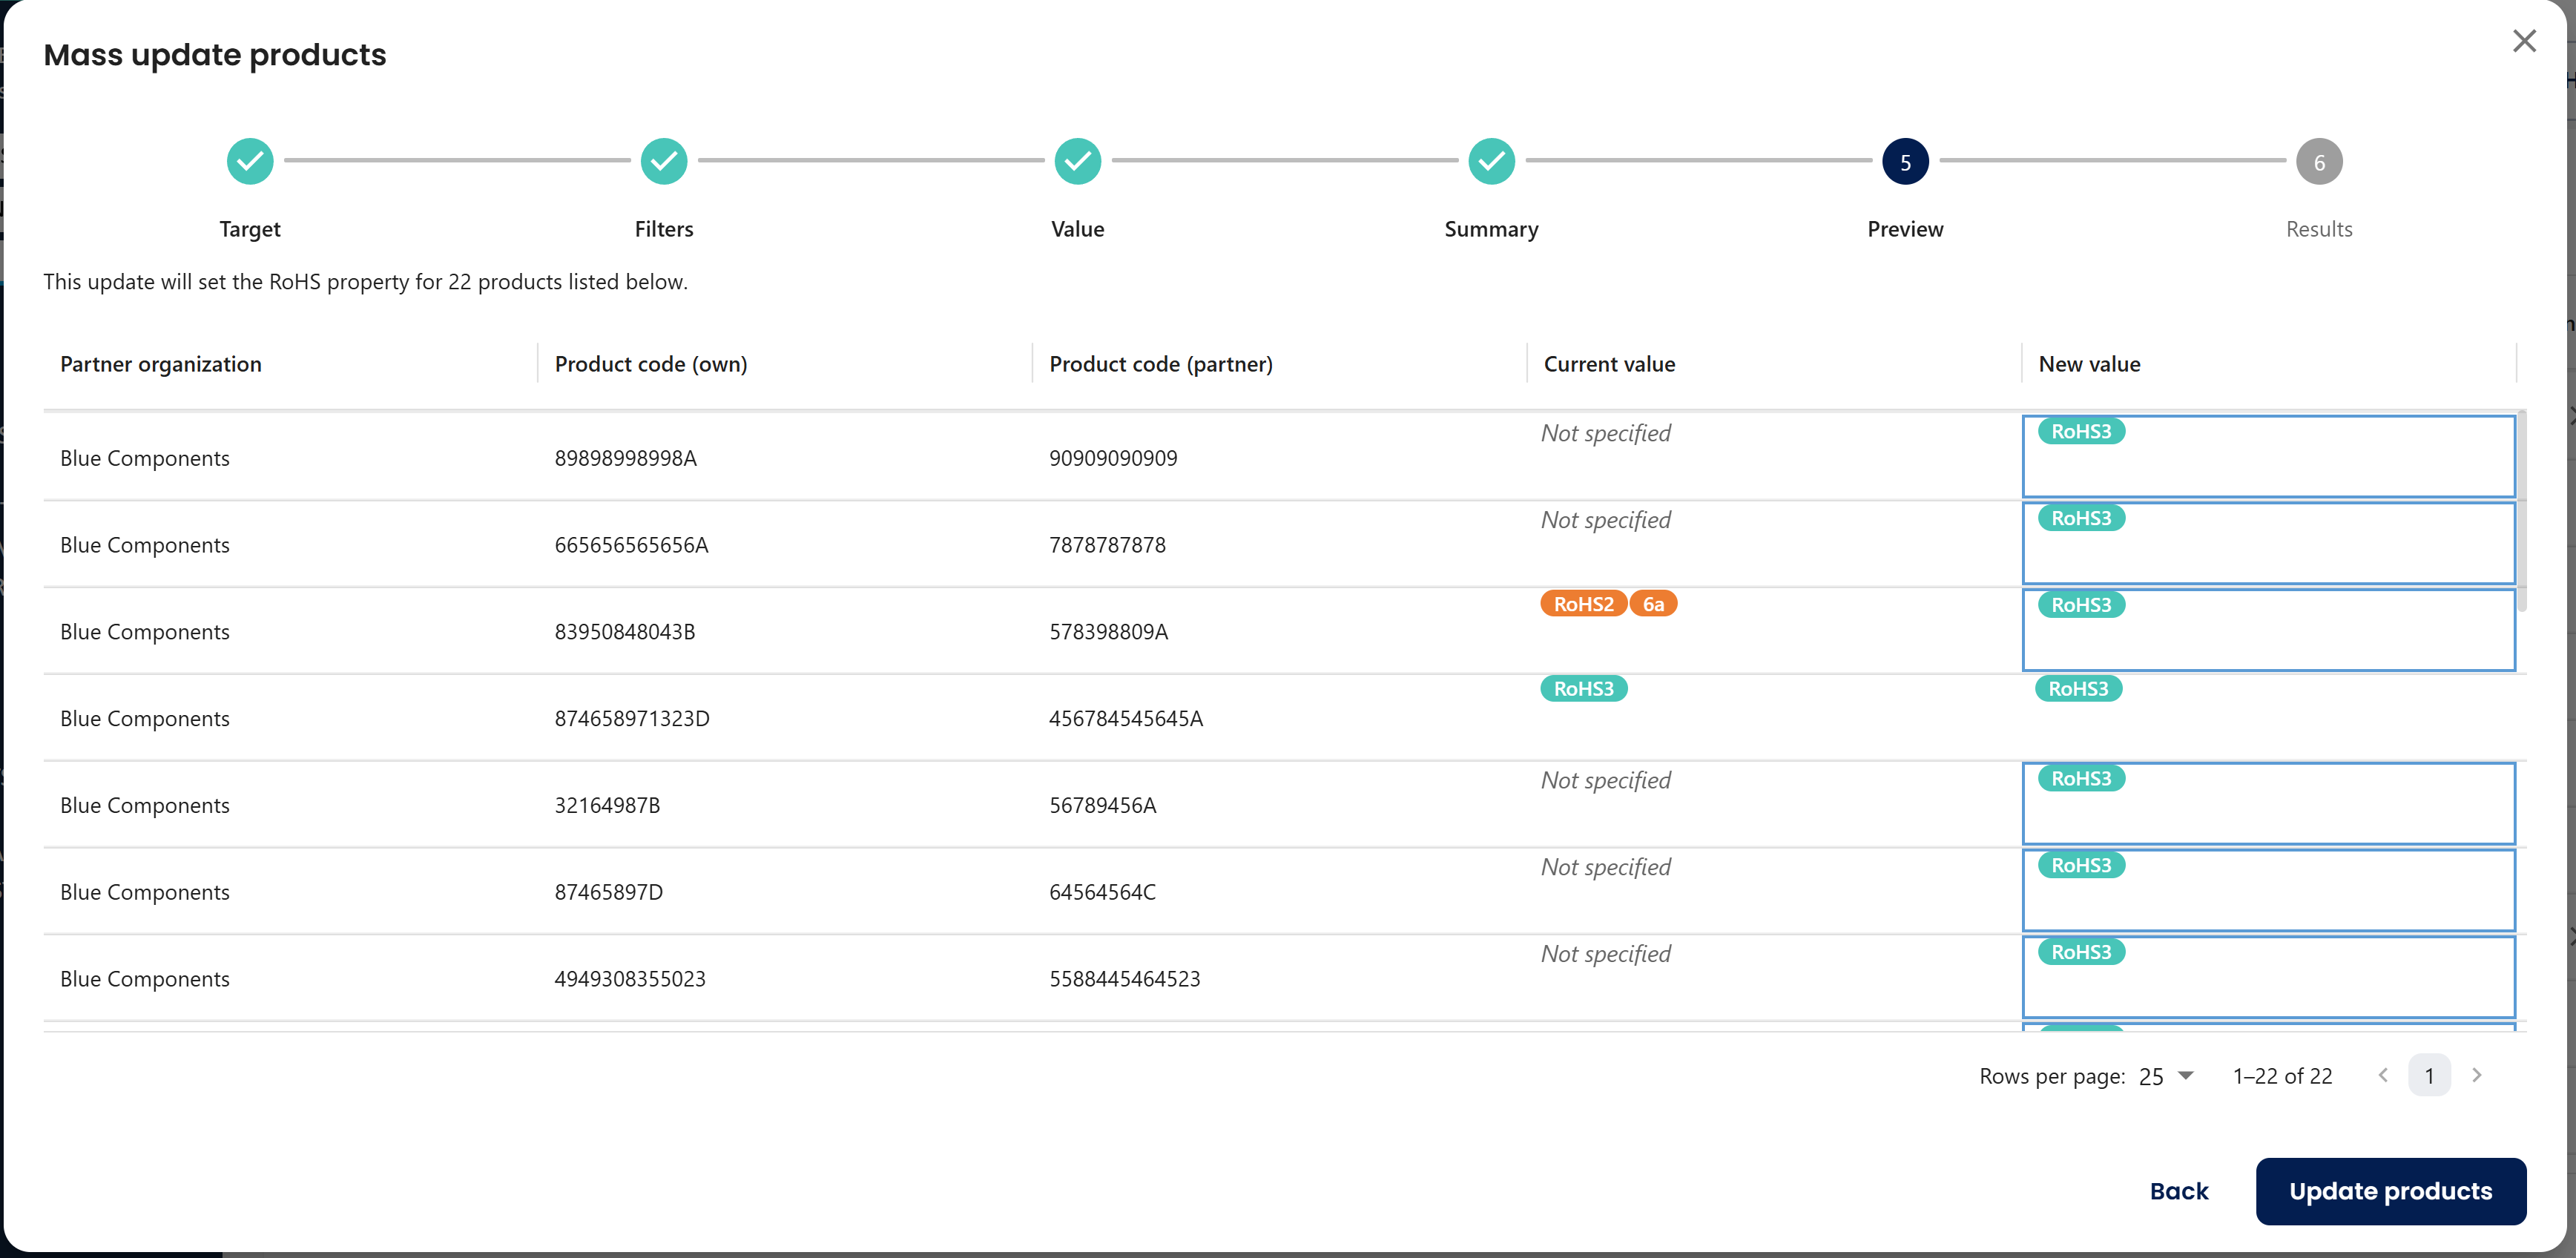
- Summary and Preview: Review the summary and preview to make sure the correct products will be updated successfully.
- Results: Continue and confirm the Mass Update by selecting
Update products. Only the products shown in the preview will be included in the update.
Note: If a product cannot be updated because of a validation issue, it will be skipped. Other valid products in the Mass Update can still be updated. Any products that could not be updated are reported after the operation.
5.5 Excel import
Use Excel Import when you want to add or update product information in bulk instead of editing products individually in Jakamo.
- Open the Products application.
- Export the product data to an Excel (.xlsx) file.
- Open the exported Excel file and update the product information.
- Save the completed Excel file.
- Return to Products and use the Excel Import function to import the file.
- Review the imported data and complete the import.
See more detailed instructions of the excel import: Excel import
Important: Keep the structure of the exported Excel file unchanged to ensure that the data can be correctly processed during the import.
6. Settings
6.1 Email reminders of pending data requests
Jakamo automatically sends email reminders every Wednesday when your company has pending product data requests that have not yet been completed.
A request remains pending when the requested product information is incomplete. This may also include missing required attachments or incomplete REACH/SCIP information.
When you receive a reminder email, use the link in the email to access the pending data requests and provide the missing information.
Once the requested information is completed, the request is no longer considered pending.
Select email reminder recipient
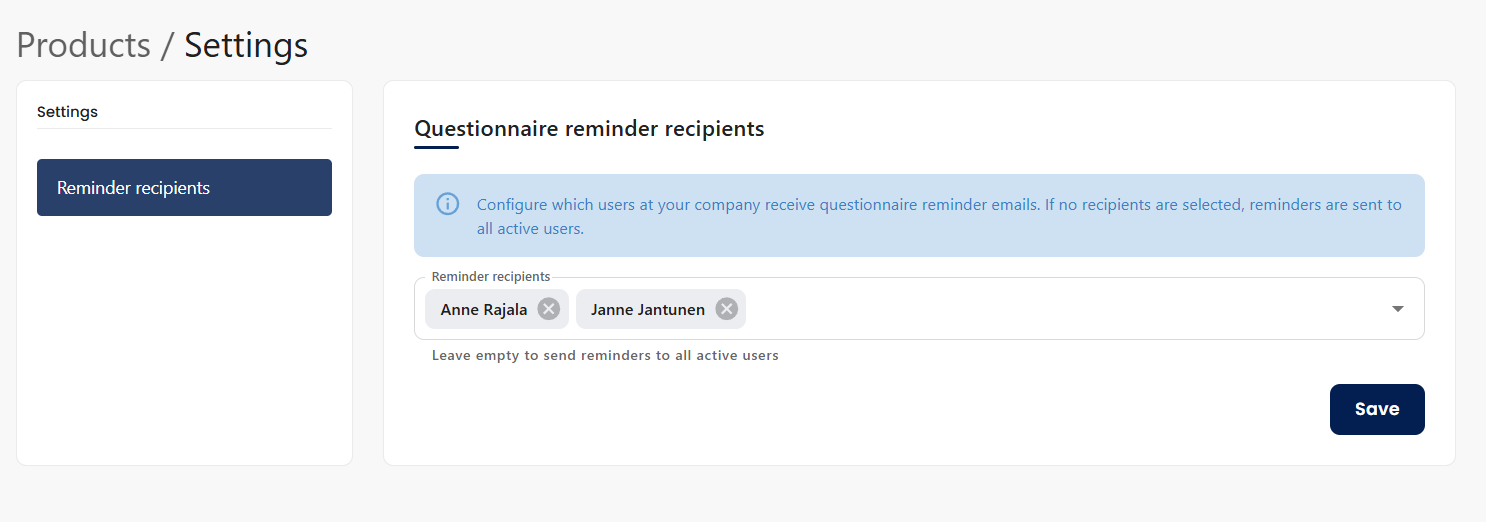
Navigate to Products > Settings > Reminder recipients.
Select the Jakamo users who should receive email reminders about pending data requests. If your Jakamo account has business units, configure which users receive questionnaire reminder emails for each business unit. If no recipients are selected for a business unit, reminders are sent to all its active users.
7. Practical recommendations
How to access Products without handling Orders?
Sometimes, item-level information is provided by someone other than the person handling sales ordersthey can still access the Products application via Apps. For more details, see here: How to find Products application? Ensure also that all required users have access to Jakamo. New users can be added here: Add User.
How do I view all questionnaires pending my response?
By using filters, you can view all questionnaires that are pending your response:

You can also navigate to Products > Received > Requests to view only items with pending data requests available.
How do I attach documents such as a 3TG certification?
Documents can be attached before or after providing item information, and existing documents can be linked to multiple items. The same steps apply to a declaration on EMRT minerals. See instructions here: Add Attachements.
Can I import item data from Excel to Jakamo?
Yes, it is possible to import item data from Excel into Jakamo. You can find comprehensive instructions here: Excel import.
Do you require a certificate related to the provided information?
Attachments, such as certifications, can be set as required if needed. This requirement is property-specific and can be configured in Properties. See more from here: Require Attachement
Didn't you find what you were looking for? Send an email to Jakamo support (support@thejakamo.com) and we will help you.