Supplier Relationship Management (SRM)
Jakamo has released a new Supplier Relationship Management (SRM) feature. New SRM feature will replace the previous Master Data feature.
1. Short Introduction to SRM
The SRM feature provides a centralized environment for managing supplier information, performance, and collaboration across the entire supplier lifecycle. By consolidating communication, documentation, and operational workflows into a single interface, SRM helps teams streamline daily procurement activities, track compliance, and identify potential risks more efficiently.
Strategic Value of SRM
From a strategic perspective, SRM supports long‑term supply chain planning and capability building. The feature enables organizations to assess supplier performance trends, monitor risk signals, and align sourcing decisions with broader business goals such as sustainability, cost optimization, and resilience. By offering consistent visibility into the supply base, SRM helps procurement and supply chain leaders develop stronger partnerships, improve supplier accountability, and proactively shape a more dependable and adaptable supplier ecosystem.
Building a Forward‑Looking Supplier Management Process
In addition to supporting operational efficiency, SRM provides the analytical foundation for strategic supplier segmentation, category planning, and continuous improvement initiatives. This ensures that supplier management is not only reactive to day‑to‑day needs but also a structured, forward‑looking process that contributes to long‑term competitiveness.
2. SRM Basics for Customers
Open SRM from the SRM link in the left-hand navigation.
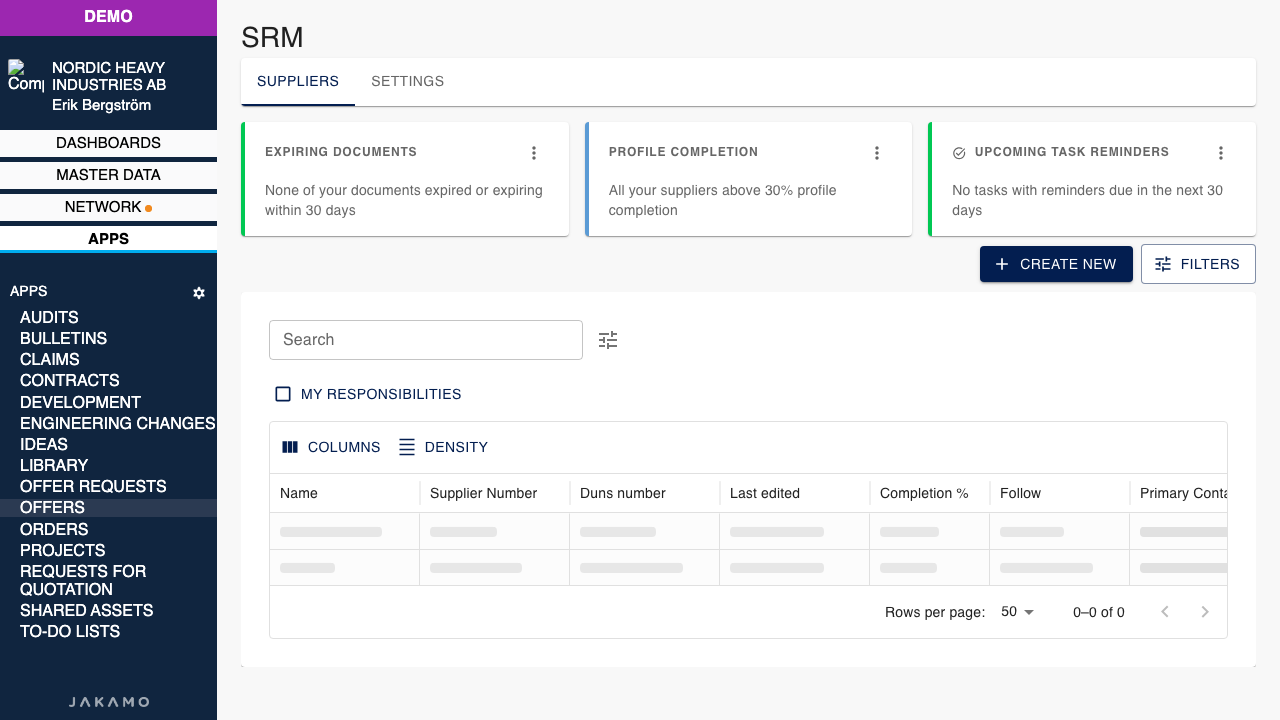
The SRM workspace has two tabs: Suppliers (list and profiles) and Settings (template, import, and configuration).
The SRM tool may not be activated for your account yet. You may also find SRM under Apps. Please contact Jakamo support (support@thejakamo.com) to request activation.
2.1 Suppliers
The Suppliers tab provides an overview of all supplier profiles in SRM. At the top of the page, summary cards highlight Expiring documents, Profile completion, and Upcoming task reminders. Below the list you can search, filter, and open individual supplier profiles.
From the list you can open a supplier profile, follow a supplier, and review completion progress. Each row shows key fields such as name, supplier number, last edited date, completion %, and primary contact.
1. Expiring Documents
The Expiring Documents section shows documents expiring within the next 30 days in SRM. You can filter the view to include only suppliers in your responsibility or all suppliers.
2. Profile Completion
The Profile Completion section shows how complete supplier profiles are in your SRM compared to a selected completion percentage. You can adjust the percentage threshold and choose to view only suppliers you are responsible for.
3. Search
The Search function allows users to quickly locate specific suppliers or supplier groups. Users can search by name, ID, category, country, or other indexed fields. Search results update dynamically, helping users navigate large supplier lists efficiently.
4. My Responsibilities
The My responsibilities filter highlights all suppliers or tasks assigned to the current user. It helps users focus on their active workload, such as completing documentation, reviewing assessments, or updating supplier details.
5. Filters
The Filters panel allows users to narrow down the supplier list based on predefined criteria such as category, risk level, region, lifecycle stage, or completion status. Multiple filters can be combined to create highly targeted views.
6. List View
The List view displays suppliers in a structured table format. It is optimized for scanning, filtering, and sorting large datasets. The view supports column sorting and quick access to supplier profiles.
7. Columns
The Columns menu lets users customize which data fields are visible in the list view. Users can show or hide columns such as supplier type, risk level, country, status, or last updated date. Customizing the layout ensures that each user sees the information most relevant to their role.
8. Density
The Density setting allows users to adjust the spacing of rows and content within the list view. Options include compact, standard and comfortable, enabling users to fit more data on the screen or increase readability based on preference.
9. Completion %
The Completion % indicator shows the progress of required supplier information fulfillment or onboarding steps per supplier. It helps users and teams track how far along each supplier is in completing mandatory fields, verifications, or compliance requirements.
10. + Create new
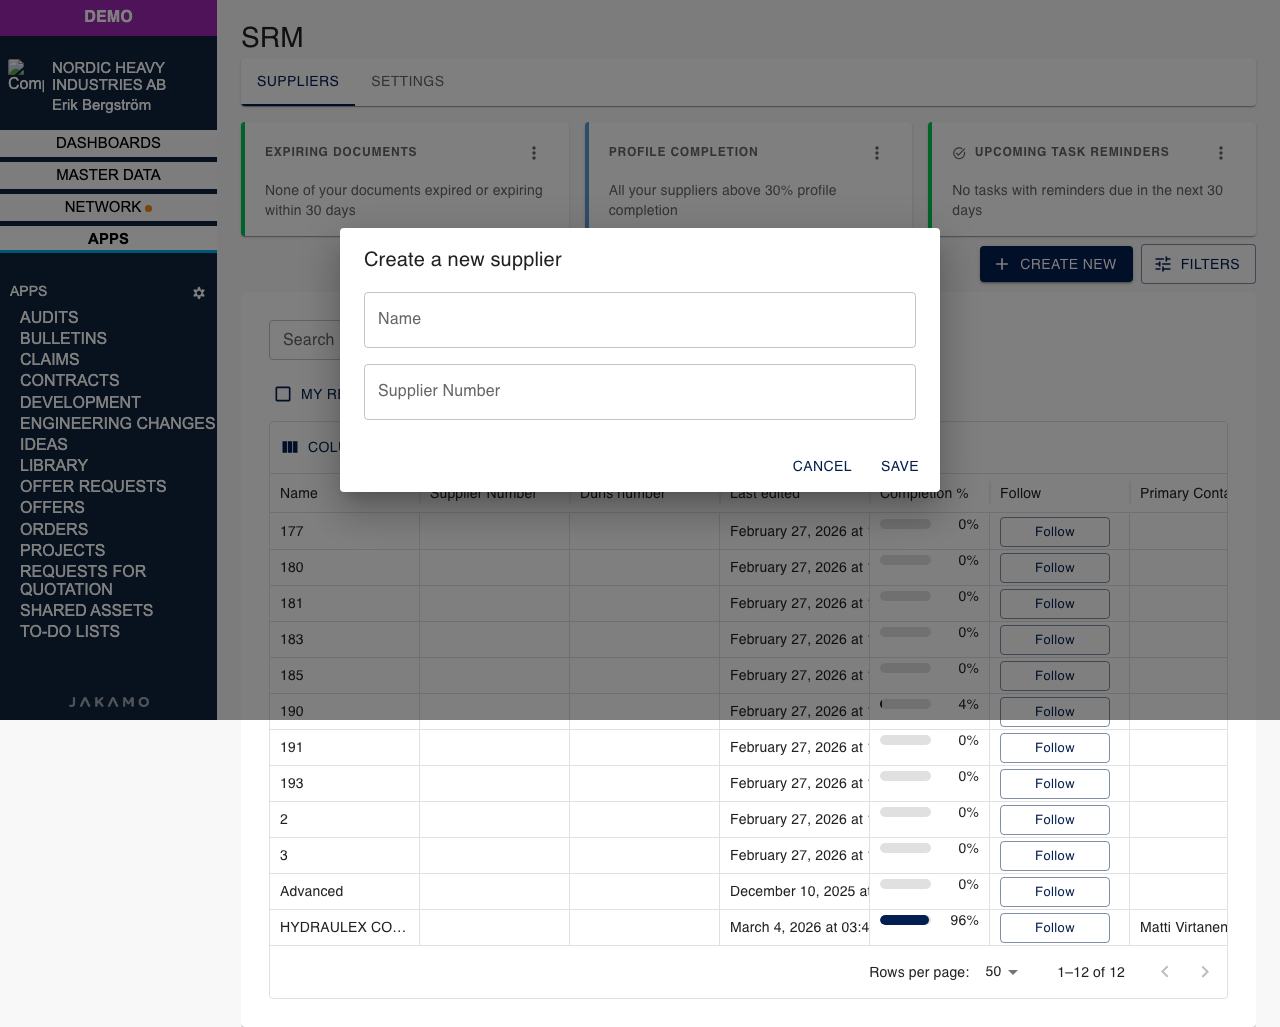
The + Create new button opens a form where you enter the supplier name and supplier number to create a single profile manually. Use this when you only need a few profiles. For larger batches, use Import suppliers instead.
11. Follow
Use Follow on a supplier row to stay updated on that profile in your own workflow.
2.2 Supplier profile
Open a supplier from the list to view its Profile. The profile page shows completion %, responsible persons, and template data grouped into widgets. Use the Activity tab to add notes and tasks, or review recent changes.
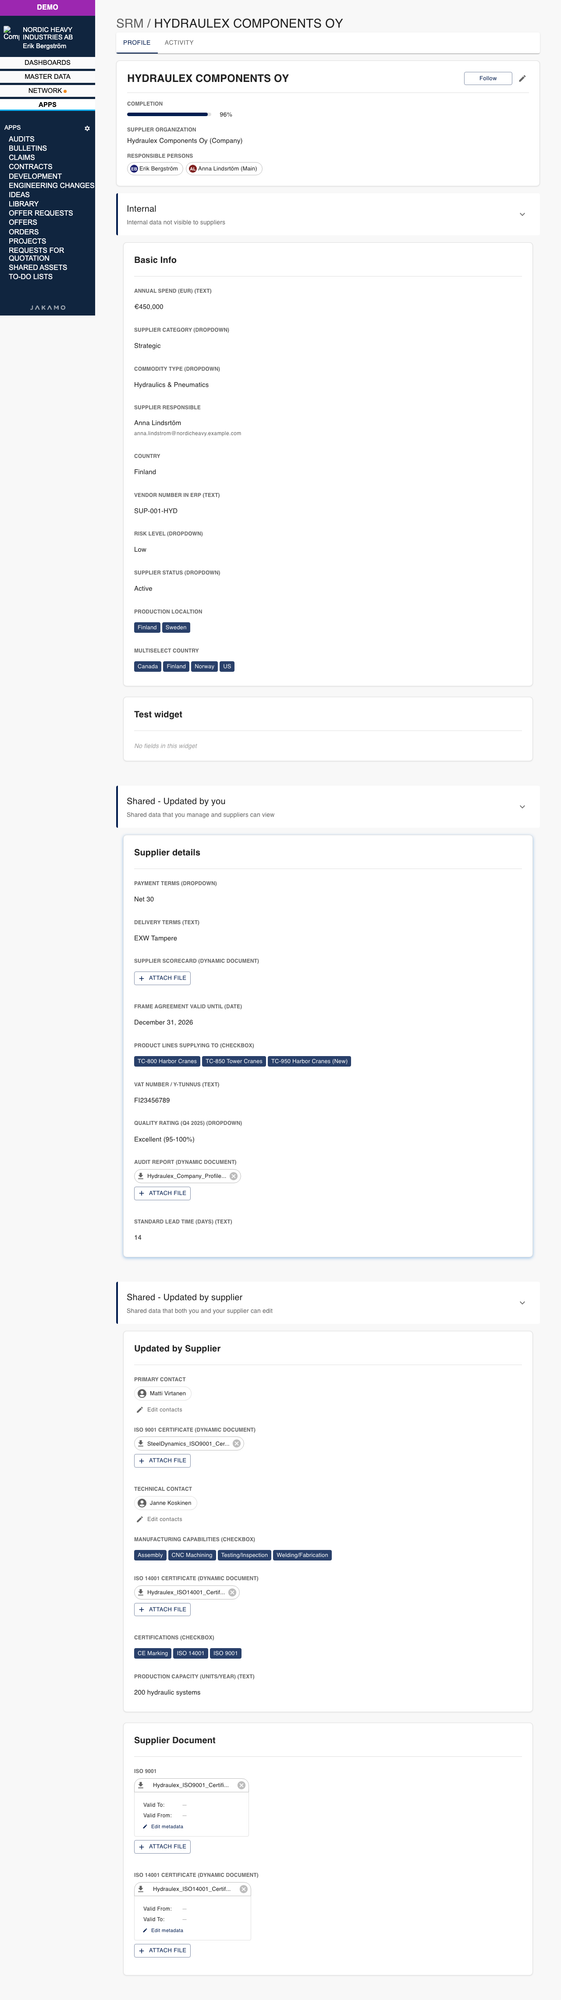
Widget sections follow the visibility rules defined in your Supplier template:
- Internal — visible only to your organization
- Shared – updated by you — you maintain the data; the supplier can view it
- Shared – updated by supplier — both parties can view and edit
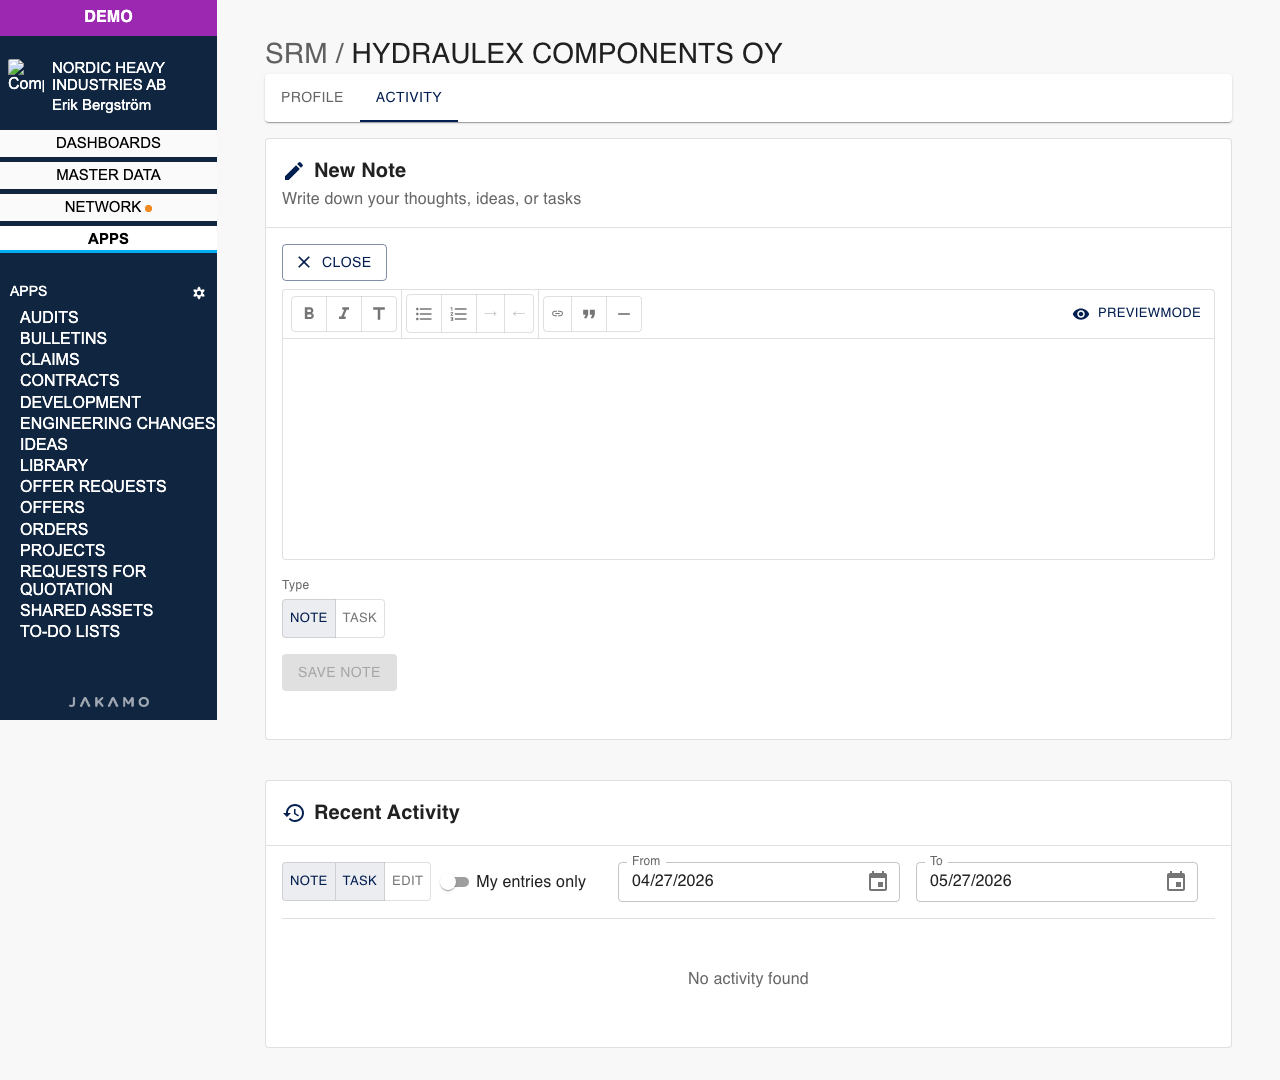
2.3 Settings
Open the Settings tab to configure SRM. The settings menu is grouped as follows:
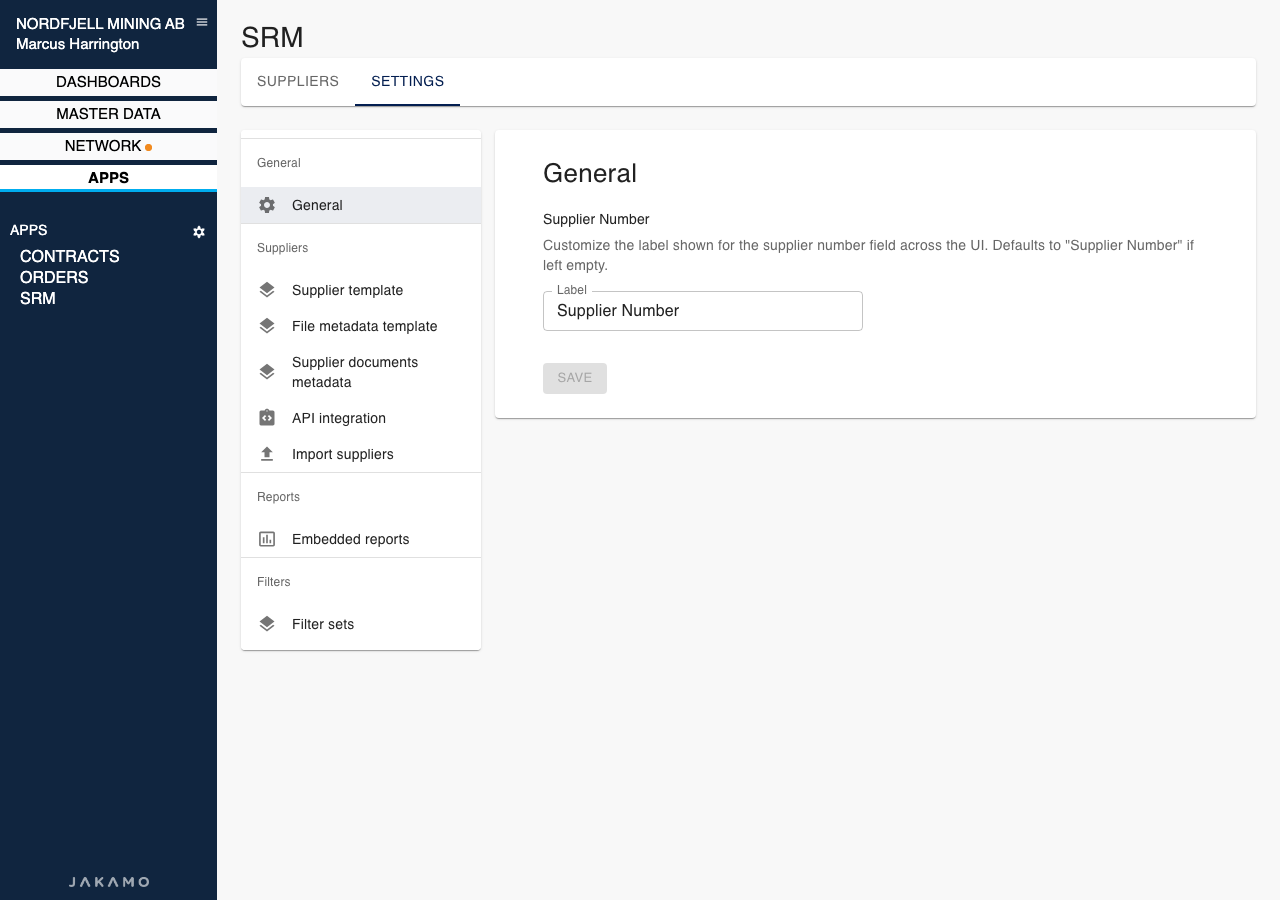
General
- General — customize labels such as the supplier number field name
Suppliers 2. Supplier template 3. File metadata template — define metadata fields (for example Valid From and Valid To) for files on a document field 4. Supplier documents metadata — fields that appear on supplier documents. These are separate from document fields on the supplier template 5. API integration — configure SRM API access for your integrations 6. Import suppliers
Reports 7. Embedded reports — show a report on the dashboard or on each supplier profile
Filters 8. Filter sets — save reusable filter combinations for the supplier list
All template and data-collection topics are covered in section 3.
2.4 API integration
Open Settings → API integration to see every template field, grouped by widget, with its type and its API identifier. The API identifier is what an external integration uses to read or write that field's value through the Supplier Relationship Management API — it is independent of the field's display name, so renaming a field in the template does not break an existing integration.
To make a field available to the API, select the pencil icon next to it and enter a short, stable identifier (for example country). Fields configured as Shared – updated by supplier cannot be written through the API — only your organization's own fields can be.
A field with Disable editing through UI turned on can still be read and written through the Supplier Relationship Management API when it has an API identifier. People cannot change that value on the supplier profile.
Set up the OAuth2.0 credentials for the integration itself on the Integrations settings page; full endpoint and payload details are in the Supplier Relationship Management API reference.
3. Collecting and Maintaining Supplier Information
The use of SRM is based on a Supplier Template, which enables the standardization of supplier information. To collect and maintain consistent data across your entire supplier base, a template must first be created and then shared with the selected suppliers. In other words, once the template has been established, it can be applied to all suppliers in your network.
3.1 Supplier Template
The Supplier template defines which information you collect from and about each supplier. It is divided into widgets (sections such as Basic Info or Supplier details), and each widget contains fields (text, dropdown, date, contact list, static document, dynamic document, and other field types).
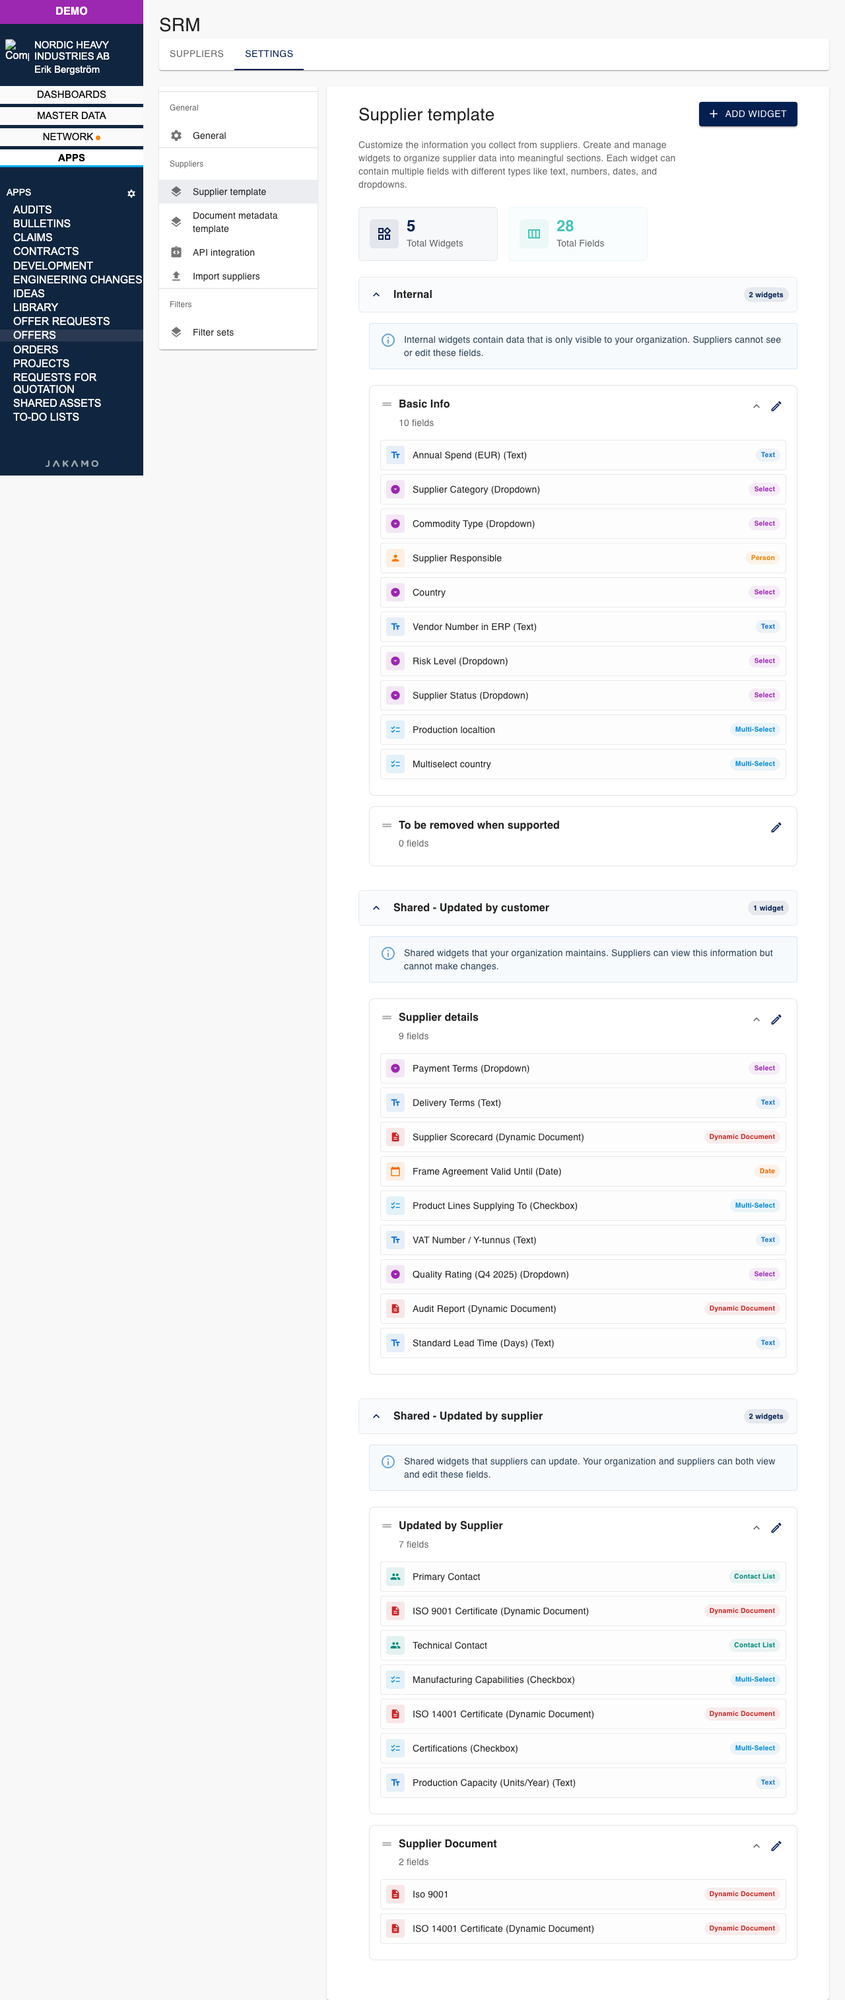
Configure the template under Settings → Supplier template. Use Add widget to create a new section, and the pencil icon on each widget to add or edit fields. To keep a value out of the on-screen form and leave it to an integration, see Disable editing through the user interface.
Each widget belongs to one of three visibility categories:
| Category | Who can view | Who can edit |
|---|---|---|
| Internal | Your organization only | Your organization |
| Shared – updated by you | Your organization and the supplier | Your organization |
| Shared – updated by supplier | Your organization and the supplier | Both parties |
When a supplier profile is shared and linked to a Jakamo account, fields in Shared – updated by supplier widgets appear in the supplier's Customer data request view.
Disable editing through the user interface
Use Disable editing through UI when a value should come from an integration, and people should not type it on the supplier profile. The switch is off until you turn it on. It is shown for every field type except Static Text and Static Document.
- Open SRM and select the Settings tab.
- Open Supplier template.
- Select the pencil icon on the widget that contains the field.
- Select Add Field, or the pencil icon on an existing field.
- Turn on Disable editing through UI.
- Select Add Field or Save.
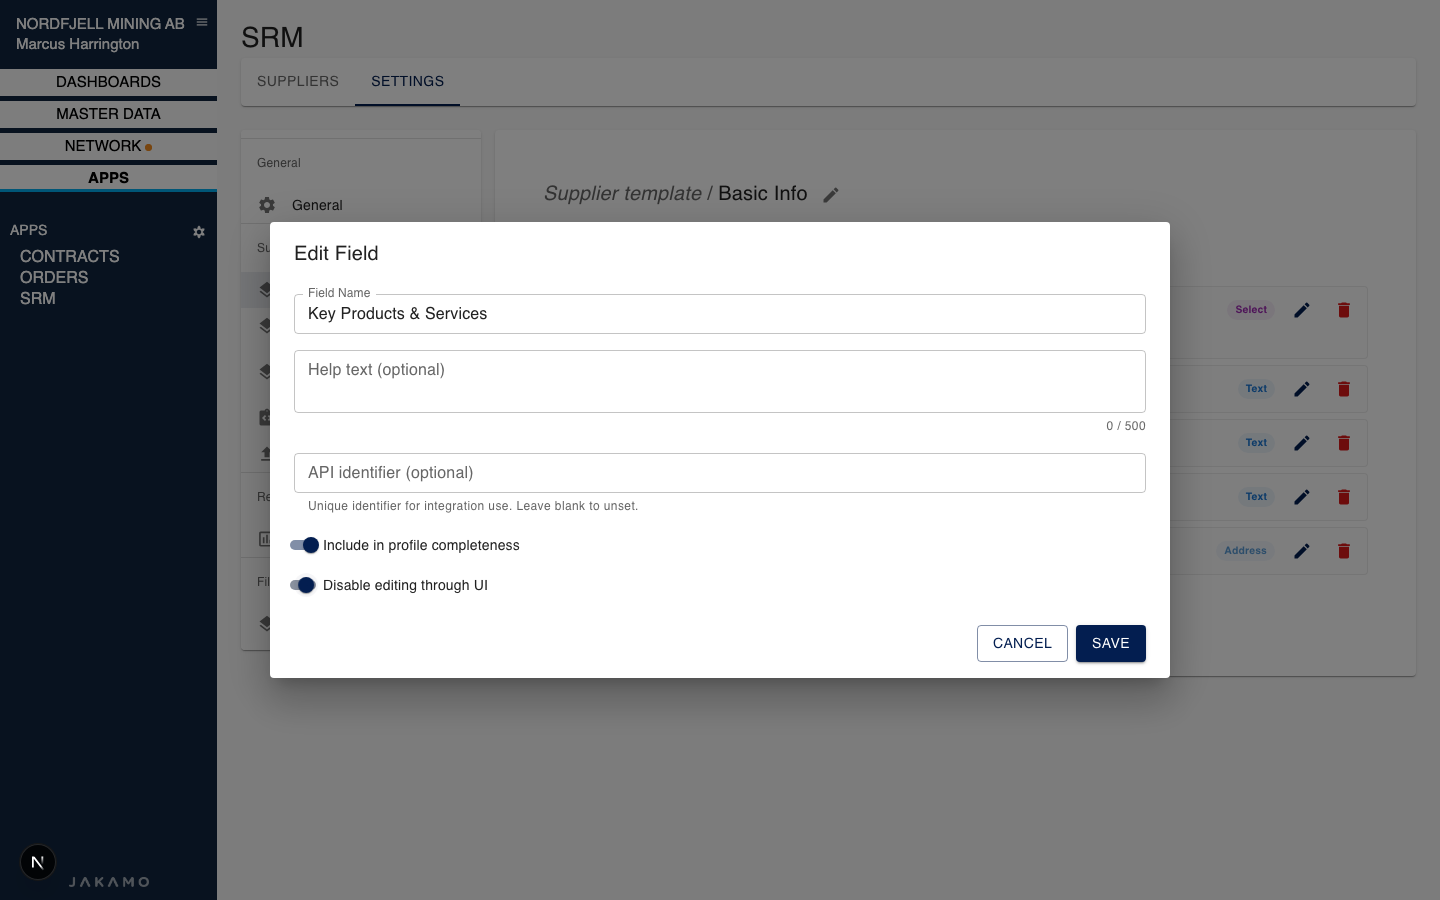
Saving the switch updates every supplier profile that uses this template, including profiles you already created.
When the switch is on:
- Your users cannot change the value on the supplier profile.
- The supplier cannot change it in the Customer data request.
- Import suppliers cannot write a value into that field. The import reports that the field is not editable.
- An integration can still read and write the value through the Supplier Relationship Management API, using the field's API identifier. Put the field on an Internal widget or a Shared – updated by you widget. Fields on a Shared – updated by supplier widget cannot be written through the API.
Include in profile completeness still decides whether the field counts toward the completion percentage. Disable editing through UI does not remove the field from that percentage. Suppliers are not asked to fill a field they cannot edit.
A document field can hold several files, each with its own metadata values. See Several files on a document field.
3.2 Create supplier profiles
Before sharing information with suppliers, supplier profiles must first be created and shared with the relevant suppliers. This section guides you through the process of creating supplier profiles. Additional information on how to share the created template with suppliers is available here: 3.3 Share the Supplier Data Request with Your Supplier.
3.2.1 + Create New
If you need to create supplier profiles for only a few suppliers, use + Create new on the Suppliers tab. Enter the supplier name and supplier number, then select Save.
To share the profile and template with the supplier, see 3.3 Share the Supplier Data Request with Your Supplier.
3.2.2 Import Suppliers
If you need to create many supplier profiles at once, use Settings → Import suppliers.
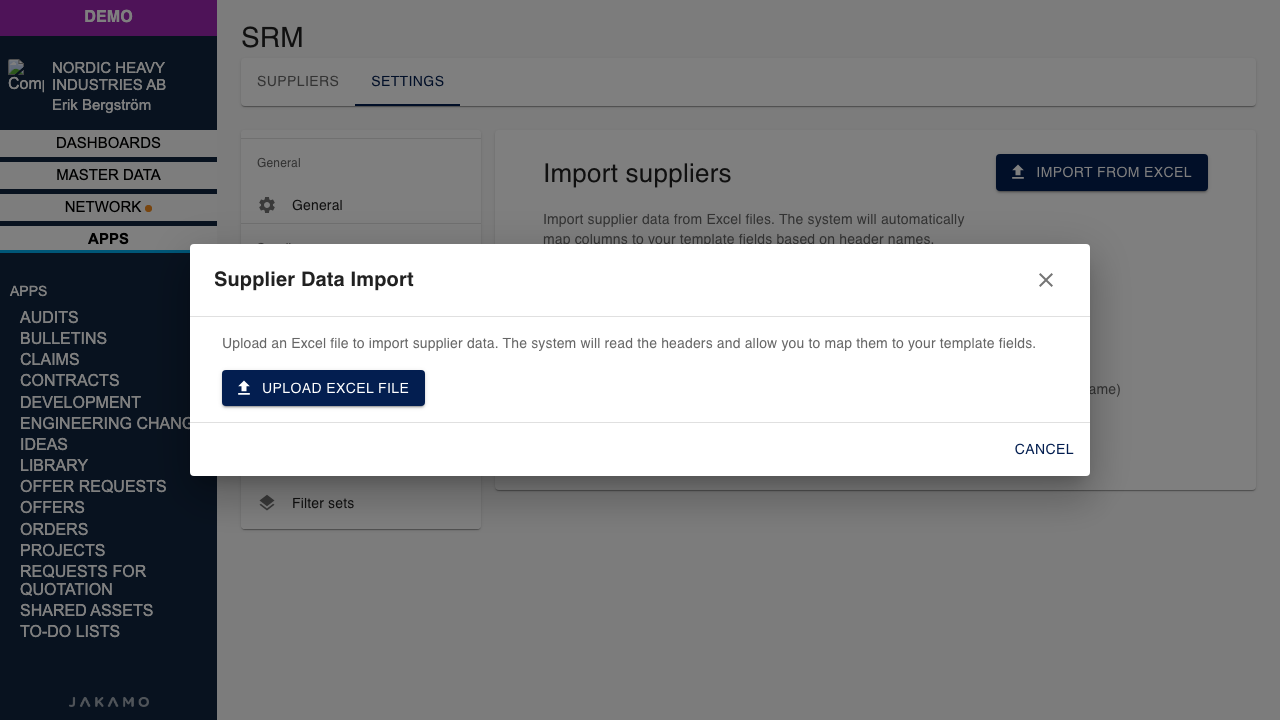
- Open Settings → Import suppliers
- Select Import from Excel
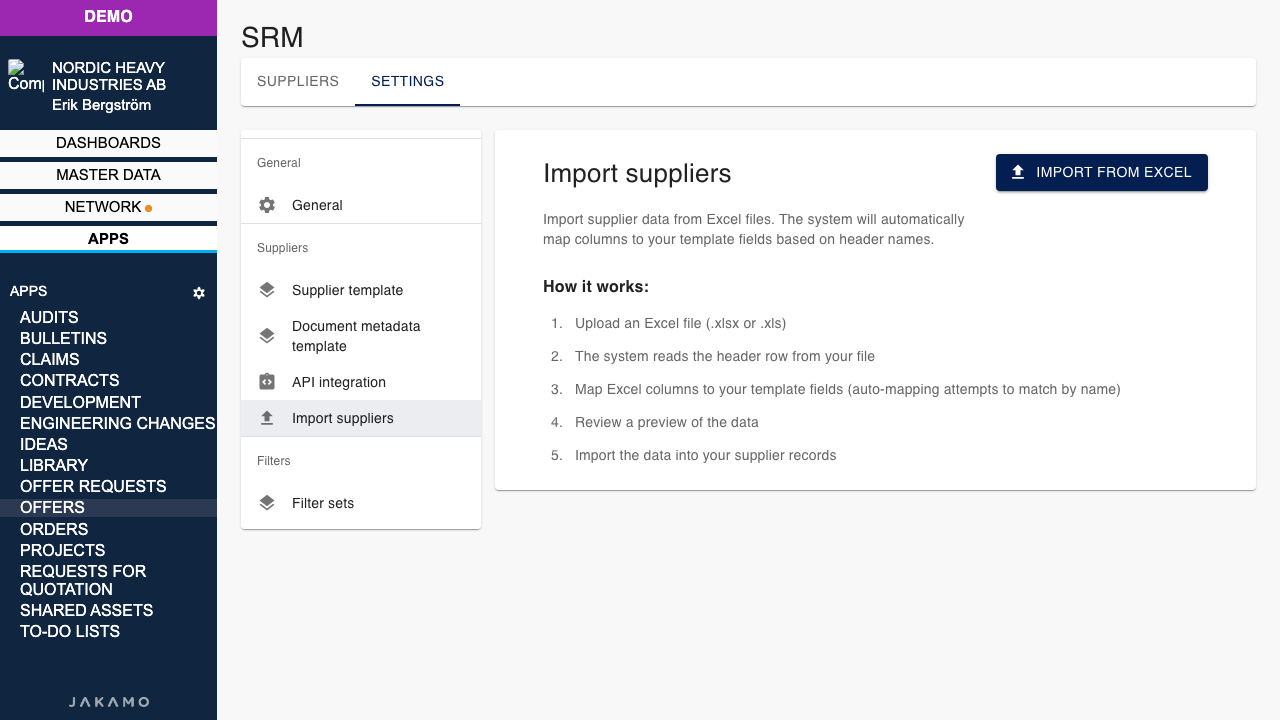
- In the import dialog, select Upload Excel File and choose your
.xlsxor.xlsfile
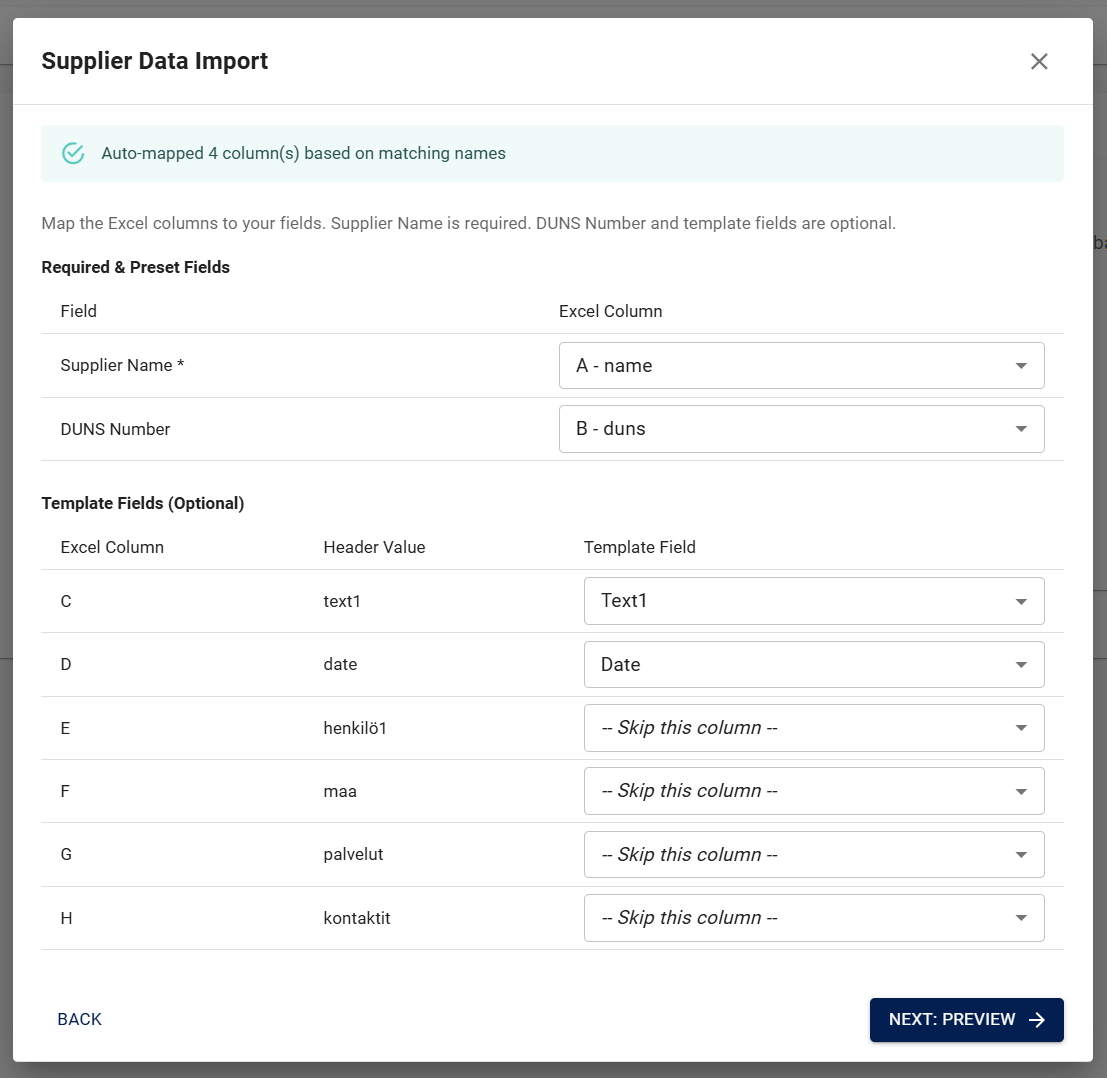
- Map Excel columns to SRM fields — matching column and field names are mapped automatically. Select Next: Preview when ready.
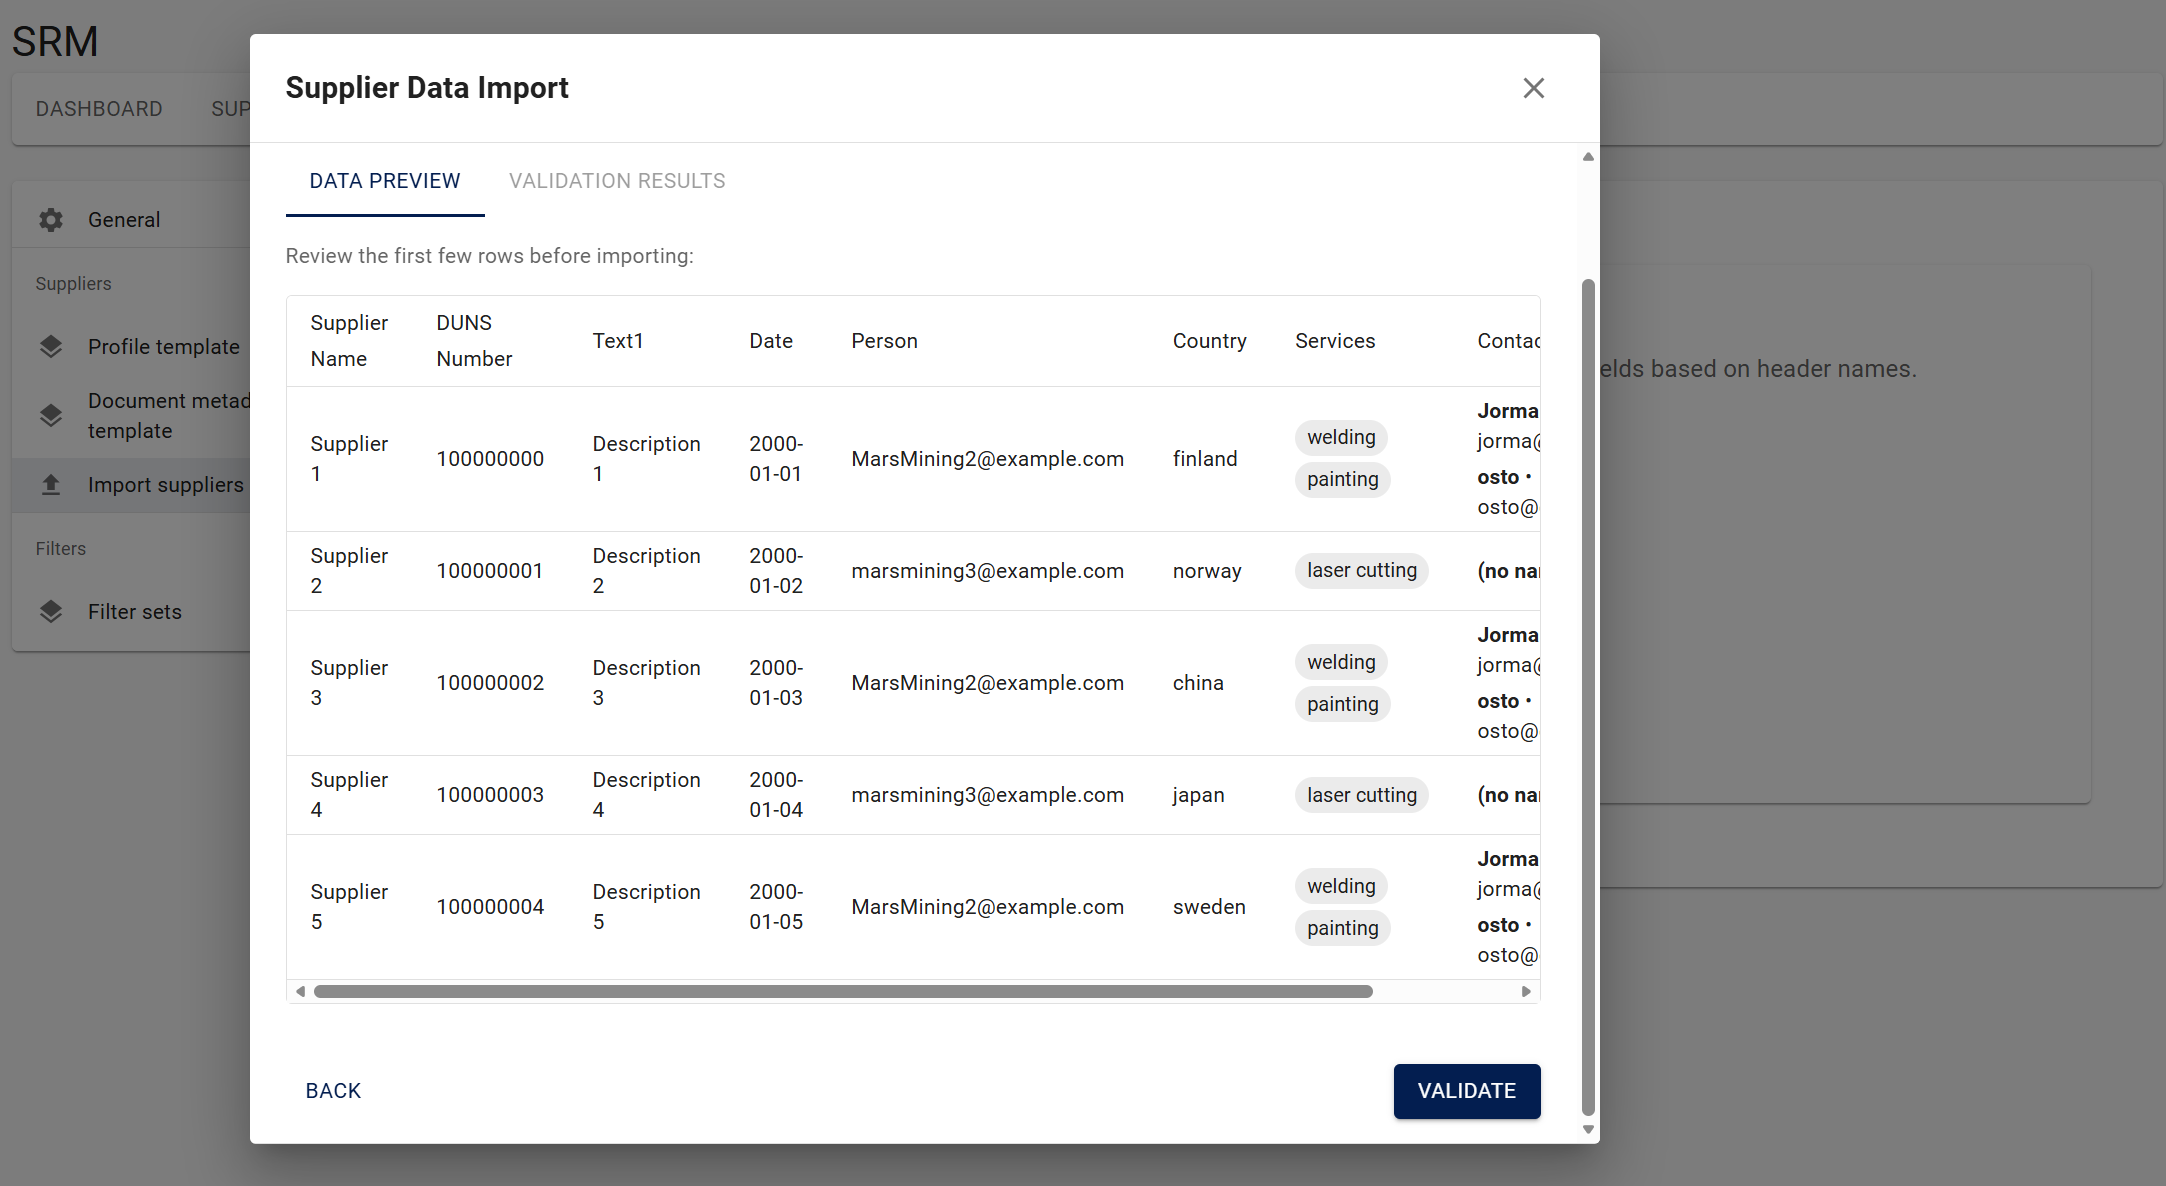
- Review the preview and select Validate to check the data.
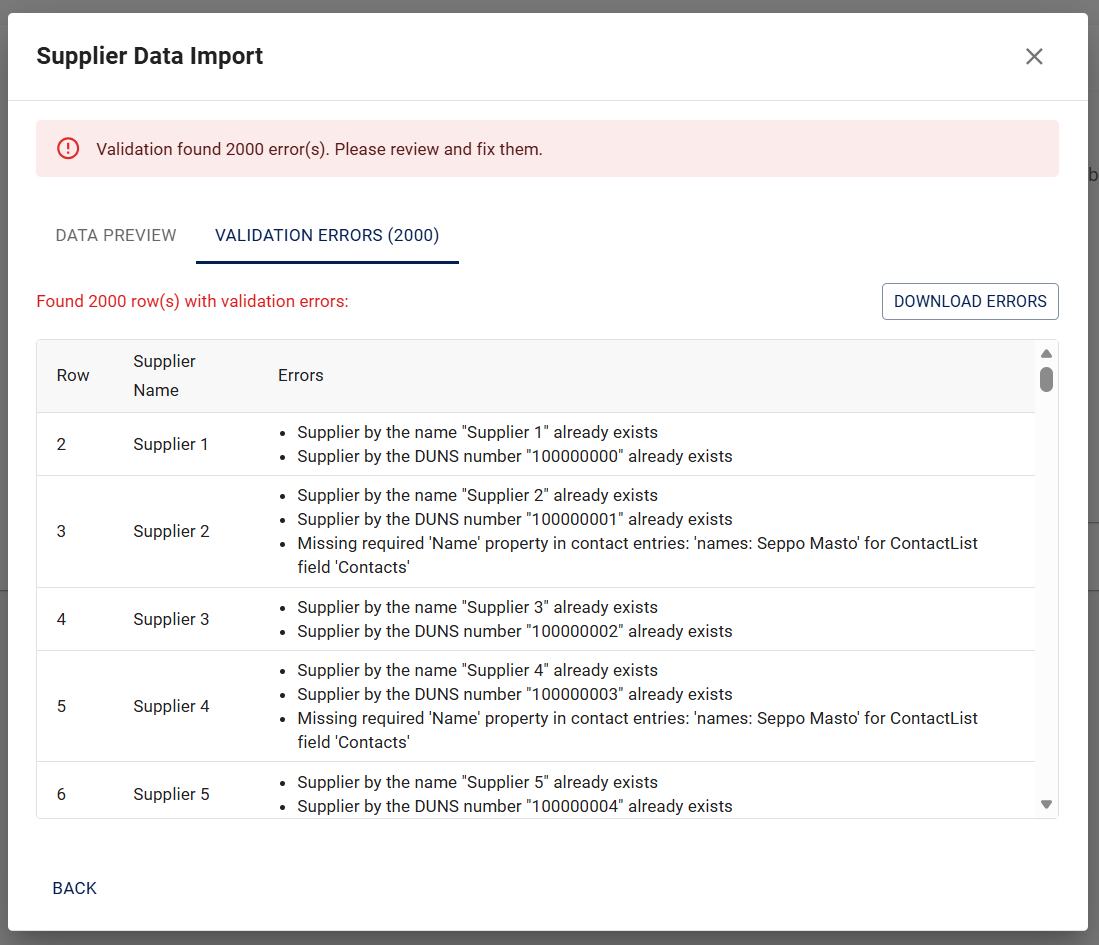
- If validation errors are found, review them on the Validation Errors tab. Use Download Errors to export the error list and fix your file before trying again.
- When validation succeeds, select Import Data to create the supplier profiles.
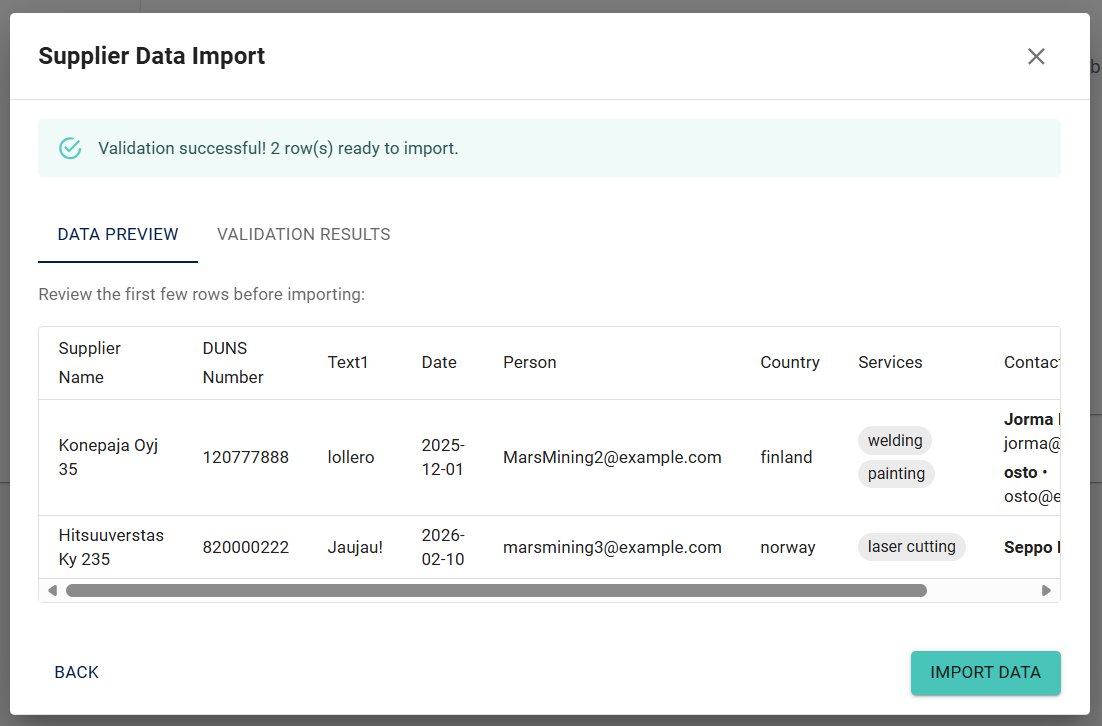
To share imported profiles with suppliers, see 3.3 Share the Supplier Data Request with Your Supplier.
3.3 Share the Supplier Data Request with Your Supplier
You can share the supplier profile in SRM with the supplier in Jakamo.
-
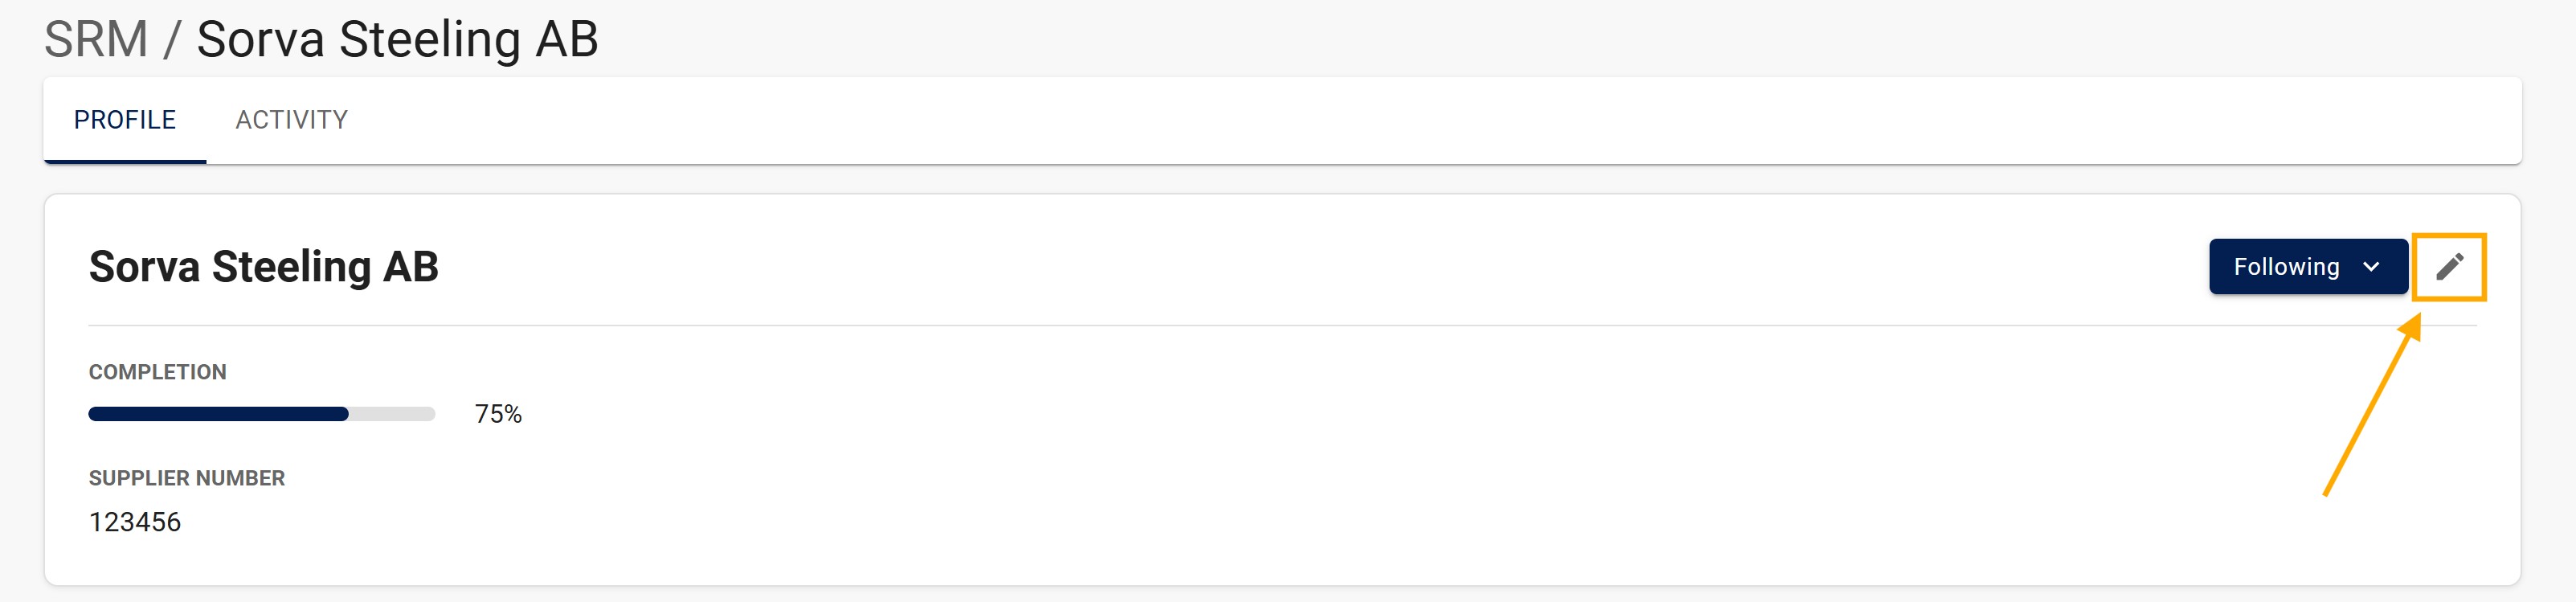
Open the supplier profile in SRM that you want to share (example shown with the supplier Sorva Steeling AB)
-
Edit the supplier’s basic information using the pen icon
-
In the
Supplier Organizationfield, select the corresponding supplier's Jakamo account from the list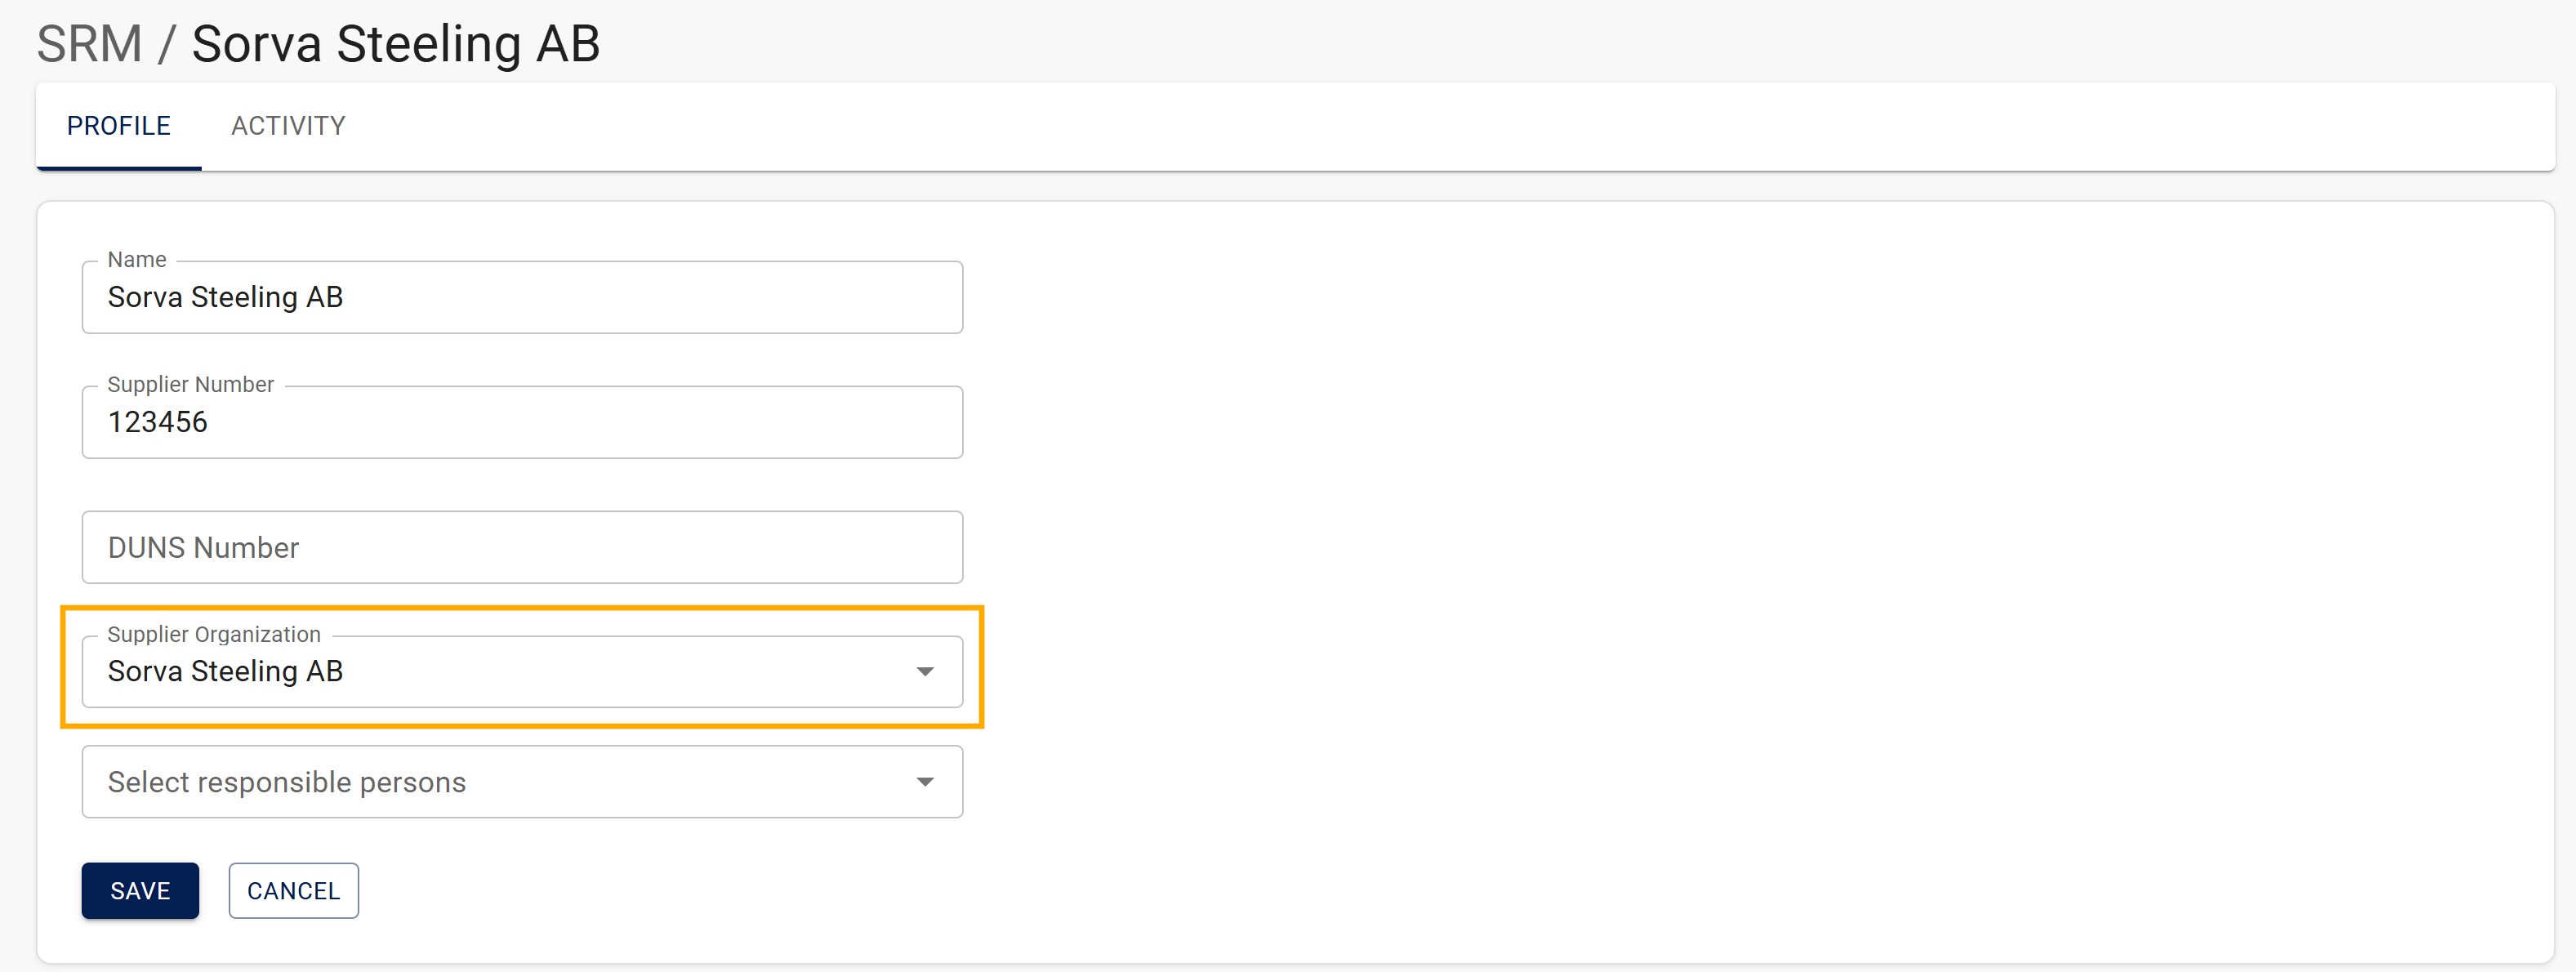
-
Savethe changes
After saving the selection:
- The supplier will gain access to the Customer Data Request section via their Network page in Jakamo.
- The supplier can then view and complete the shared data request.
3.4 Several files on a document field
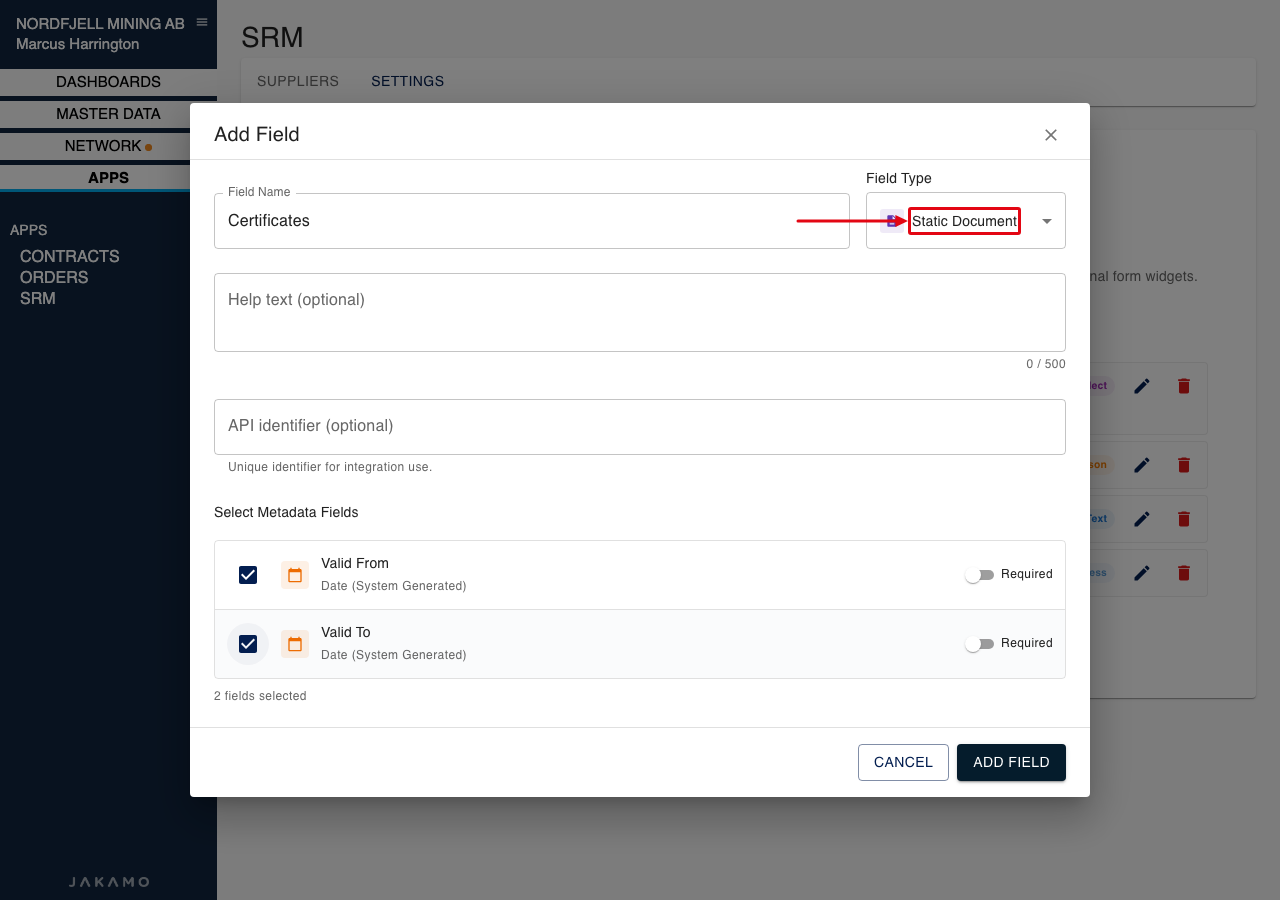
A document field can hold more than one file. When you add the field, set Field Type to one of:
- Static Document. You upload the files once on the supplier template. The same files appear on every supplier profile that can see the widget.
- Dynamic Document. The files belong to one supplier. Add them on that supplier's profile. When the widget is Shared – updated by supplier, the supplier adds them on the customer data request.
Both types hold up to 20 files. Each file can be up to 200 MB.
The metadata you tick on the field, such as Valid From and Valid To, is the same list for every file. Each file stores its own values, so two certificates on one field can expire on different dates.
File metadata template defines the metadata you can tick on a Static Document or Dynamic Document field. Supplier documents metadata applies to supplier documents, which are separate from these fields.
Set up the document field
- Open Settings → File metadata template. Valid From and Valid To are already there. Select Create Metadata to add another field, such as a certificate number.
- Open Settings → Supplier template and select the pencil icon on the widget.
- Select Add Field.
- Enter the field name and set Field Type to Static Document or Dynamic Document.
- Under Select Metadata Fields, tick the metadata that applies to every file on this field. Switch Required on when a value must be filled in before that file's metadata can be saved.
- Select Add Field.
Add files to a static document
Static document files are added on the supplier template, on the widget where the field sits.
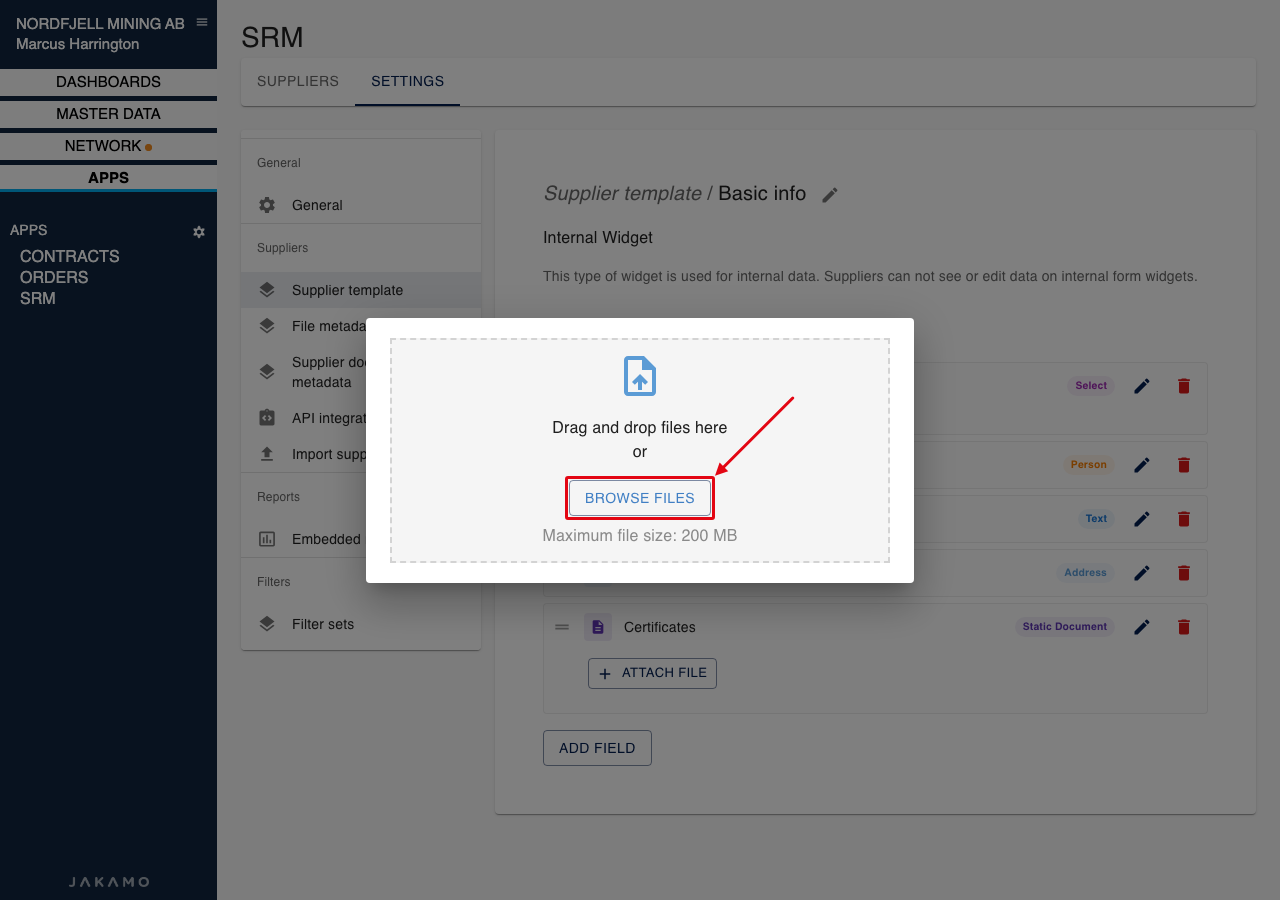
- Select Attach file.
- Drag the files onto Drag and drop files here, or select Browse Files and choose several files.
- Under a file, select Edit metadata, fill in that file's values, and select Save. Repeat for each file.
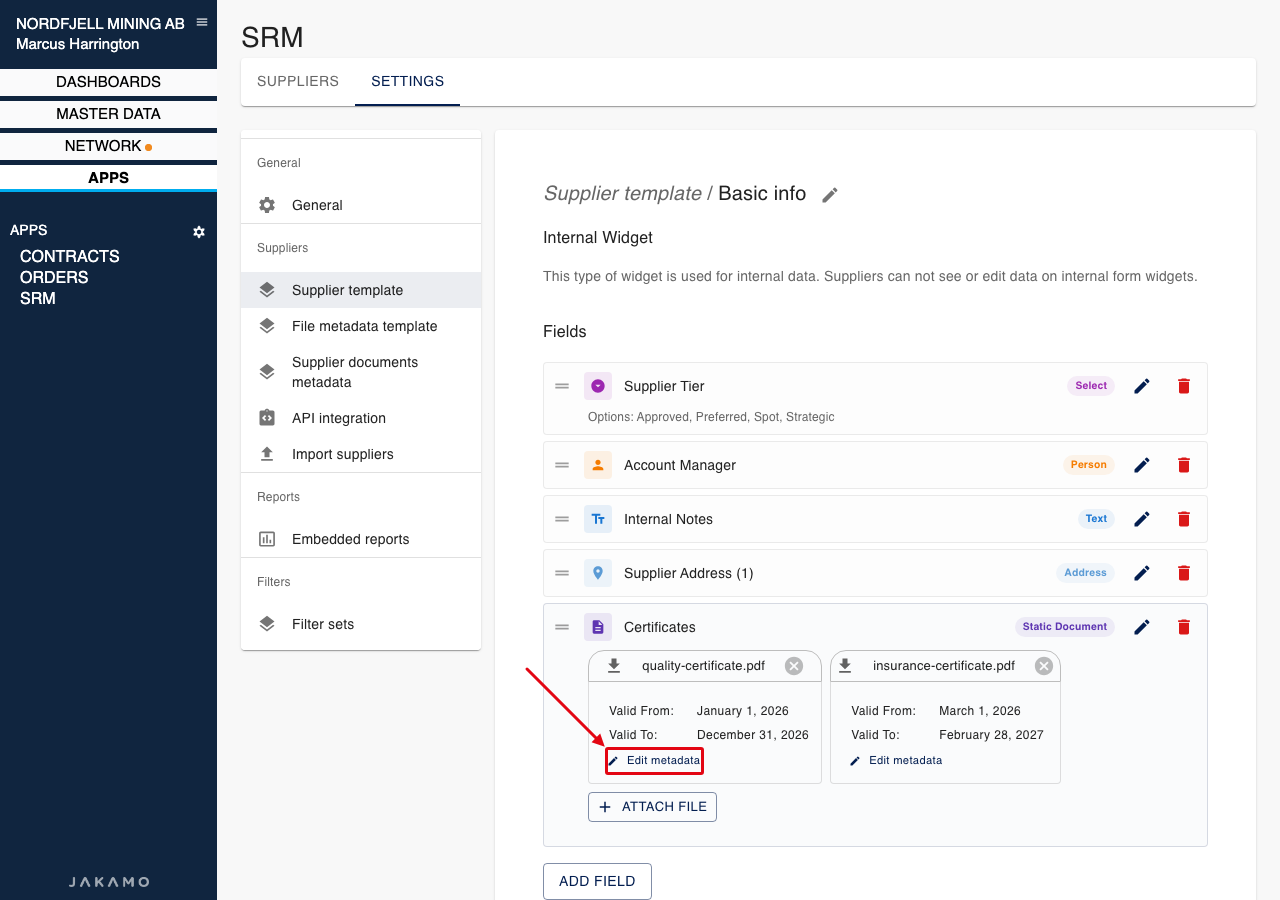
To remove one file, select the remove icon on that file, then Delete. The other files on the field stay, with their own metadata values.
Add files to a dynamic document
- Open the supplier profile and find the dynamic document field.
- Select Attach file and add one or more files, the same way as on a static document.
- Select Edit metadata under each file and save that file's values.
A supplier uses the same steps on the customer data request when the widget is Shared – updated by supplier.
Put related files, such as a supplier's certificates, on one document field. Open Edit metadata on the file whose dates or other values you want to change.
A document field holds at most 20 files. If you choose more than the field can still take, Jakamo keeps the ones that fit and skips the rest. A file larger than 200 MB is not uploaded.
4. How Suppliers Access and Complete Data Requests?
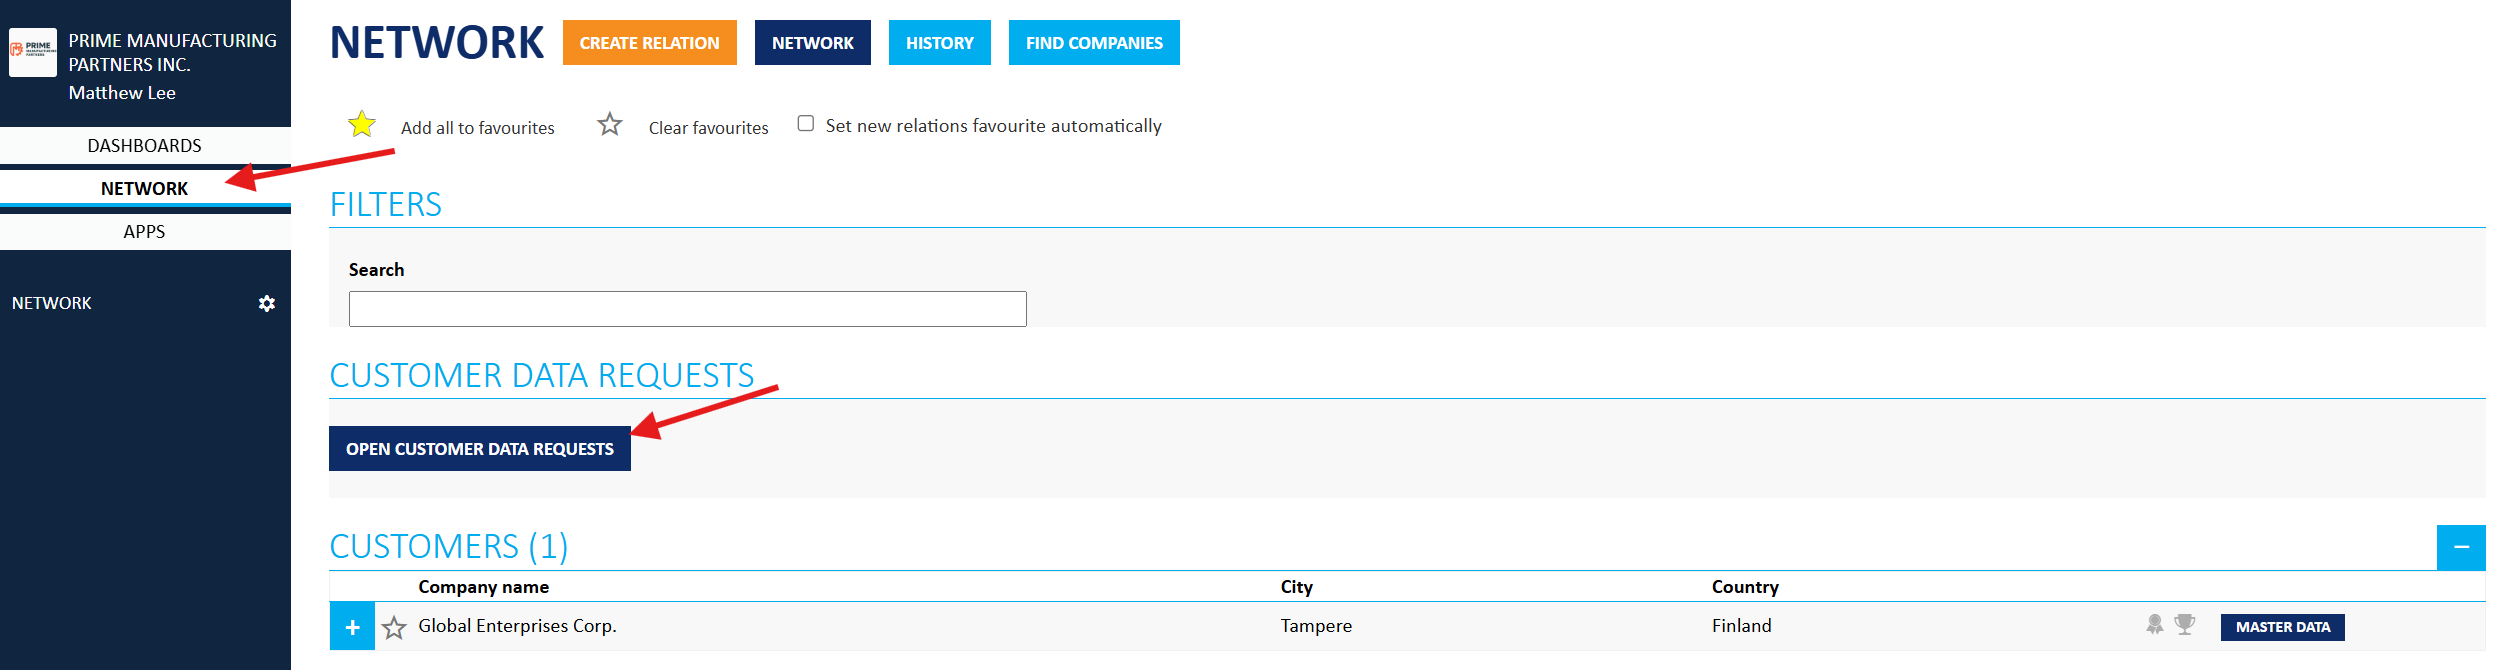
1. Open customer data request
Suppliers can access all the open customer data requests from their Jakamo Network.
Select Open customer data requests to get started.
Can’t see Customer data requests from your network?
The customer may not have shared the data request with you yet. Please ask your customer to share the data request so it becomes visible to you.
2. Select the customer from the list
Select the customer whose data request you want to update from the Your profiles list.
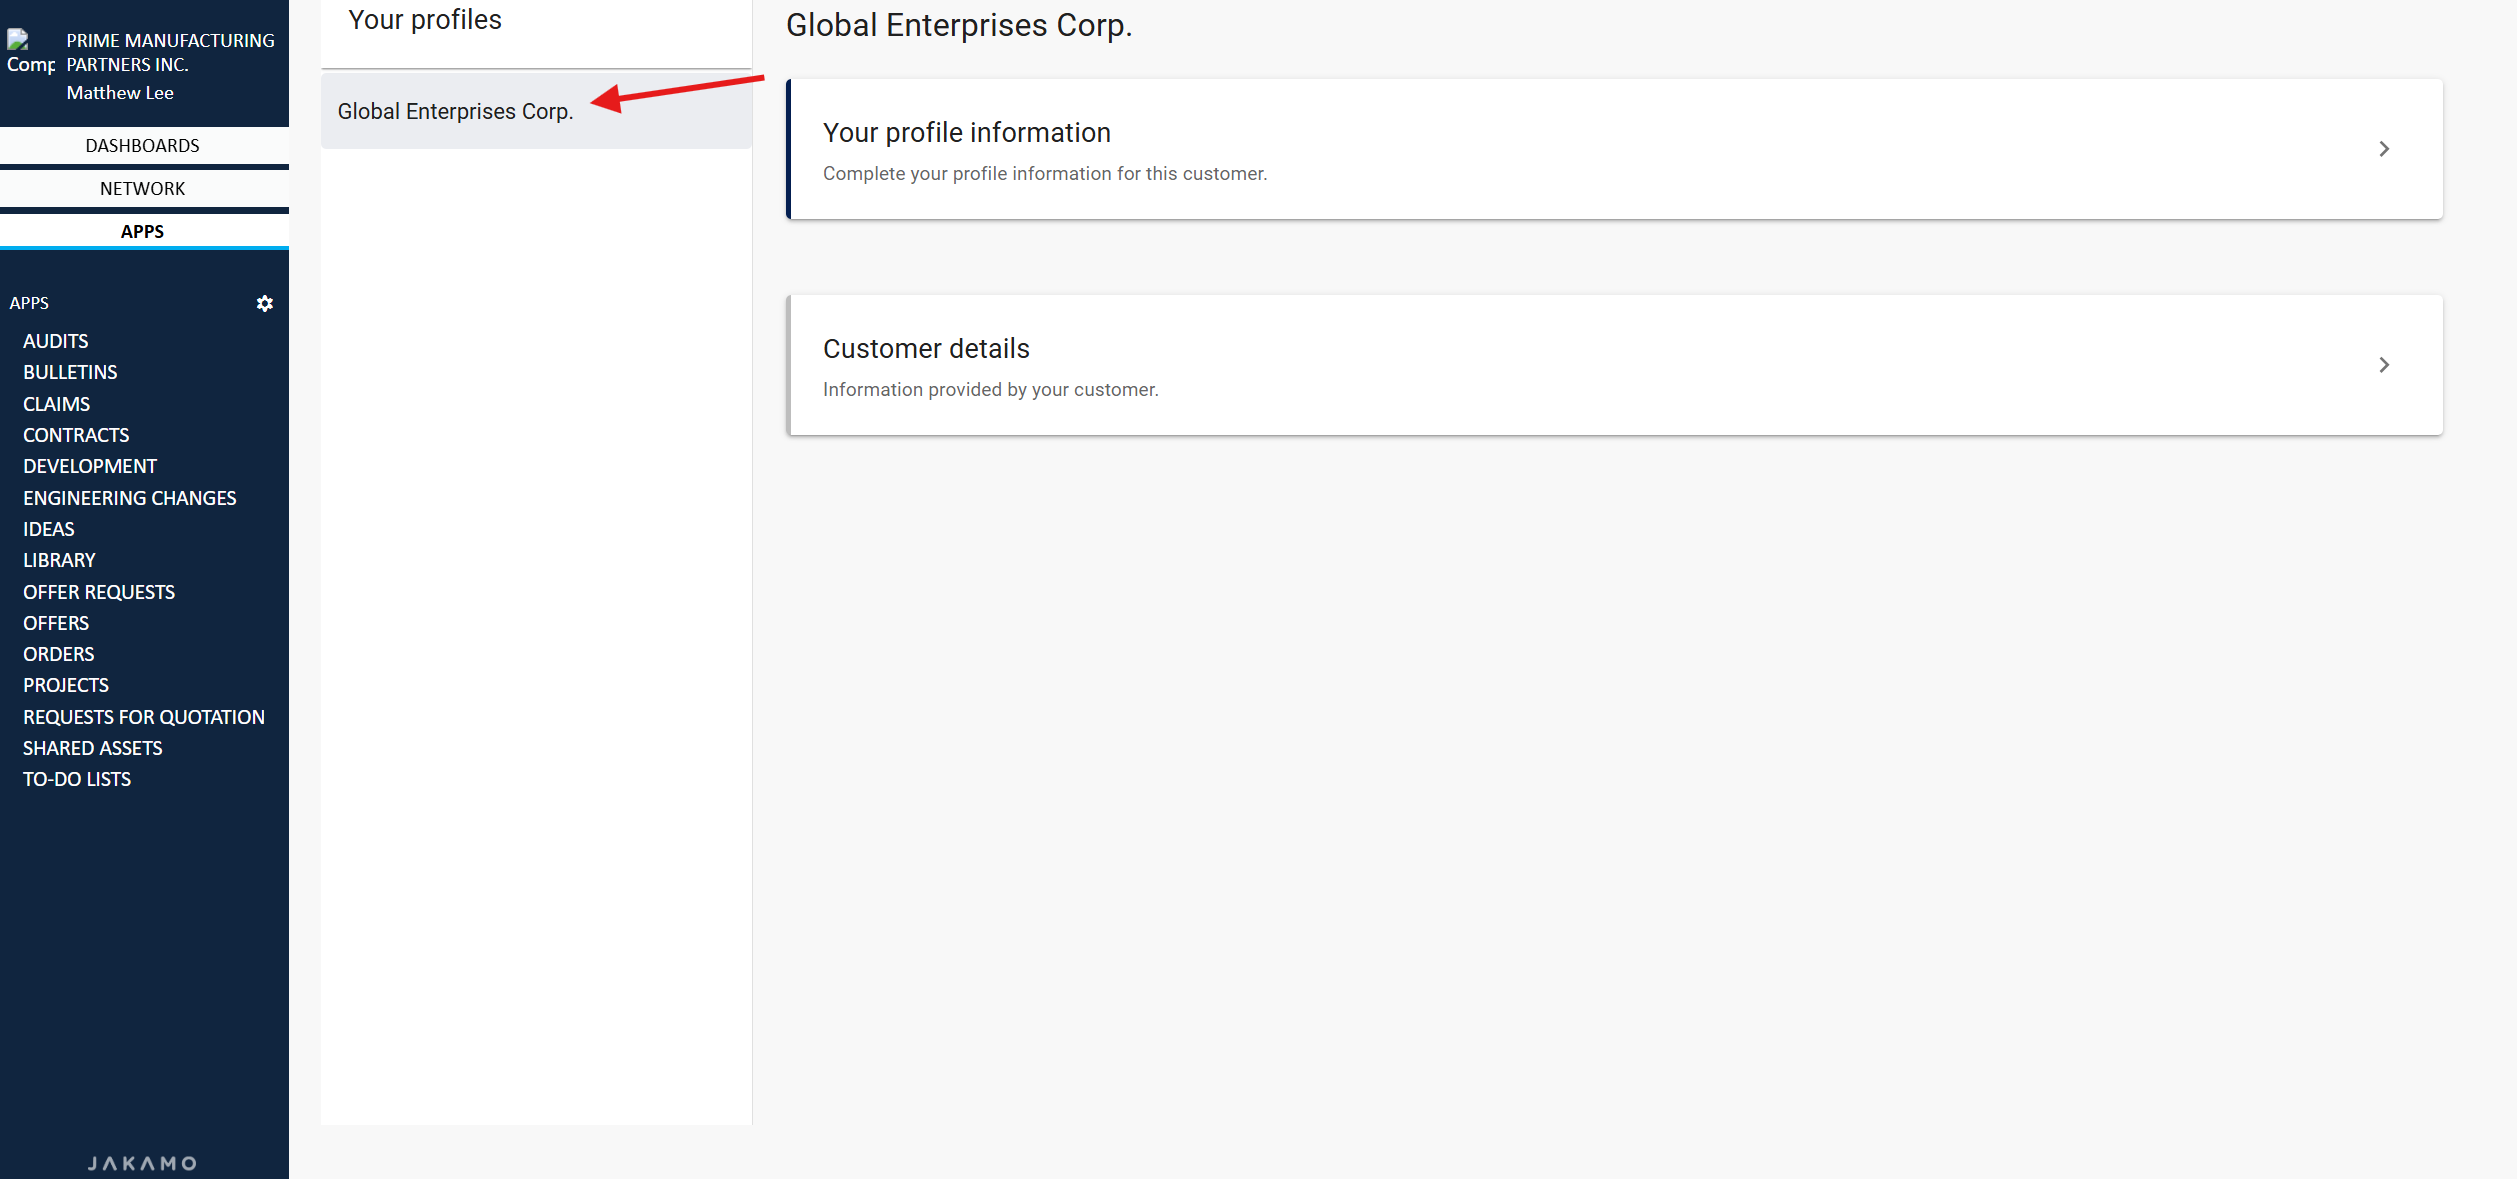 (Please note that in this example there is only one customer, but in other cases there may be multiple customers listed below each other.)
3. Provide the information
The data request consists of two sections: Your profile information and Customer details. Start filling in your company profile information by providing your answer below each field. Just write down or download the document and select Save. It’s as easy as that!
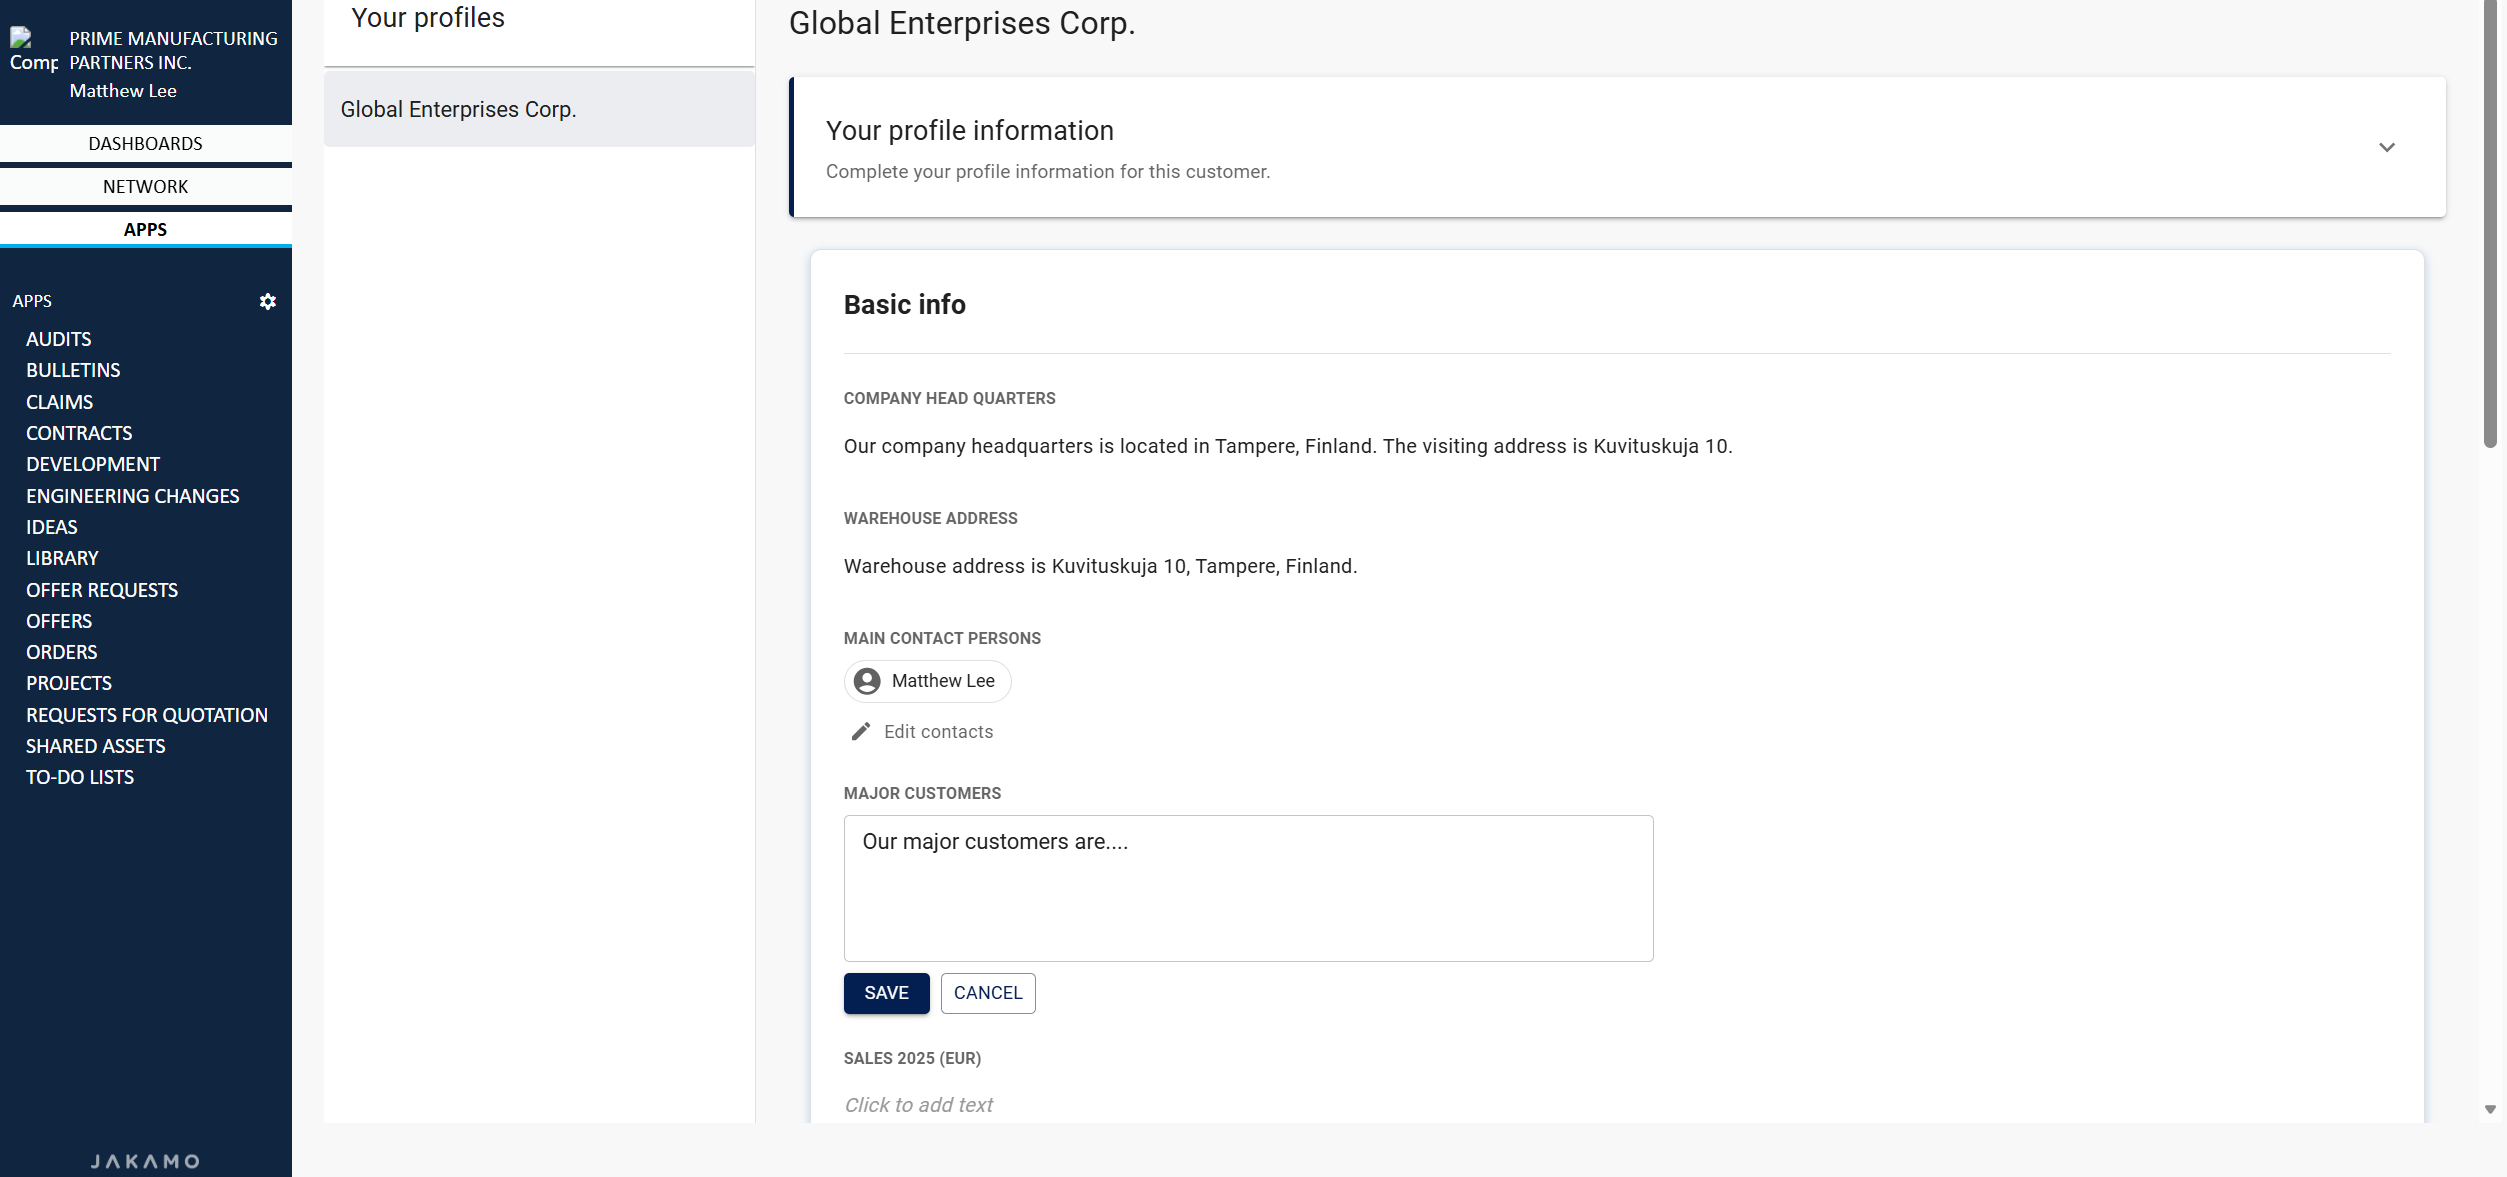 (Please note, Fields are usually divided into sections such as Basic Info, Risk Management, Production, etc.)
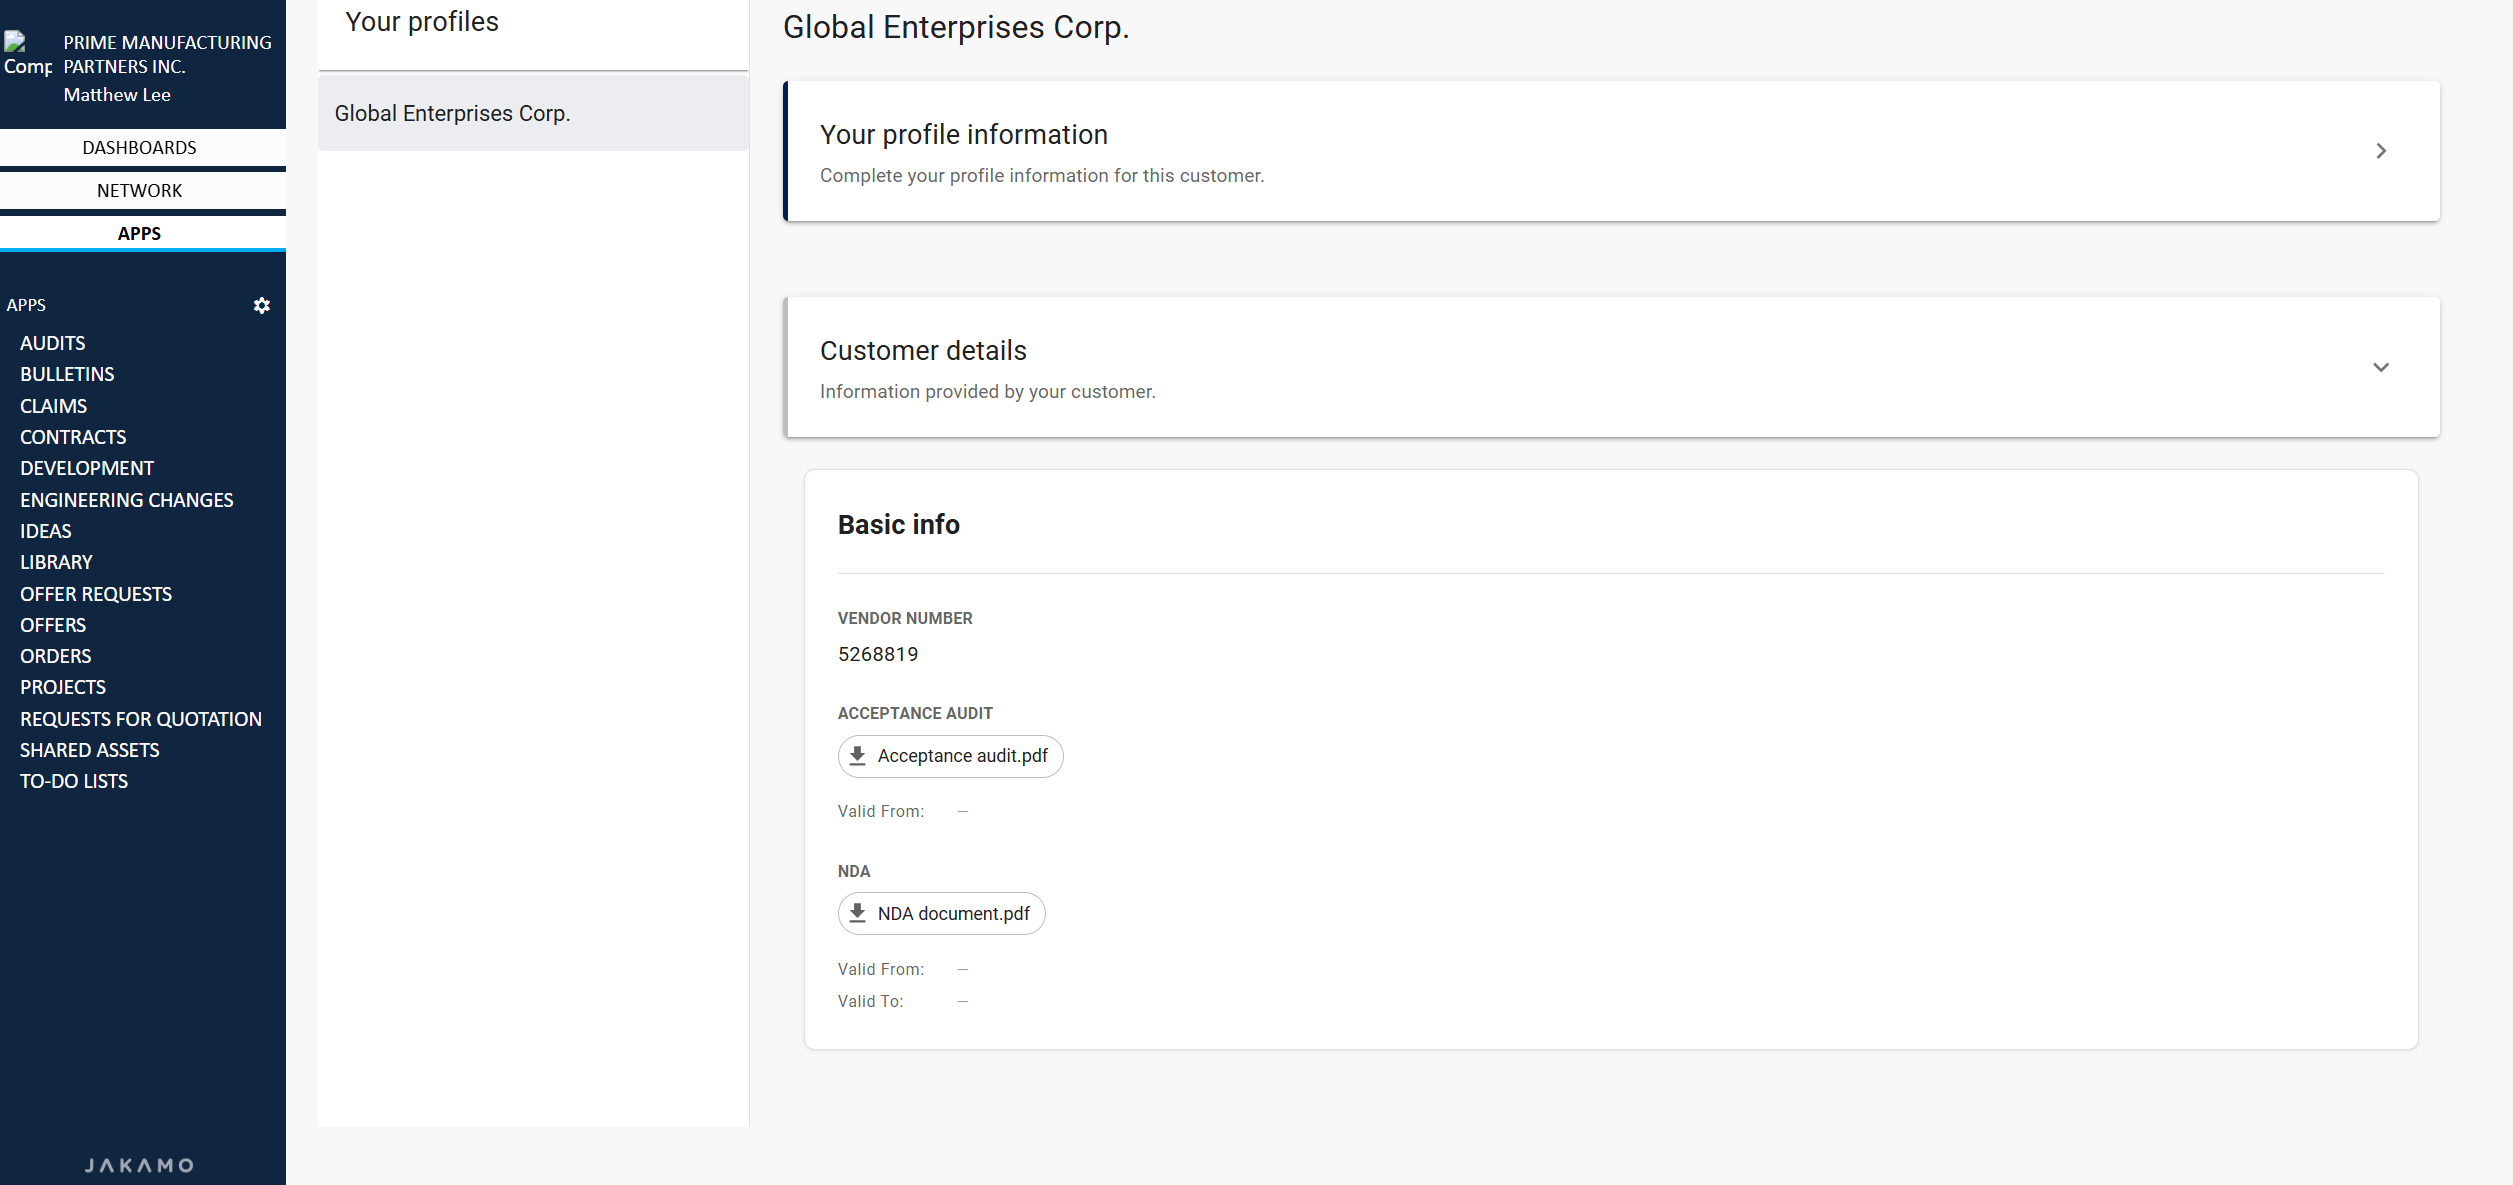
4. Review Customer Details
After providing your information, you can view the details your customer has shared with you under Customer details:
Didn't you find what you were looking for? Send an email to Jakamo support (support@thejakamo.com) and we will help you.