Mapping Tables
Mapping Tables provide a centralized way to manage partner and supplier identifiers across all your Jakamo integrations. Instead of configuring the same vendor mappings separately for each integration, you can now create a single mapping table and use it across Purchase Orders, ASN, Invoices, and other integrations.
This guide explains how to use Mapping Tables to simplify your integration setup, migrate from existing mappings, and reduce duplicate configuration work.
Table of Contents
- Why use Mapping Tables
- Prerequisites & Permissions
- Getting Started
- Creating and Managing Mapping Tables
- Adding Mapping Entries
- Migrating from Existing Integrations
- Connecting Mapping Tables to Integrations
- Troubleshooting
- FAQ
1. Why use Mapping Tables
Previously, if you used Purchase Order, ASN, and Invoice integrations, you needed to configure the same 50 supplier mappings three separate times—once in each integration's settings. Mapping Tables solve this problem.
Before Mapping Tables:
- Configure supplier "ACME-VENDOR-123" → "ABC Manufacturing Ltd" in PO integration
- Configure the same mapping again in ASN integration
- Configure it a third time in Invoice integration
- Repeat for all 50+ suppliers ❌
With Mapping Tables:
- Create one Mapping Table called "My Suppliers"
- Add "ACME-VENDOR-123" → "ABC Manufacturing Ltd" once
- Attach this table to PO, ASN, and Invoice integrations
- Done! ✅
Key Benefits
- Centralized management - Maintain partner identifiers in one place
- Reuse across integrations - One mapping table can be used by multiple integrations
- Easy migration - Import existing mappings from an integration with one click
- Better visibility - See all your partner mappings in a single view
- Fewer errors - Update once, apply everywhere
If you currently manage the same partner mappings across multiple integrations, consolidating them into Mapping Tables will save significant time and reduce errors.
2. Prerequisites & Permissions
Who can use Mapping Tables:
- You must be a company admin to create and manage mapping tables
- Your user account needs mapping tables management permissions
What you need:
- At least one active integration (Purchase Order, ASN, Invoice, etc.)
- A list of your partner companies and their identifiers from your ERP/internal system
The Jakamo UI will only show actions you're permitted to perform. If you don't see the Mapping Tables option, contact your company administrator.
3. Understanding Mapping Tables
How They Work
Mapping Tables connect your ERP codes to Jakamo companies. When your integration sends/receives messages, it uses these mappings to route data correctly.
Key benefit: One table shared by multiple integrations (PO, ASN, Invoice).
Two Tabs, Two Purposes
Partner Identifiers (main tab)
- Your ERP vendor code → Partner company in Jakamo
- Example:
VENDOR-123→ABC Manufacturing Ltd - Optional: Add partner's business unit if they have multiple locations
- This is what routes messages
Own Identifiers (rarely needed)
- Your ERP code → Your own company's business unit
- Example:
PLANT-FIN→Your Company Finland BU - Used for: PDF footers, auto-confirmation, multi-location tracking
- Skip this unless you have multiple business units
Business Units (Optional)
Many companies don't use business units at all. If you don't, just map: ERP code → Partner company. Done.
If your partner has business units:
- After selecting the company, a Business Unit dropdown appears
- Select their specific location/division
- Required if the dropdown shows options
If you have business units:
- Use Own Identifiers tab
- Maps your ERP codes to your locations
Business units must be activated in Jakamo (contact support). Most companies operate without them.
4. Creating Your First Mapping Table
- Go to Company menu → Integrations → Mapping Tables
![]()
- Click + ADD MAPPING TABLE
- Enter a name (e.g., "Main Suppliers")
- Click CREATE
Naming tips:
- Good: "Main Suppliers", "European Vendors"
- Avoid: "Table 1", "Test"
5. Adding Partner Mappings
Add an Entry (Partner Identifiers Tab)
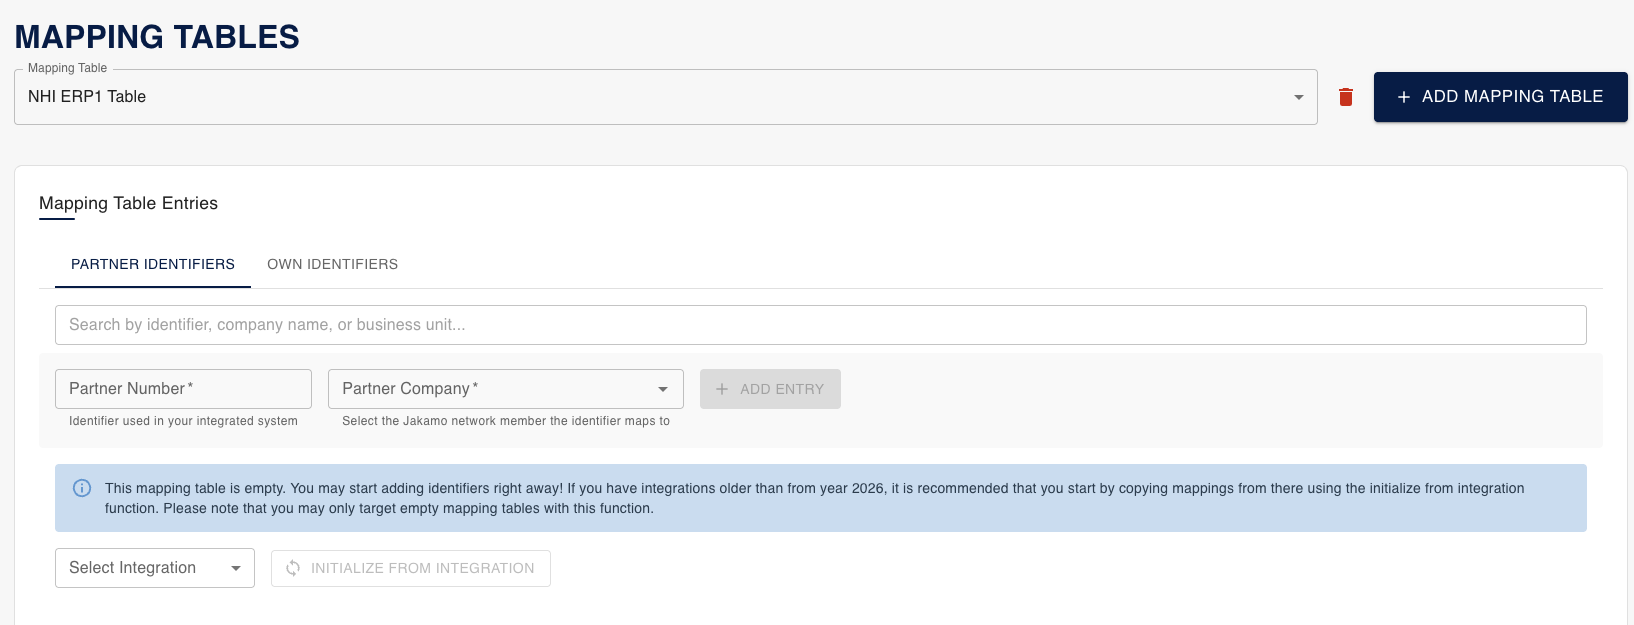
- Partner Number - Your ERP vendor/customer code
- Partner Company - Select from dropdown
- Business Unit - Select if dropdown appears (optional otherwise)
- Click + ADD ENTRY
Example:
- Partner Number:
HYDR-001 - Partner Company:
Hydraulex Components Oy - Business Unit:
Seinäjoki Plant(if they have multiple plants)
Managing Entries
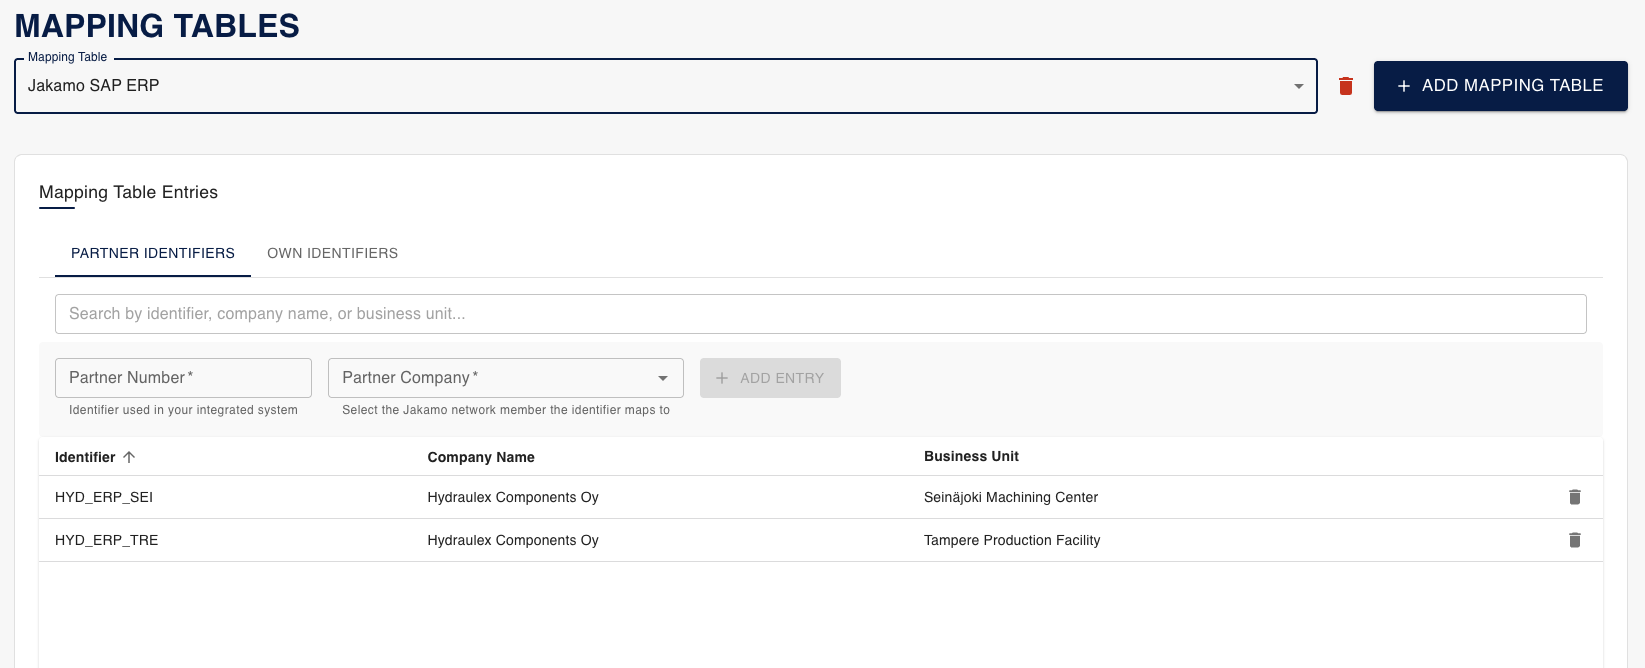
Search: Use search box to find by code, company name, or business unit
Delete: Click trash icon → entry removed immediately
Edit: Delete old entry, add new one (no direct edit)
Deletions take effect immediately. Messages with that code will fail until you add it back.
Common Errors
"Mapping entry with this identifier already exists"
- The code is already in this table
- Search for it → delete if wrong → add correct one
"Failed to create mapping entry"
- Company doesn't exist or no access
- Refresh page and retry
6. Own Identifiers (Skip if No Business Units)
Most users skip this. Only needed if your company has multiple business units.
Where to Find It
The Own Identifiers tab is on the Mapping Tables page, next to Partner Identifiers:
Navigation: Company menu → Integrations → Mapping Tables → Select your table → Own Identifiers tab
You'll see two tabs at the top:
- Partner Identifiers (default tab - covered in Section 5)
- Own Identifiers (this section)
When You Need This
If you have BUs (Finland office, Germany office, etc.):
- Go to Mapping Tables page
- Select your mapping table from the dropdown
- Click the Own Identifiers tab (next to Partner Identifiers)
- Add entries mapping your ERP codes → your BUs
- Example:
NHI_STO→Nordic Heavy Industries Stockholm
This identifies which of your locations sent the order. Doesn't affect message routing.
7. Connecting to Integrations
Creating a mapping table does nothing until you connect it to an integration.
How to Connect
From integration settings (not from Mapping Tables page):
- Go to Company menu → Integrations
- Find your integration (e.g., "Nordic Heavy PO")
- Under "Mapping table" dropdown → select your table
- Integration now uses that table
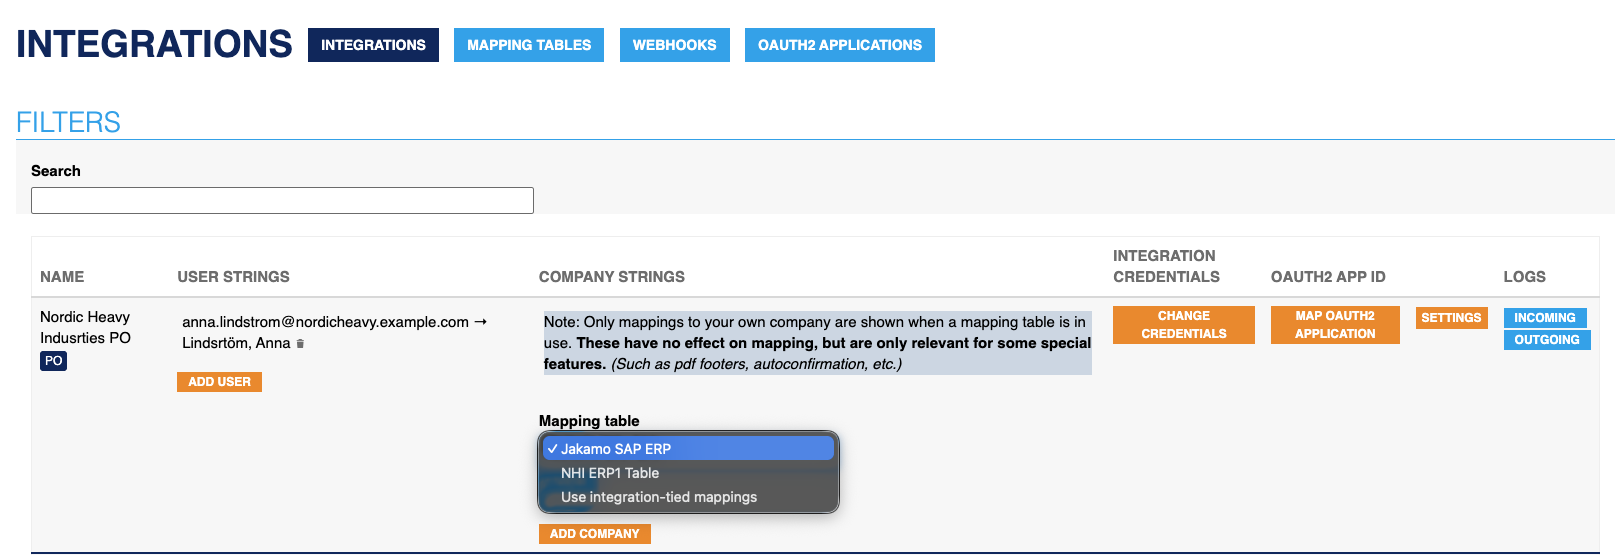
Multiple Integrations, One Table
Connect the same table to multiple integrations:
- PO integration → "Main Suppliers"
- SO integration → "Main Suppliers"
- Invoice integration → "Main Suppliers"
Add one supplier = works in all three integrations ✅
What Happens After Connection
Success: ERP sends VENDOR-123 → table maps to ABC Mfg → message routed ✅
Failure: ERP sends UNKNOWN-999 → not in table → message fails ❌
Fix: Add missing code to table → go to integration logs → click REQUEUE
Old Mappings
Old per-integration company mappings are hidden but kept permanently as backup. You cannot delete them.
8. Migrating from Existing Integrations
Skip this if starting fresh. This is for importing existing integration mappings.
Quick Process
- Create an empty mapping table
- Select it in Mapping Tables page
- Click Initialize from Integration
- Choose source integration → Confirm
- Review results (some may be skipped)
Why Items Get Skipped
Skip Reasons (click to expand)
"External identifier mapping, skipped"
- Not supported in mapping tables
- Cannot be added manually
- Contact support if critical
"Duplicate, skipped"
- Same code mapped multiple times
- First one imported, rest skipped
- Check which was imported, adjust if needed
"Business unit defined vendor mapping namespace, skipped"
- You use different vendor codes per BU for same supplier
- Not supported (requires one code per supplier)
- Standardize vendor codes across BUs
After Migration
- Verify imported entries
- Test with messages
- Connect table to integrations
Re-import: Delete all entries (or delete table) → create new empty table → initialize again
9. Managing Tables
Editing Entries
Delete old → add new (no direct edit)
Changes apply immediately to all integrations using the table.
Switching Tables
Use dropdown at top to view/edit different tables.
Deleting a Table
Click trash icon → confirm
Error: "This mapping table is referenced in one or more integrations"
- Go to each integration settings
- Select different table (or None)
- Then delete
10. Troubleshooting
Top Issues
"Mapping not found" in integration logs
- Note the identifier from error
- Add it to your mapping table
- Requeue the message
Cannot delete table
- Check which integrations use it (go through integration settings)
- Detach from each
- Delete table
Duplicate identifier
- Search for existing entry
- Delete if wrong, add correct one
11. FAQ
Can multiple integrations share one table?
Yes. Main benefit of mapping tables.
What if I update an entry?
Changes apply immediately to all integrations.
Can same identifier exist in different tables?
Yes. Only unique within one table.
What happens to old mappings?
Hidden permanently, cannot be deleted. Kept as backup.
Why can't I initialize into non-empty table?
Safety feature. Delete entries or create new empty table first.
When do I need Business Units?
Only if your partner (or you) have multiple divisions/locations in Jakamo. Most companies don't use them.
When do I need Own Identifiers tab?
Only if YOUR company has multiple business units. Otherwise skip it.
Can I rename a table?
No. Delete and create new one if needed.
Need Help?
Jakamo Support: support@thejakamo.com
Quick Reference:
- Can't see Mapping Tables? → Ask admin for permissions
- Duplicate error? → Delete existing entry first
- Can't delete table? → Detach from integrations first
- Message failing? → Add missing identifier, requeue message
Mapping Tables simplify integration management. Set them up once, use across all integrations.